💡 I included the link to the example repository at the conclusion of this tutorial.
The observer pattern is a cool design pattern. Imagine you have a big box of LEGOs, and you like building things with LEGOs. One day, you decide to build a cool spaceship. You also have some friends who enjoy watching you build.
Now, every time you add a new item to your spaceship, your friends want to know about it. Instead of notifying each friend individually every time you add a work, you create a plan: you’ll shout “New item added!” every time you do it.
Your friends are waiting and listening. When they hear you shout, they turn around and see what new part you added. This way, they stay updated without you having to notify them individually.
In computer terms, you (the builder) are called the “subject” and your friends are called the “observer”. The Observer Pattern is a way for your friends (observers) to keep track of what you are building (subjects) just by listening to your screams (notifications). This makes it easier for everyone to stay informed about changes. This pattern is particularly useful in applications where multiple components need to stay updated about state changes.
Observer Pattern in Laravel
Laravel makes it easy for us to implement the observer pattern. They offer us two features, namely Laravel Observers and Laravel Events.
Laravel Observers
So what is the difference between the two? Laravel Observers are basically model related event handlers, they only occur in Eloquent Models (creating a record, updating a record, deleting, etc).
Laravel Events
Laravel Events are general, do not have to be tied to a particular model (although they can be), apply to the entire application. You can fire events using Laravel Events when a user logs in, clicks a button, etc. This is different from Laravel Observers which can only be used in Eloquent Models.
Examples
Let’s create an example implementation for each of the two.
Laravel Observers Example
Let’s create an example implementation of Laravel Observers. Let’s say we want to create an online marketplace. We will handle the purchase of goods, every time a user buys something, the stock of that item will decrease. This is a great use case for Laravel Observer. Sounds like a lot of fun? Let’s begin!
Create the Migrations
Before continuing, you may want to set up your Laravel application with a .env configuration. Prepare the database you will use in this tutorial before continuing.
First, let’s prepare the tables needed for our demo. We will create users, products and purchases tables.
Now, make sure we have a users table first. Actually I would just use the users table migration that comes from the Laravel installation as is. But I’ll still include the migration code here.
// database\migrations\xxxxx_create_users_table.php
public function up(): void
{
    Schema::create('users', function (Blueprint $table) {
        $table->id();
        $table->string('name');
        $table->string('email')->unique();
        $table->timestamp('email_verified_at')->nullable();
        $table->string('password');
        $table->rememberToken();
        $table->timestamps();
    });

    Schema::create('password_reset_tokens', function (Blueprint $table) {
        $table->string('email')->primary();
        $table->string('token');
        $table->timestamp('created_at')->nullable();
    });

    Schema::create('sessions', function (Blueprint $table) {
        $table->string('id')->primary();
        $table->foreignId('user_id')->nullable()->index();
        $table->string('ip_address', 45)->nullable();
        $table->text('user_agent')->nullable();
        $table->longText('payload');
        $table->integer('last_activity')->index();
    });
}
Also create a migration for the products table. Here I will only create name, price, and stock. Later we will reduce this stock every time a user buys it.
php artisan make:model Product -m
// database\migrations\xxxxx_create_products_table.php
public function up(): void
{
    Schema::create('products', function (Blueprint $table) {
        $table->id();
        $table->string('name');
        $table->decimal('price', 8, 2);
        $table->integer('stock');
        $table->timestamps();
    });
}
Read also:
We will also create a purchases table where we will create an observer for the table. Every time we write to the purchases table, there should be a decrease in the product purchased.
php artisan make:model Purchase -m
// database\migrations\xxxxx_create_purchases_table.php
public function up(): void
{
    Schema::create('purchases', function (Blueprint $table) {
        $table->id();
        $table->unsignedBigInteger('user_id');
        $table->unsignedBigInteger('product_id');
        $table->integer('quantity');
        $table->decimal('total_price', 8, 2);
        $table->timestamps();
    });
}
Create the Seeders
We need to create seeders for the user and product tables so that we can have dummy data to write to the purchases table.
Create the seeder with the following command:
php artisan make:seeder UserSeeder
And write the following code to the seeder:
<?php
// database\seeders\UserSeeder.php

namespace Database\Seeders;

use App\Models\User;
use Illuminate\Database\Seeder;

class UserSeeder extends Seeder
{
    /**
     * Run the database seeds.
     */
    public function run(): void
    {
        User::create([
            'name' => 'Jepri',
            'email' => 'jepri@test.com',
            'password' => 'password',
        ]);
    }
}
Before running this seeder, make sure you have written the properties written here inside the $fillable property in the User model like so:
// app\Models\User.php
protected $fillable = [
    'name',
    'email',
    'password',
];
Now let’s create the seeder for the products table.
Create it with the following command:
php artisan make:seeder UserSeeder
And write the following code to the seeder:
<?php
// database\seeders\ProductSeeder.php

namespace Database\Seeders;

use App\Models\Product;
use Illuminate\Database\Seeder;

class ProductSeeder extends Seeder
{
    /**
     * Run the database seeds.
     */
    public function run(): void
    {
        Product::create([
            'name' => 'The Amazing Book',
            'price' => 25,
            'stock' => 100,
        ]);
    }
}
You also need to write the properties written here inside the $fillable property in the Product model like so:
// app\Models\Product.php
protected $fillable = [
    'name',
    'email',
    'password',
];
Finally, call the seeder inside DatabaseSeeder so we can run just one command to execute the seeder.
// database\seeders\DatabaseSeeder.php
public function run(): void
{
    $this->call([
        UserSeeder::class,
        ProductSeeder::class,
    ]);
}
Read also:
Once the migration and seeder are ready, run the following command to run the migration and seeder at once:
php artisan migrate --seed
Create the Purchase Function
To illustrate purchasing an item, create a PurchaseController and store function within it.
php artisan make:controller PurchaseController
Write the store function inside the controller.
// app\Http\Controllers\PurchaseController.php

use App\Models\Product;
use App\Models\Purchase;

public function store(Request $request)
{
    // Suppose we have a user with id 1 who wants to buy
    // 2 product quantities with id 1
    $userId = 1;
    $quantity = 2;
    $productId = 1;
    $product = Product::find($productId);

    // write the transaction to the purchases table
    $purchase = Purchase::create([
        'user_id' => $userId,
        'product_id' => $productId,
        'quantity' => $quantity,
        'total_price' => $product->price * $quantity,
    ]);

    return response()->json([
        'purchase' => $purchase->load('product'),
    ], 201);
}
Create the Observer
Now here’s the interesting part. We will create an observer who listen to each purchase record creation. So run the following command to create an observer in Laravel:
php artisan make:observer PurchaseObserver
You will notice that there is a new folder inside the app folder namely Observers. Write the following code to the PurchaseObserver:
<?php
// app\Observers\PurchaseObserver.php

namespace App\Observers;

use App\Models\Purchase;

class PurchaseObserver
{
    /**
     * Handle the Purchase "created" event.
     */
    public function created(Purchase $purchase): void
    {
        // Notify the user about the purchase here

        // Notify the seller about the purchase here

        // You may also want to use Laravel Database Transactions to handle these
        // https://fajarwz.com/blog/laravel-database-transaction-for-data-consistency/

        // Update the product stock
        $product = $purchase->product;
        $product->stock -= $purchase->quantity;
        $product->save();
    }

    /**
     * Handle the Purchase "updated" event.
     */
    public function updated(Purchase $purchase): void
    {
        //
    }

    /**
     * Handle the Purchase "deleted" event.
     */
    public function deleted(Purchase $purchase): void
    {
        //
    }

    /**
     * Handle the Purchase "restored" event.
     */
    public function restored(Purchase $purchase): void
    {
        //
    }

    /**
     * Handle the Purchase "force deleted" event.
     */
    public function forceDeleted(Purchase $purchase): void
    {
        //
    }
}
Very easy! Now register the observer by placing it using the ObservedBy attribute on the appropriate model:
// app\Models\Purchase.php

use App\Observers\PurchaseObserver;
use Illuminate\Database\Eloquent\Attributes\ObservedBy;

#[ObservedBy([PurchaseObserver::class])]
class Purchase extends Model
{
    // ...
}
Create the Route
Don’t forget to create the purchase route. Here I will just use the GET method for the route so that I can just call it in the browser.
// routes\web.php

use App\Http\Controllers\PurchaseController;

Route::get('purchases', [PurchaseController::class, 'store']);
Test the Action
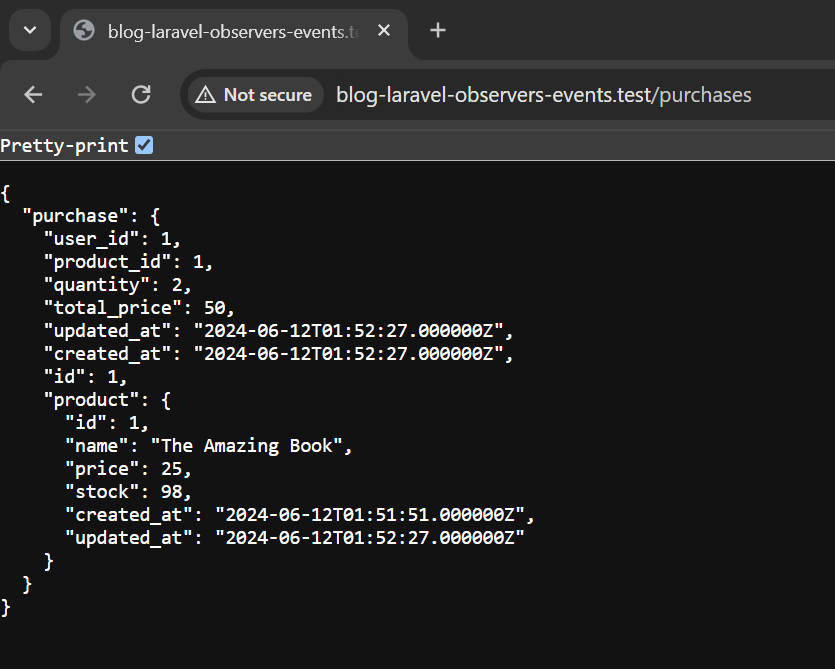
Finally, everything is ready! We can run the Laravel application and try visiting /purchases. The first time we visited the route, the product stock should have decreased to 98, because we tried to buy 2 quantities of the product.
Laravel Events Example
Now we will try how to use Laravel Events and Listeners. Let’s say we create some kind of blog site that contains content and creators. We want to encourage authors/creators to create engaging content, and to do this, we will notify content creators whenever visitors to their content/page reach a certain threshold. This should be a lot of fun! Keep following me and I’ll walk you through this example.
Create the Show Page Function
I’m still using the same project. Now I will create a new controlller to handle the page visits called PageController.
php artisan make:controller PageController
Inside this controller, let’s create a function called show to serve the content/page and check whether the page has reached the visitor threshold.
<?php
// app\Http\Controllers\PageController.php

namespace App\Http\Controllers;

use App\Events\VisitorsThresholdReached;
use App\Models\User;
use Illuminate\Http\Request;

class PageController extends Controller
{
    public function show(Request $request)
    {
        // Suppose a page reaches 1000 visitors
        // this data can be collected from the page table.
        // You may also want to run this check elsewhere,
        // probably in some kind of middleware
        $visitorCount = 1000;
        $creator = User::first();

        if ($visitorCount >= 1000) {
            VisitorsThresholdReached::dispatch($visitorCount, $creator);
        }

        return 'my page';
    }
}
Read also:
Create the “Visitor Threshold Reached” Event
Next we will create the event. Let’s create it with the following command:
php artisan make:event VisitorThresholdReached
Notice that Laravel creates a new folder called Events inside the app folder. This is where Laravel will read events by default. You can check whether your event is registered or not using the following command:
php artisan event:list
Write the following code inside the event so that it can serve the variables collected from the controller to the listeners.
<?php
// app\Events\VisitorsThresholdReached.php

namespace App\Events;

use App\Models\User;
use Illuminate\Broadcasting\Channel;
use Illuminate\Broadcasting\InteractsWithSockets;
use Illuminate\Broadcasting\PresenceChannel;
use Illuminate\Broadcasting\PrivateChannel;
use Illuminate\Contracts\Broadcasting\ShouldBroadcast;
use Illuminate\Foundation\Events\Dispatchable;
use Illuminate\Queue\SerializesModels;

class VisitorsThresholdReached
{
    use Dispatchable, InteractsWithSockets, SerializesModels;

    public $visitorCount;
    public User $creator;

    /**
     * Create a new event instance.
     */
    public function __construct($visitorCount, User $creator)
    {
        $this->visitorCount = $visitorCount;
        $this->creator = $creator;
    }

    /**
     * Get the channels the event should broadcast on.
     *
     * @return array<int, \Illuminate\Broadcasting\Channel>
     */
    public function broadcastOn(): array
    {
        return [
            //
        ];
    }
}
Create the Listeners
We will notify the creator via Email and SMS, each of which is processed by a different listener. So we will create two listeners that listen from the same event.
We will create the listener for the email first.
php artisan make:listener VisitorThresholdEmailListener --event VisitorsThresholdReached
It will create a listener that automatically imports the proper event class and type-hint the event in the handle method. You can omit the --event though.
Write the following code inside the listener:
<?php
// app\Listeners\VisitorThresholdEmailListener.php

namespace App\Listeners;

use App\Events\VisitorsThresholdReached;
use Illuminate\Contracts\Queue\ShouldQueue;
use Illuminate\Queue\InteractsWithQueue;

class VisitorThresholdEmailListener
{
    /**
     * Create the event listener.
     */
    public function __construct()
    {
        //
    }

    /**
     * Handle the event.
     */
    public function handle(VisitorsThresholdReached $event): void
    {
        $visitorCount = $event->visitorCount;
        $creator = $event->creator;

        $message = "Hi $creator->name, your content has reached $visitorCount visitors! Keep up the good work.";

        // send the email notification
        // https://fajarwz.com/blog/easily-send-emails-in-laravel-with-brevo/
        \Mail::raw($message, function($msg) use ($creator) {
            $msg->to($creator->email)->subject('Trending page!');
        });
    }
}
There is no need to register the listener to the event, it will be automatically triggered by the event type-hinted in the handle method.
I’m using Laravel 11 so this implementation will work if I use the default mailer, which is log. Here are my .env values regarding email configuration:
MAIL_MAILER=log
MAIL_HOST=127.0.0.1
MAIL_PORT=2525
MAIL_USERNAME=null
MAIL_PASSWORD=null
MAIL_ENCRYPTION=null
MAIL_FROM_ADDRESS="hello@example.com"
MAIL_FROM_NAME="${APP_NAME}"
You can also try it using Mailtrap. All you need to do to integrate it is just update some .env values, for example something like:
MAIL_MAILER=smtp
MAIL_HOST=sandbox.smtp.mailtrap.io
MAIL_PORT=2525
MAIL_USERNAME=yourusername
MAIL_PASSWORD=yourpassword
That’s all for the listener for the email notification.
Now let’s create the listener for the SMS notification. You can just copy-paste from the listener for the email notification or you can run the following command:
php artisan make:listener VisitorThresholdSmsListener --event VisitorsThresholdReached
Write the following code to illustrate an SMS notification:
<?php
// app\Listeners\VisitorThresholdSmsListener.php

namespace App\Listeners;

use App\Events\VisitorsThresholdReached;
use Illuminate\Contracts\Queue\ShouldQueue;
use Illuminate\Queue\InteractsWithQueue;

class VisitorThresholdSmsListener
{
    /**
     * Create the event listener.
     */
    public function __construct()
    {
        //
    }

    /**
     * Handle the event.
     */
    public function handle(VisitorsThresholdReached $event): void
    {
        $visitorCount = $event->visitorCount;
        $creator = $event->creator;

        $message = "Hi $creator->name, your content has reached $visitorCount visitors! Keep up the good work.";

        // send the sms notification
        // https://fajarwz.com/blog/sending-sms-in-laravel-using-twilio-a-step-by-step-tutorial/
        info($message);
    }
}
That’s all for our listeners.
Add the Show Page Route
Don’t forget to add the route for the show page action:
// routes\web.php
use App\Http\Controllers\PageController;

Route::get('trending-page', [PageController::class, 'show']);
Read also:
Try the Events Demo
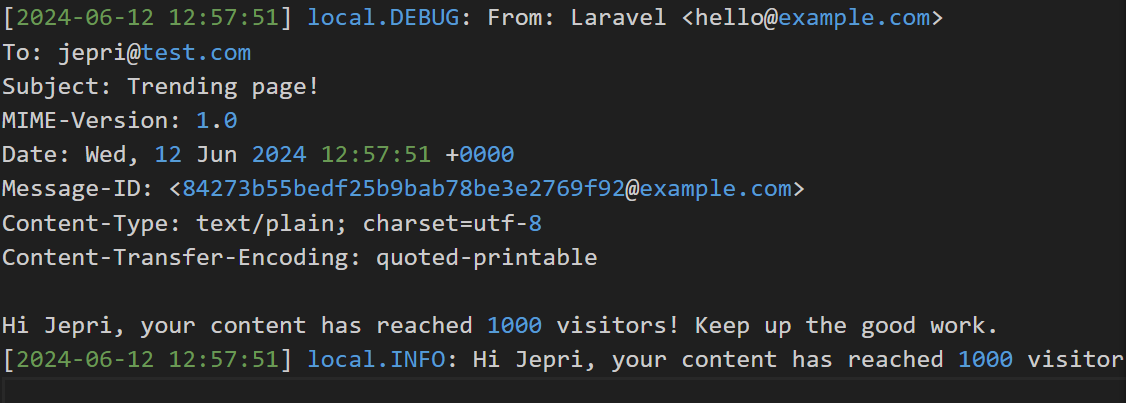
When you visit /trending-page you will only see a page with the text “my page”, but in your laravel log located at storage\logs\laravel.log, you will see a log illustrating email and SMS notifications.
Queued Event Listeners
Sometimes listeners perform slow tasks such as sending emails or making HTTP requests. This is where the queued listeners can be beneficial. You can queue listeners with just simple code. To specify that the listener should be queued, implement ShouldQueue in the listener class.
use Illuminate\Contracts\Queue\ShouldQueue;

// add this "implements"
class VisitorThresholdEmailListener implements ShouldQueue
{
    //
}
I will use the default queue implementation in Laravel 11 which is database. You should also make sure to set up the queue driver in the .env.
QUEUE_CONNECTION=database
After that, let’s run the queue worker with the following command:
php artisan queue:work
Now let’s try visiting /trending-page again. When you previously tried using Mailtrap you will notice that now the page loads faster than before, that is because now the email sending uses a queue rather than being sent immediately before loading the page.

Conclusion
We have explored the fun and powerful implementation of the Observer Pattern in Laravel using Observers and Events. We’ve also learned how to integrate this pattern with email notifications and queuing. This knowledge equips you to create more robust and real-world features that benefit from this implementation. By using Observers and Events, you can decouple your application components, making your code more modular, maintainable, and scalable. Enjoy building your applications with this new, fun approach!
💻 The repository for this example can be found at fajarwz/blog-laravel-observers-events.

