
💡 I included the link to the example repository at the conclusion of this tutorial.
Efficient and accurate search functionality is crucial for any web application or platform. Users expect to find relevant results quickly and effortlessly, making search implementation a critical component of user experience. Fortunately, Laravel Scout, a powerful full-text search package, combined with MeiliSearch, a lightning-fast and feature-rich search engine, offers an exceptional solution for implementing advanced search capabilities in your Laravel application.
Laravel Scout acts as a bridge between your application and various search engines, allowing you to seamlessly integrate a search feature without compromising on performance. MeiliSearch is an open-source search engine known for its speed and relevance, delivering exceptional search experiences. When used together, Laravel Scout and MeiliSearch create a powerful and customizable search system that is both robust and efficient.
Laravel Scout and MeiliSearch provide a powerful combination that can enhance the search functionality of any application, including e-commerce platforms, content management systems, and more.
This article will explore the seamless integration of Laravel Scout and MeiliSearch, demonstrating how these two technologies work together to deliver lightning-fast search results. We will delve into the steps required to set up and configure both Laravel Scout and MeiliSearch within your Laravel application. Additionally, we will explore the advanced search features offered by MeiliSearch, such as typo tolerance, pagination, sorting, and filtering, which further enhance the search experience for your users.
What is Meilisearch
Meilisearch is an open-source and highly scalable search engine. It is built on top of Rust, a modern programming language that is known for its speed and safety. Meilisearch is designed to be easy to use and to scale to large datasets.
Meilisearch works by first indexing your data. This means that Meilisearch creates a representation of your data that is optimized for searching. Once your data is indexed, Meilisearch can then be used to search your data quickly and efficiently.
When your app needs to search for data, it will first contact the Meilisearch server. The Meilisearch server will then use the index to search your data and return the results to your app.
Here is a diagram of how Meilisearch works:
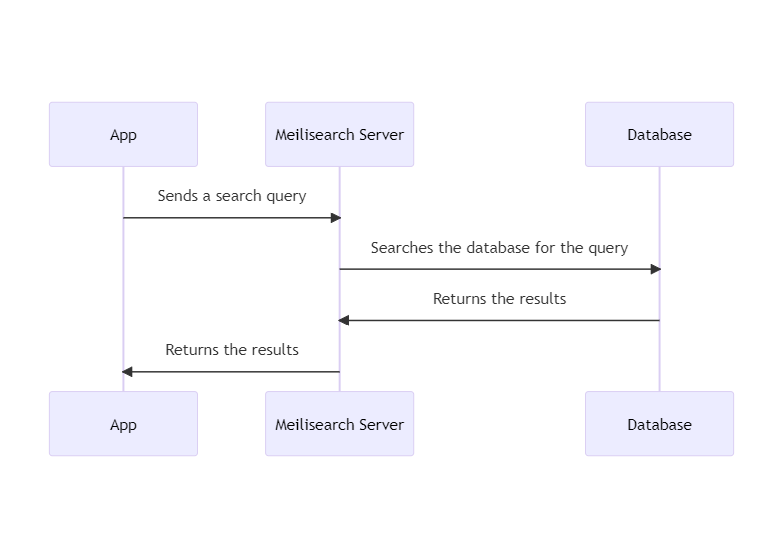
The app sends a search query to the Meilisearch server. The Meilisearch server then uses the index to search the database and returns the results to the app.
It’s important to note that MeiliSearch should not be considered as your primary data store. MeiliSearch is specifically designed as a search engine, not a database. Its purpose is to store and manage the data that you want your users to search through efficiently.
When using MeiliSearch, it’s recommended to include only the relevant data that you want to be searchable. If you have additional data that is not directly related to search functionality, it’s advisable to mark those fields as non-searchable. This helps improve the relevancy of search results and enhances the response time of MeiliSearch queries.
Meilisearch is a powerful search engine that can be used to power a variety of applications. It is easy to use and to scale, making it a great choice for both small and large projects.
Read also:
Features
Search as You Type: Also referred to as “quick search,” MeiliSearch provides real-time search results as you type in your query. The displayed results dynamically update as you enter more text into the search box.
Filters: MeiliSearch allows you to create filters that enable users to narrow down their search results based on user-defined criteria. This helps refine the search experience and provide more specific results.
Sorting: MeiliSearch allows users to customize the sorting of search results at query time. Users can choose the types of results they want to see first, enhancing their search experience.
Typo Tolerant: MeiliSearch handles typos gracefully, ensuring that even with spelling mistakes, the intended results are still discovered. This prevents typos from hindering the search experience.
Prefix Search: In Meilisearch, you can perform a search using just a single letter as your query. This is possible due to the prefix search approach the Meilisearch follow. Prefix search involves sorting the documents by comparing the search query with the beginning of each word in your dataset. This means that even with a single letter query, Meilisearch will return relevant results by matching the prefix of words in your dataset. You can check in the documentation for more detail.
And many more, check out the official website for more detail.
Now, let’s explore MeiliSearch within a Laravel application.
Step 1: Install Laravel
As always, we will start with a fresh Laravel application. Create a new application for this demo:
Using the Laravel Installer
laravel new blog-laravel-scout-meilisearch
Using Composer create-project
composer create-project laravel/laravel blog-laravel-scout-meilisearch
Using Laravel build and Sail
curl -s "https://laravel.build/blog-laravel-scout-meilisearch" | bash
This command will create a new Laravel project in a directory named blog-laravel-scout-meilisearch.
Step 2: Install Laravel Scout
Open your terminal and navigate to your project directory (blog-laravel-scout-meilisearch). Run the following command to install Laravel Scout:
composer require laravel/scout
Step 3: Publish Laravel Scout Config
The next step is to publish the configuration for Laravel Scout by running the following artisan command:
php artisan vendor:publish --provider="Laravel\Scout\ScoutServiceProvider"
This command will generate a Scout configuration file at config/scout.php, allowing us to modify Scout settings if needed. For now, we will keep the configuration as it is.
Step 4: Install the MeiliSearch PHP Client
In order to communicate with the MeiliSearch server, we need to install the MeiliSearch PHP SDK. Run the following command to install the library:
composer require meilisearch/meilisearch-php
Step 5: Install Meilisearch
To install Meilisearch, you have the option to either install it locally or deploy it on a cloud service. In this case, we will use the local installation method.
Download the latest stable release of Meilisearch using cURL. Once the download is complete, launch Meilisearch to start the server.
# Install Meilisearch
curl -L https://install.meilisearch.com | sh

# Launch Meilisearch
./meilisearch
# Or in Windows
meilisearch
Step 6: Configure Laravel Scout
Next, open your .env file and add the necessary Scout configuration variables. These variables include the SCOUT_DRIVER and the MEILISEARCH_HOST:
SCOUT_DRIVER=meilisearch
MEILISEARCH_HOST=http://localhost:7700
# use your own master key with a length of 16 bytes or more, or you can leave this blank
MEILISEARCH_KEY=joVaZyaMWrqrO8OXEyTPxpvE8kY_gjLf6FTq1t9chR8
Adjust the MEILISEARCH_HOST value based on your MeiliSearch server setup, the default value is http://localhost:7700.
If you choose to specify the MEILISEARCH_KEY in your .env file or configuration, Laravel Scout will use it to authenticate API requests sent to the MeiliSearch server. This can be helpful if you have set up access restrictions or need to secure your search data. The MEILISEARCH_KEY should be at least 16 bytes long if you choose to fill it.
This key should match the key used to run the MeiliSearch server. To start the MeiliSearch server with the provided key, use the following command:
meilisearch --master-key joVaZyaMWrqrO8OXEyTPxpvE8kY_gjLf6FTq1t9chR8
However, if you omit the MEILISEARCH_KEY configuration, Laravel Scout will still function properly. MeiliSearch supports unauthenticated requests by default, allowing you to interact with the server without requiring a key. This is particularly useful during development or in scenarios where authentication is not necessary.
Step 7: Initializing the Database
We will create a basic application that can store and display data. Let’s start by initializing a database for this purpose.
For this tutorial, create a database named blog_laravel_scout_meilisearch. Once the database is created, we need to update the database connection settings in the .env file of our Laravel application. Modify the settings to match the newly created database name, as well as the username and password associated with the database.
Step 8: Create table migration
Next, we will create two tables: posts and categories. To do this, we need to generate the table migrations.
Run the following command to generate the posts table migration files for the posts tables:
php artisan make:migration create_posts_table
Insert the following code in the up() function. Here, we include the published column, which we will use to conditionally display the post and also to selectively import the record to the MeiliSearch server. Additionally, we have the category_id column to establish a relation between the posts and categories tables.
Schema::create('posts', function (Blueprint $table) {
    $table->id();
    $table->string('title');
    $table->string('slug')->unique();
    $table->text('content');
    $table->boolean('published')->default(true);
    $table->foreignId('category_id')
        ->index()->constrained()->cascadeOnDelete();

    $table->timestamps();
});
Run the following command to generate the categories table migration files for the categories tables:
php artisan make:migration create_categories_table
Insert the following code:
Schema::create('categories', function (Blueprint $table) {
    $table->id();
    $table->string('name');
    $table->string('slug')->unique();
    $table->timestamps();
});
Step 9: Create Models
Create a Category model and establish a relation with the Post model. Here, we use a one-to-many relation to allow a category to have multiple post records, utilizing the hasMany method.
<?php

namespace App\Models;

use Illuminate\Database\Eloquent\Factories\HasFactory;
use Illuminate\Database\Eloquent\Model;

class Category extends Model
{
    use HasFactory;

    public function posts()
    {
        return $this->hasMany(Post::class);
    }
}
Also create a Post model that has a category() relation with the following code:
<?php

namespace App\Models;

use Illuminate\Database\Eloquent\Factories\HasFactory;
use Illuminate\Database\Eloquent\Model;

class Post extends Model
{
    use HasFactory;

    protected $fillable = [
        'title',
        'slug',
        'content',
        'published',
        'category_id',
    ];

    public function category()
    {
        return $this->belongsTo(Category::class);
    }
}
Read also:
Step 10: Create Factories
To generate some data, we need a factory. Let’s start by creating the CategoryFactory and inserting the following code:
// database\factories\CategoryFactory.php
// codes ...
use Str;
// codes ...

public function definition(): array
{
    // the category name should be unique
    $name = $this->faker->unique()->word();

    return [
        'name' => $name,
        // generate slug from category title
        'slug' => Str::slug(
            title: $name,
        ),
    ];
}
Additionally, create a factory for the posts data using the following code:
// database\factories\PostFactory.php
// codes ...
use Illuminate\Support\Str;
use App\Models\Category;
// codes ...

public function definition(): array
{
    $title = $this->faker->unique()->sentence();

    return [
        'title' => $title,
        // insert slug based on the generated title
        'slug' => Str::slug(
            title: $title,
        ),
        'content' => $this->faker->paragraph(),
        // insert boolean to published and the chance of the value being true
        'published' => $this->faker->boolean(
            chanceOfGettingTrue: 85,
        ),
        // insert category_id with Category Factory, but we will replace this later
        'category_id' => Category::factory(),
    ];
}
Step 11: Prepare DatabaseSeeder
After preparing our migration and factory, let’s proceed to prepare our database seeder. In this step, we can add a progress bar to the seeder to track its progress, although you can choose to skip this if you prefer.
// database\seeders\DatabaseSeeder.php
//  codes ...
use App\Models\Category;
use App\Models\Post;
// codes ...

public function run(): void
{
    // create 10 categories from factory
    $categories = Category::factory(10)->create();

    // "do this for each category"
    $categories->each(function (Category $category) {
        // optional
        $this->command->getOutput()->info(
            message: "Creating posts for category: [$category->name]",
        );

        // optional
        $bar = $this->command->getOutput()->createProgressBar(100);

        // loop 100x
        for ($i = 0; $i < 100; $i++) {
            // optional
            $bar->advance();

            // create a post from factory
            Post::factory()->create([
                // use category id from current category
                'category_id' => $category->id,
            ]);
        }

        // optional
        $bar->finish();
    });
}
Step 12: Run the Database Seeder
After preparing the seeder, the next step is to migrate the database and run the seeder. Simply execute the following command to accomplish this:
php artisan migrate --seed
The terminal will display one progress bar for each category, and once the process is completed, we should have approximately 1000 posts in our database.
Step 13: Make Model Searchable
Before importing our data into MeiliSearch, we need to make our model searchable. To achieve this, we only need to use the Searchable trait from Laravel Scout
// codes ...
use Laravel\Scout\Searchable;

class Post extends Model
{
    use Searchable;
    use HasFactory;

    // codes ...
}
Let’s do the same thing to Category model
// codes ...
use Laravel\Scout\Searchable;

class Category extends Model
{
    use Searchable;
    use HasFactory;

    // codes ...
}
We can further customize the search configuration by specifying the data we want to store in the Meilisearch server using the toSearchableArray() function and conditionally make data searchable using the shouldBeSearchable() function.
// App\Models\Post.php
// codes ...

// control how the data is added to the Meilisearch server
public function toSearchableArray(): array
{
    return [
        'id' => (int) $this->title,
        'title' => $this->title,
        'slug' => $this->slug,
        'content' => $this->content,
        'published' => (bool) $this->published,
        // making sure the category id is treated as a number
        'category_id' => (int) $this->category_id,
        'created_at' => $this->created_at,
        'updated_at' => $this->updated_at,
    ];
}

// make the data searchable based on this condition
public function shouldBeSearchable(): bool
{
    return $this->published;
}
Step 14: Run Meilisearch and import data
Now that our preparation is complete, let’s ensure that our Meilisearch server is running. Run the following command in the terminal:
meilisearch --master-key joVaZyaMWrqrO8OXEyTPxpvE8kY_gjLf6FTq1t9chR8
Note that we are running it with the same master key as specified in the .env file.
Now let’s import all of our post records into Meilisearch:
php artisan scout:import "App\Models\Post"
Step 15: Simple Search
When it comes to simple search, we can achieve it using the search() method. By default, it will return only 20 records. You have the option to modify the limit or use the paginate() method to retrieve more records.
$post = Post::search(trim($request->get('query')) ?? '')->get();

return response()->json([
    'data' => $post,
    'status' => 200,
]);
Step 16: Advanced Search
Imagine having a vast customer database with millions of searchable, filterable, and sortable records. We desire to empower end-users with the ability to perform comprehensive searches and apply various filters. We want to leverage Eloquent models and utilize Scout’s native capabilities. But how can we achieve this?
Fortunately, we can utilize the search() method inherited by the model through the Searchable trait by passing a callback function. This allows us to define customized search logic tailored to our specific requirements.
Before proceeding, let’s configure our Scout settings in the config/scout.php file:
use App\Models\Post;
// codes ...

'meilisearch' => [
    'host' => env('MEILISEARCH_HOST', 'http://localhost:7700'),
    'key' => env('MEILISEARCH_KEY', null),
    'index-settings' => [
        // we will set config for Post model or "posts" index
        Post::class => [
            // we need to filter based on id and category_id
            'filterableAttributes'=> ['id', 'category_id'],
            // we need to sort based on these columns
            'sortableAttributes' => ['title', 'category_id', 'created_at', 'updated_at'],
        ],
    ],
],
Run the following command to update our scout config:
php artisan scout:sync-index-settings
Next, set up our route file. We will use an API route, so we don’t need to set up a view for this.
// routes/api.php

use App\Http\Controllers\SearchController;
// codes ...

Route::get('search', SearchController::class)->name('search');
Now let’s go to the controller.
<?php

namespace App\Http\Controllers;

use Illuminate\Http\Request;
use App\Models\Post;
use MeiliSearch\Endpoints\Indexes;
use Illuminate\Database\Eloquent\Builder;

class SearchController extends Controller
{
    public function __invoke(Request $request)
    {
        // simple search based on given query query parameter
        $post = Post::search(trim($request->get('query')) ?? '',
            function(Indexes $meiliSearch, string $query, array $options) use ($request) {
                if ($request->has('order_by')) {
                    // if there is an order_by query then apply sorting
                    // here we use comma (,) if we need to apply sort direction
                    // the default sort direction is "ascending"
                    $orderBy = explode(',', $request->order_by);
                    $options['sort'] = [$orderBy[0].':'.($orderBy[1] ?? 'asc')];
                }
                if ($request->has('category_id')) {
                    // if there is a category_id query then apply filtering
                    // we can add multiple filtering conditions using "AND", "OR", "=", ">" etc. here
                    $options['filter'] = 'category_id = "'.$request->category_id.'"';
                }

                return $meiliSearch->search($query, $options);
            });

        return response()->json([
            // load category relation after search, paginate, and include query strings
            // with the paginate url
            'data' => $post->query(fn (Builder $query) => $query->with('category'))
                ->paginate()->withQueryString(),
            'status' => 200,
        ]);
    }
}
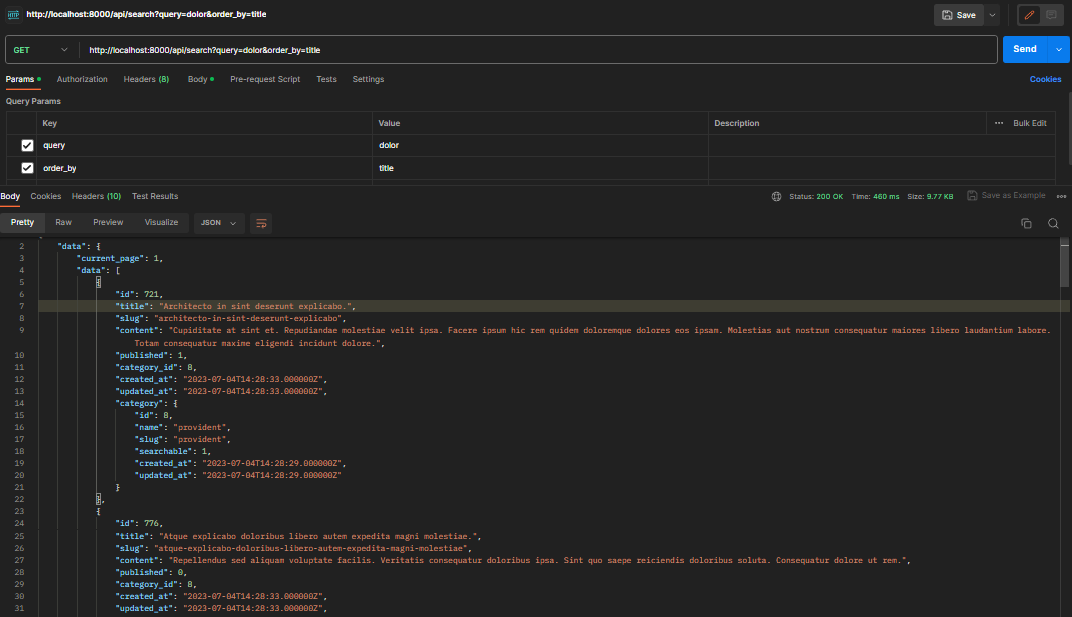
Another approach to perform advanced search, like filtering and sorting with Meilisearch is to utilize the where() and orderBy() methods, similar to querying an original Eloquent ORM. Here’s an example:
// Perform a simple search based on the provided 'query' query parameter
$post = Post::search(trim($request->get('query')) ?? '');

// if there is a category_id query then apply filtering
if ($request->has('category_id')) {
    // we can add multiple filtering conditions using "where" etc.
    $post->where('category_id', $request->get('category_id'));
}

// if there is an order_by query then apply sorting
if ($request->has('order_by')) {
    // here we use orderBy even if we use "desc" sorting direction
    $orderBy = explode(',', $request->get('order_by'));
    $post->orderBy($orderBy[0], $orderBy[1] ?? 'asc');
}

return response()->json([
    'data' => $post->query(fn (Builder $query) => $query->with('category'))
        ->paginate()->withQueryString(),
    'status' => 200,
]);
Hey, Why Isn’t the String Ordering in the Expected Order?
If the sorting is not producing the desired results, you can try updating the ranking rules. For example here I will update the ranking rules because the ordering of the string is not as expected.
url: http://localhost:7700/indexes/posts/settings/ranking-rules
method: PUT
data: ["words", "typo", "sort", "proximity", "attribute", "exactness"]
Here I will use Postman to update the ranking rules.
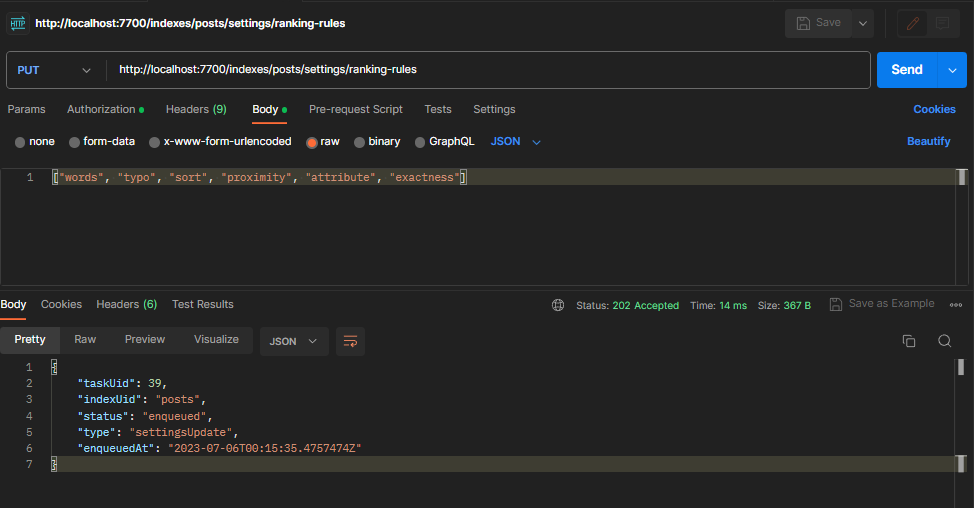
Now, the ordering functionality is working as expected.
Read also:
How to Update the Search Index When New Data is Stored
Once you have included the Laravel\Scout\Searchable trait in a model, adding a model instance to your search index is as simple as saving (using save()) or creating (using create()) the instance. Laravel Scout takes care of automatically indexing the model for you.
For example let’s create a store post functionality in our Laravel app
Route:
use App\Http\Controllers\PostController;

Route::resource('posts', PostController::class)->only(['store']);
PostController:
<?php

namespace App\Http\Controllers;

use Illuminate\Http\Request;
use App\Models\Post;
use Str;

class PostController extends Controller
{
    public function store(Request $request)
    {
        $post = Post::create([
            'title' => $request->title,
            'slug' => Str::slug($request->title , '-') . '-' . time(),
            'content' => $request->content,
            'published' => $request->published,
            'category_id' => $request->category_id,
        ]);

        return response()->json([
            'data' => $post,
            'status' => 200,
        ]);
    }
}
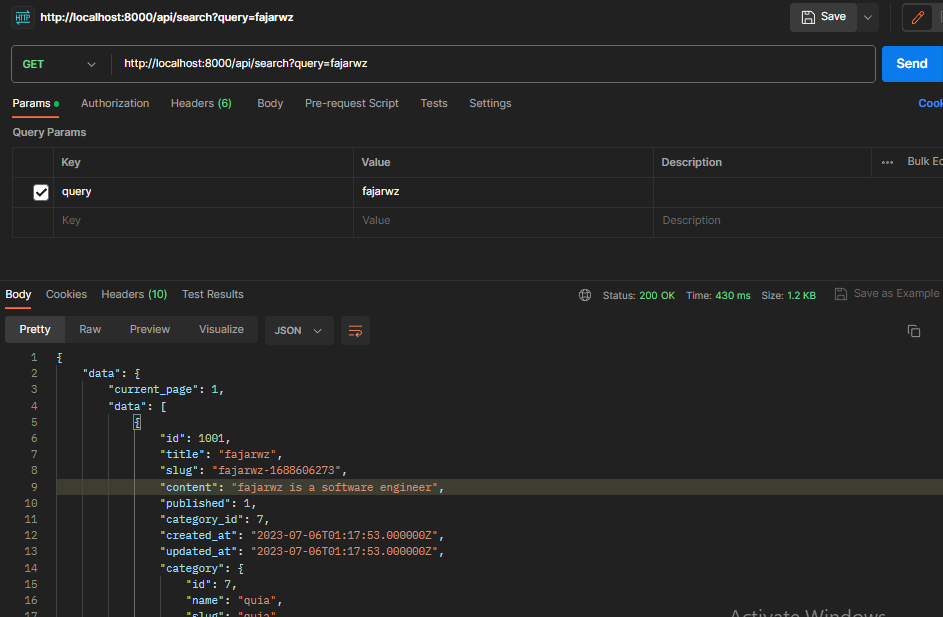
Let’s try creating a new record for posts now.
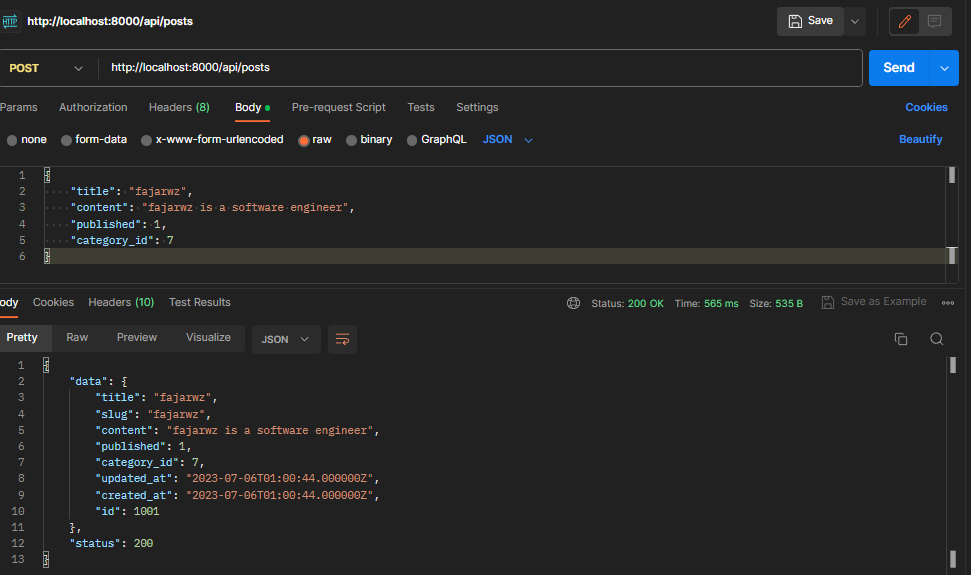
Now, let’s check the results when we search for the string “fajarwz”.
Notice that if we directly insert data into the database without utilizing Laravel Scout, we won’t be able to see the record when we perform searches. This is because the record is not indexed by MeiliSearch, and we rely on MeiliSearch to handle the searching functionality in our Laravel application.
Conclusion
In this article, we have covered the initial setup process, including the installation and configuration of Laravel Scout and MeiliSearch. We have also explored how to index data and perform searches using these technologies.
By integrating Laravel Scout with MeiliSearch, we can revolutionize the search functionality of our Laravel application. The combination of Laravel Scout’s seamless integration and MeiliSearch’s speed and relevance offers an exceptional search experience for our users.
💻 The repository for this example can be found at fajarwz/blog-laravel-scout-meilisearch.

