
💡 I included the link to the example repository at the conclusion of this tutorial.
Sending emails is an essential part of many Laravel applications. Whether you need to send notifications, confirmations, or marketing messages, Laravel provides a powerful and flexible way to send emails.
Laravel provides a simple and straightforward email API that is powered by the popular Symfony Mailer component. This means that you can quickly and easily send emails through a local or cloud-based service of your choice, such as SMTP, Mailgun, Brevo, etc.
In this tutorial, we will give you step-by-step instructions on how to send an email in Laravel using Brevo (formerly Sendinblue). We will show you how to create a simple blade file design and how to include dynamic information in the mail layout. So let’s get started!
Step 1: Install Laravel
We will start with a fresh Laravel application. Create a new application for this demo:
Using the Laravel Installer
laravel new blog-laravel-mail-brevo
Using Composer create-project
composer create-project laravel/laravel blog-laravel-mail-brevo
Using Laravel build and Sail
curl -s "https://laravel.build/blog-laravel-mail-brevo" | bash
This command will create a new Laravel project in a directory named blog-laravel-mail-brevo.
Step 2: Create Brevo Account
Next, if you don’t have a Brevo account, you need to create one. Create account using email address that you want to use to send mail in Laravel. You can register by clicking on the link below:
https://onboarding.brevo.com/account/register
Read also:
Step 3: Applying Brevo Configuration to Laravel .env
Once we have created an account, search for SMTP & API menu or go to the following URL:
https://app.brevo.com/settings/keys/smtp

Click the menu and we will be redirected to the page
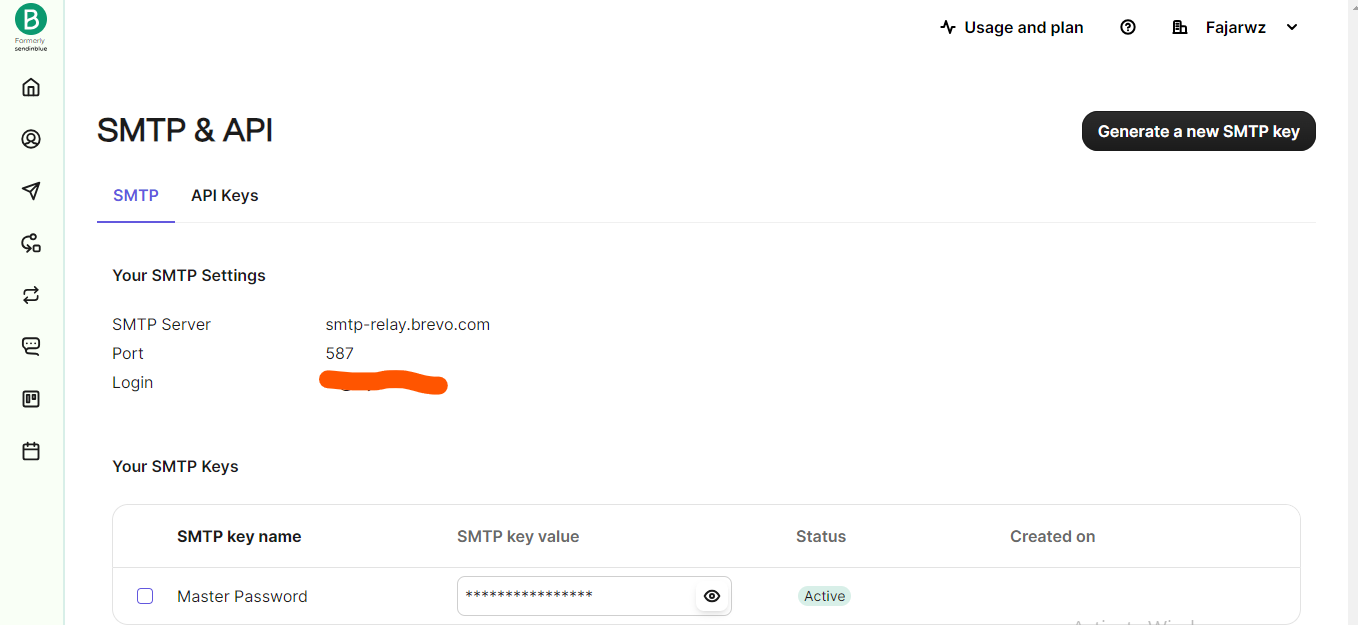
Replace the MAIL_XXX configuration in the Laravel .env file with our Brevo account configuration.
MAIL_DRIVER=smtp
MAIL_HOST=smtp-relay.brevo.com
MAIL_PORT=587
MAIL_USERNAME=login.address@xxx.com
MAIL_PASSWORD=masterpassword
MAIL_ENCRYPTION=tls
MAIL_FROM_ADDRESS="${MAIL_USERNAME}"
MAIL_FROM_NAME="${APP_NAME}"
Step 4: Create the Mailable Class
Next, let’s create a mail class called TestMail to facilitate email sending. This class will specify the view to be used and the necessary data for the mail content. To proceed, run the following command:
php artisan make:mail TestMail
Fill the Class with the following codes:
// app\Mail\TestMail.php
<?php

namespace App\Mail;

use Illuminate\Bus\Queueable;
use Illuminate\Contracts\Queue\ShouldQueue;
use Illuminate\Mail\Mailable;
use Illuminate\Queue\SerializesModels;

class TestMail extends Mailable
{
    use Queueable, SerializesModels;

    public $data;

    /**
     * Create a new message instance.
     *
     * @return void
     */
    public function __construct($data)
    {
        $this->data = $data;
    }

    /**
     * Build the message.
     *
     * @return $this
     */
    public function build()
    {
        return $this->subject('Mail test')->view('emails.test');
    }
}
Step 5: Creating Blade View
Create a blade view file where we can write the email content that we want to send. For now, we will simply write some dummy text. Follow the instructions below to create the necessary files in the emails folder:
// resources\views\emails\test.blade.php
<!DOCTYPE html>
<html>
<head>
</head>
<body>
    <h2>{{ $data['title'] }}</h2>
    <p>{{ $data['content'] }}</p>
</body>
</html>
Step 6: Adding the Route
Next, we will create a web route to test the sending of our TestMail email.
Open your Laravel application’s routes/web.php file.
Add the following route definition:
Route::get('send-mail', function () {
    $details = [
        'title' => 'Success',
        'content' => 'This is an email testing using Laravel-Brevo',
    ];

    \Mail::to('destination.address@xxx.com')->send(new \App\Mail\TestMail($details));

    return 'Email sent at ' . now();
});
Read also:
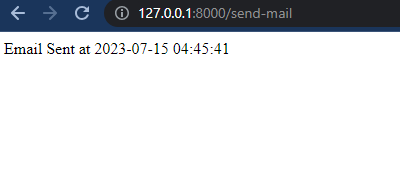
Step 7: Test the Mail Sending
Once the route is added, you can access it by visiting the /send-mail URL in your browser. This will trigger the sending of the TestMail email to the specified email address.
Run the App
php artisan serve
Open Link
localhost:8000/send-mail
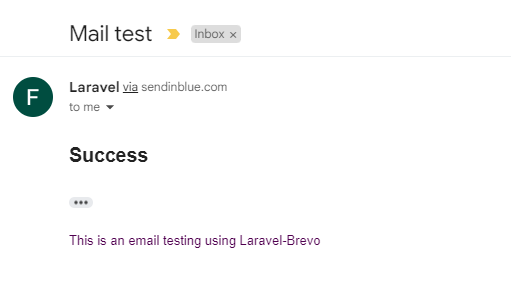
Now, let’s check our inbox to verify if the email was sent successfully. If the email was sent without any issues, you should see the following email in your inbox:
Conclusion
In this tutorial, we explored how to easily send emails in Laravel using Brevo as our email service provider. We covered the necessary steps to set up the configuration, create a Mailable class, and define a blade view for the email content. By following these steps, we can integrate email sending functionality into our Laravel applications effortlessly.
With Brevo’s SMTP configuration added to the Laravel .env file, we can leverage Laravel’s powerful email API to send various types of emails, such as notifications, confirmations, and marketing messages. By creating a Mailable class and a corresponding blade view, we have full control over the email’s structure and content, enabling us to customize the email to suit our application’s needs.
By following this tutorial, we now have the knowledge and tools to send emails in Laravel using Brevo, empowering us to enhance our application’s communication capabilities and provide a seamless email experience to our users.
💻 The repository for this example can be found at fajarwz/blog-laravel-mail-brevo.

