💡 I included the link to the example repository at the conclusion of this tutorial.
Signed URLs in Laravel are a very useful feature. This is a URL containing a unique string. Typically, signed URLs are used for actions that require special permissions and are sometimes time-limited.
Some use cases of Signed URLs are:
Email Verification Link: When users register for an account on a website, they often need to verify their email address. Sending a signed URL via email ensures that the verification link remains secure and cannot be tampered with by malicious entities.
Password Reset Link: Similar to email verification, the password reset function requires a secure mechanism to prevent unauthorized access. By generating a signed URL for the password reset link, Laravel ensures that only the intended user can reset their password.
Restricted Access File Download: Sometimes, you may want to grant access to downloadable files only to authenticated users or users with special permissions. By creating signed URLs for these files, you can ensure that only authorized users can download them, even if the URL is shared.
Invitation Link: In applications where users can invite others to join, creating a signed invitation link will add an extra layer of security. Only users with a valid invitation link can register or access certain features on the app.
One-Time Access Links: For certain actions that should only be performed once, such as confirming a subscription cancellation or completing a one-time transaction, a temporary signed URL is ideal. These links expire after a certain amount of time or use, thereby preventing replay attacks.
Let’s make an example. Let’s say we want to create a password reset feature where, to be more secure, we will use a Signed URL to prevent compromised accounts from accessing the password reset page. You need a medium to send the link to the user and you can do that by sending it to the user’s email, but we won’t do that here.
In this tutorial I will use Laravel 11, but for other versions the implementation should be similar.
Step 1: Create the Functions
I assume you already have a Laravel application installed on your machine. Now let’s create a UserController which contains a function to send the password reset page link and a function to display the password reset page.
// app/Http/Controllers/UserController.php

<?php

namespace App\Http\Controllers;

use Illuminate\Http\Request;
use Illuminate\Support\Facades\URL;

class UserController extends Controller
{
    public function sendResetPasswordLink()
    {
        $link = URL::signedRoute('reset-password.index', ['userId' => 4]);

        // you may want to send the link to the user's email here
        // here let's print the link so we know it's working
        dd($link);
    }

    public function index(Request $request)
    {
        // you may want to display the reset password page here
        // here I will display the user id so we know we can get
        // the parameter in the link
        dd('You are a user with ID ' . $request->userId);
    }
}
Read also:
Step 2: Add the Routes
Let’s create a route for the send password reset feature and the password reset page.
// routes/web.php

use App\Http\Controllers\UserController;

Route::get('reset-password/send-link', [UserController::class, 'sendResetPasswordLink'])
    ->name('reset-password.send-link');

Route::middleware('signed')->get('reset-password/{userId}', [UserController::class, 'index'])
    ->name('reset-password.index');
To send the link, we will use the reset-password.send-link route. And to display the reset password page, we will use the reset-password.index route. Note that the reset-password.index route uses the signed middleware, this is the middleware that is important for our Signed URLs to work.
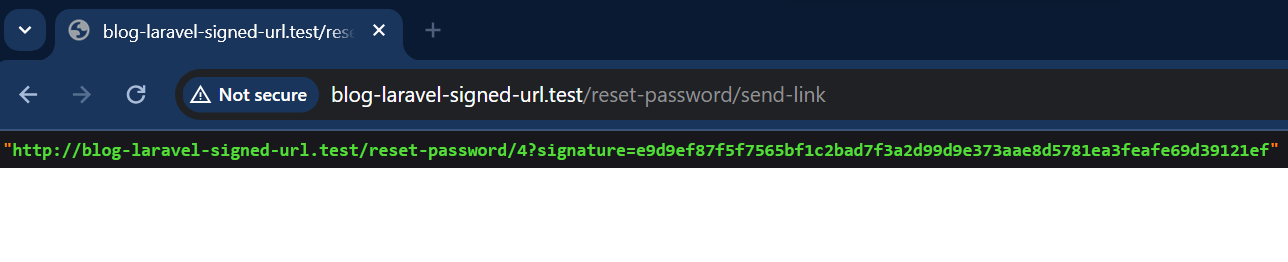
You can try visiting the reset-password.send-link route and you will see this page.
And when you visit the reset password page, you will see this page.

Good! Now our password reset feature is working. But you might be thinking what if someday an unauthorized user finds this link, such as on the device, in the browser history, and visits the page and performs a password reset again. This is when you want to use Laravel temporarySignedRoute, a Signed URL with a time limit.
Step 3: Using Temporary Signed URL
Laravel has temporarySignedRoute to make a temporary Signed URL. Let’s demonstrate it by updating our UserController.
<?php

namespace App\Http\Controllers;

use Illuminate\Http\Request;
use Illuminate\Support\Facades\URL;

class UserController extends Controller
{
    public function sendResetPasswordLink()
    {
        $link = URL::temporarySignedRoute(
            'reset-password.index',
            now()->addMinutes(60),
            ['userId' => 4],
        );
        // $link = URL::signedRoute('reset-password.index', ['userId' => 4]);

        // you may want to send the link to the user's email
        // here let's print the link so we know it's working
        dd($link);
    }

    public function index(Request $request)
    {
        // you may want to display the reset password page here
        // here I will display the user id so we know we can get
        // the parameter in the link
        dd('You are a user with ID ' . $request->userId);
    }
}
Using temporarySignedRoute you can add a time limit as a second argument. And when you visit the submit link again, it should look like this.

And when you visit the password reset page, you will see this page, the same as the previous password reset page.

And when 60 minutes have passed, the link is no longer accessible.
However, the problem with our current implementation is when the user has reset the password. The link is still valid if it has not passed 60 minutes. So now we need to manually invalidate the Signed URL after the user performs a password reset.
Step 4: Invalidate Signed URL After User Successfully Reset Password
The idea behind this is to store the Signed URL somewhere and also add a time limit to it. Redis is a great tool we can use to support this.
The logic behind this is, when the user asks to send a password reset link, we also put the link in the cache, with a key containing the user’s identity, for example user id. Set the same time limit as the temporary Signed URL.
Then on the password reset route we delete the Signed URL in the cache if the password reset is successful. With this we also need to check the password reset route page and password reset route whether the Signed URL is still in the cache (meaning the user has not successfully reset the password) or not.
Read also:
First I will install the predis package. With this package, we don’t need to install any additional extensions.
composer require predis/predis:^2.0
I will also update my .env file like so:
CACHE_STORE=redis
CACHE_PREFIX=

REDIS_CLIENT=predis
REDIS_HOST=127.0.0.1
REDIS_PASSWORD=null
REDIS_PORT=6379
💡 Make sure you also have Redis installed on your machine.
Let’s update our UserController to support this implementation.
<?php
namespace App\Http\Controllers;
use Illuminate\Http\Request;
use Illuminate\Support\Facades\Cache;
use Illuminate\Support\Facades\URL;
class UserController extends Controller
{
public function sendResetPasswordLink()
{
$userId = 4;
$timeLimit = now()->addMinutes(60);
$link = URL::temporarySignedRoute(
'reset-password.index',
$timeLimit,
['userId' => $userId],
);
// $link = URL::signedRoute('reset-password.index', ['userId' => 4]);
// put to cache for one time signed url
Cache::put('reset-password-' . $userId, $link, $timeLimit);
// you may want to send the link to the user's email
// here let's print the link so we know it's working
dd($link);
}
public function index(Request $request)
{
// if this is not the first time, return 403
$signedUrlCacheKey = 'reset-password-' . $request->userId;
if (!Cache::has($signedUrlCacheKey)) {
return abort(403, 'INVALID SIGNATURE');
}
// you may want to display the reset password page here
// here I will display the user id so we know we can get
// the parameter in the link
dd('You are a user with ID ' . $request->userId);
}
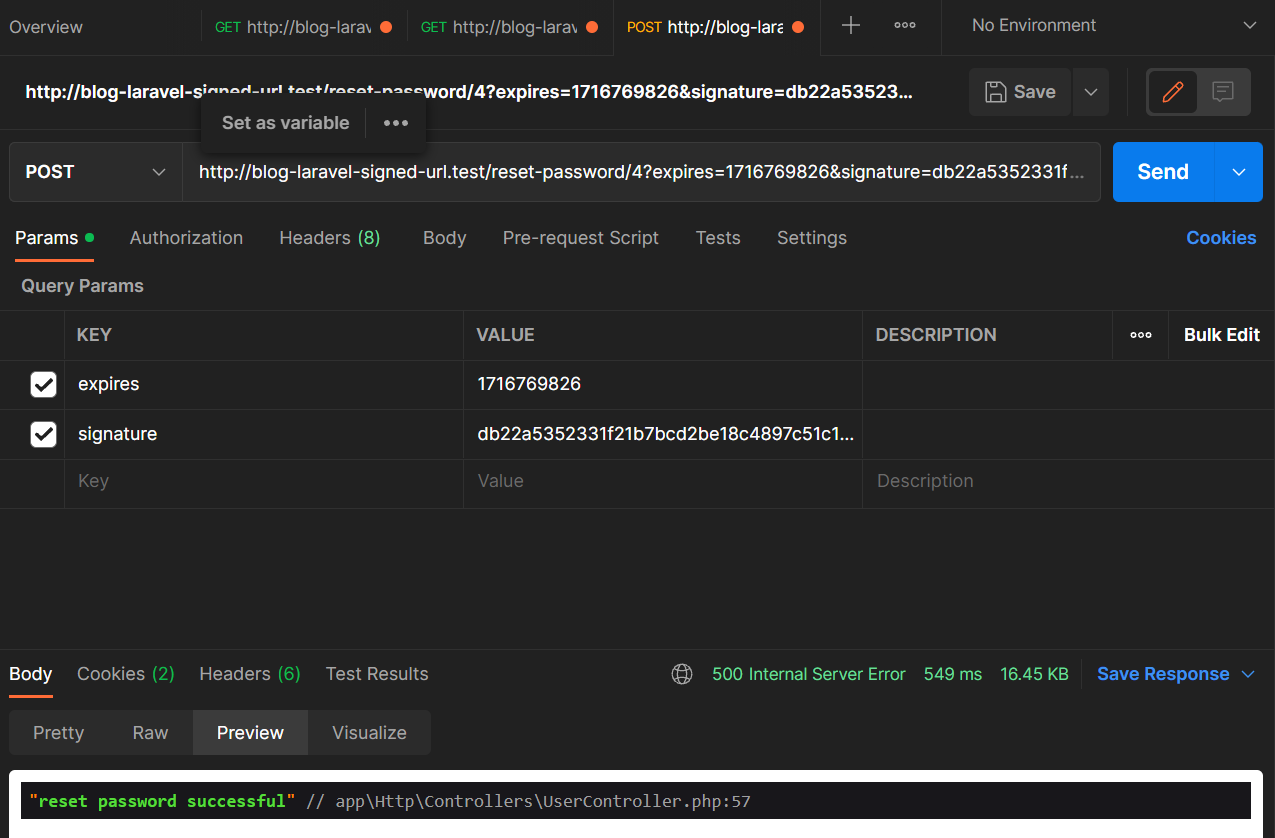
public function resetPassword(Request $request)
{
$signedUrlCacheKey = 'reset-password-' . $request->userId;
if (!Cache::has($signedUrlCacheKey)) {
return abort(403, 'INVALID SIGNATURE');
}
// reset password logic here...
// remove the url from cache after successful reset
Cache::forget($signedUrlCacheKey);
dd('password reset was successful');
}
}
Let’s also update the route. For the password reset route, use the same route as the password reset page route but with a different HTTP method. Use POST instead for the password reset route.
use App\Http\Controllers\UserController;

Route::get('reset-password/send-link', [UserController::class, 'sendResetPasswordLink'])
    ->name('reset-password.send-link');

Route::middleware('signed')->get('reset-password/{userId}', [UserController::class, 'index'])
    ->name('reset-password.index');

Route::middleware('signed')->post('reset-password/{userId}', [UserController::class, 'resetPassword'])
    ->name('reset-password.index');
Here I am using Laravel 11, I will use Postman to trigger the POST route and to make it easier for me to demo, I will disable CSRF token validation. To do that I had to add some code to bootstrap\app.php. You should never do this in a production application unless there is a compelling reason to do so.
// bootstrap\app.php

return Application::configure(basePath: dirname(__DIR__))
    ->withRouting(
        web: __DIR__.'/../routes/web.php',
        commands: __DIR__.'/../routes/console.php',
        health: '/up',
    )
    ->withMiddleware(function (Middleware $middleware) {
        // I added this code
        $middleware->validateCsrfTokens(except: [
            '*',
        ]);
    })
    ->withExceptions(function (Exceptions $exceptions) {
        //
    })->create();
Okay, now let’s test our application. After we get the password reset link, try hitting it using Postman.
Read also:
GET http://blog-laravel-signed-url.test/reset-password/send-link

result:
http://blog-laravel-signed-url.test/reset-password/4?expires=1716769826&signature=db22a5352331f21b7bcd2be18c4897c51c1cea0dc324162601cbff3b04f95d51

POST http://blog-laravel-signed-url.test/reset-password/4?expires=1716769826&signature=db22a5352331f21b7bcd2be18c4897c51c1cea0dc324162601cbff3b04f95d51

result:
password reset was successful
And the second time the user tries to visit the password reset page or password reset route, they will get 403 | INVALID SIGNATURE even though the time has not passed 60 minutes.
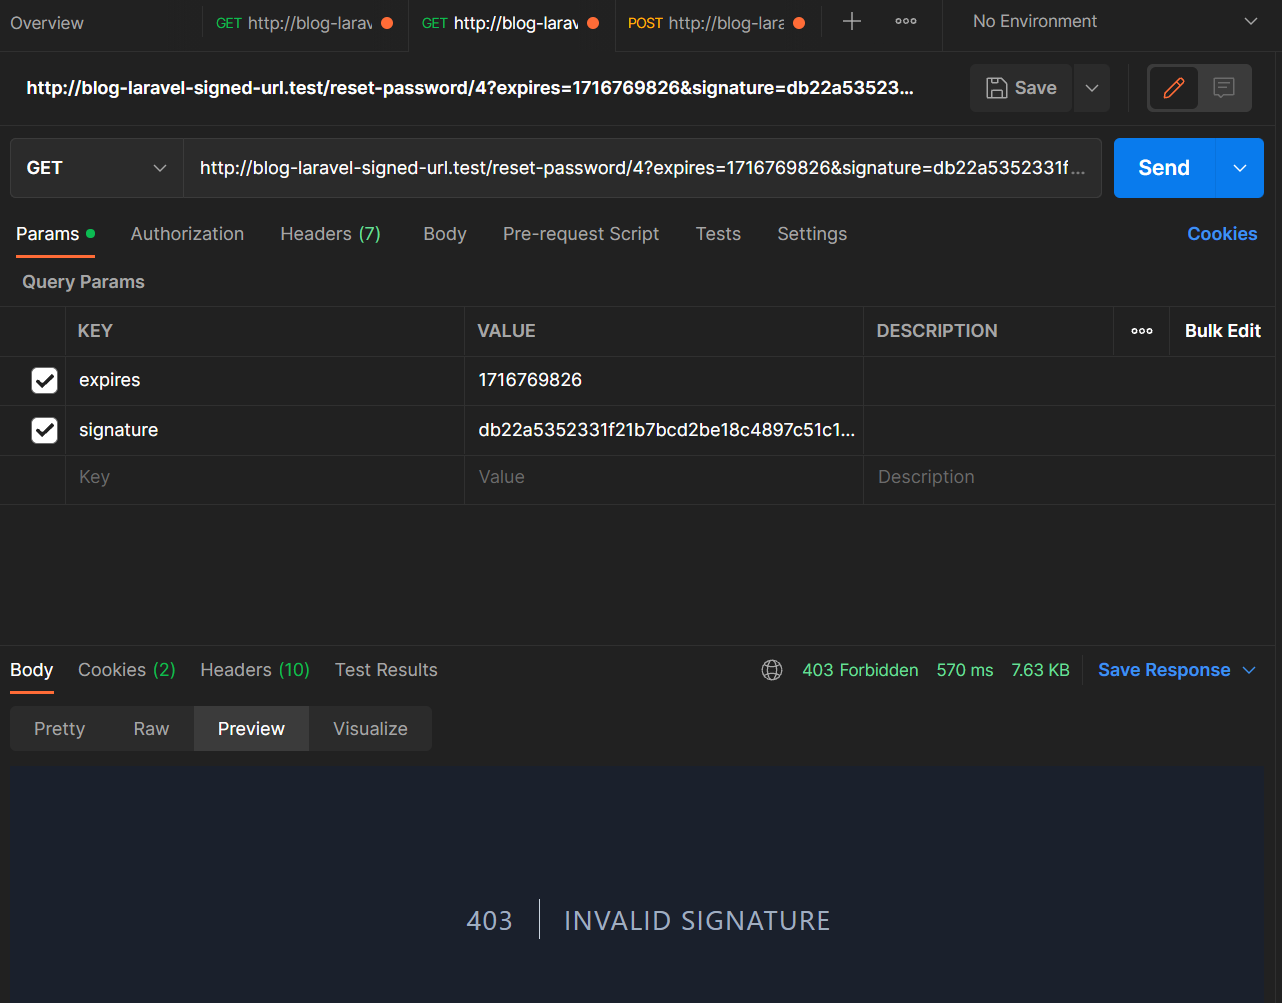
Good! Our password reset feature is now secure.
You may also want to make the code cleaner by moving the additional Signed URL check into the middleware or even just adding it to the existing signed middleware.
Conclusion
We’ve had a lot of fun trying to implement secure password resets using Laravel Signed URL and Temporary Signed URL and even Redis to support our implementation. This is enough for you to implement a combat-ready password reset feature on your awesome app.
💻 The repository for this example can be found at fajarwz/blog-laravel-signed-url.

