💡 I included the link to the example repository at the conclusion of this tutorial.
Building data analysis tools has traditionally required complex backend systems, statistical libraries, and hours of manual work. But what if we could simplify the entire process, allowing anyone to upload a dataset and immediately ask questions in plain English? In this tutorial, you’ll learn how to create an AI-powered data analysis assistant using Node.js, Express, and OpenAI’s GPT model.
By combining the power of natural language processing with a simple file upload system, we’ll build a web-based tool that turns CSV or JSON files into interactive, conversational datasets. This assistant can answer questions like “What’s the average age?” or “Which product has the highest price?” without needing to write a single line of SQL or code logic for analysis. The backend will use Node.js with Express and OpenAI’s GPT model to analyze and respond.
This project offers a practical introduction to integrating OpenAI into real-world applications, and is good for beginners looking to explore AI in web development or developers curious about building smarter tools with the LLM.
💡 Note:
While ChatGPT is a powerful and popular AI language model, it is not the only option available for natural language processing tasks. Depending on your needs and budget, you can also use alternative models such as DeepSeek or Ollama (which supports self-hosted mode). These alternatives can offer competitive performance at a much lower cost and provide greater control over deployment and data privacy. Choosing the right model depends on your specific use case, required features, and budget constraints.
So, feel free to explore and integrate other models beyond ChatGPT to optimize cost and flexibility.
What You’ll Learn
- How to upload and parse CSV/JSON files with
multerandcsv-parse - How to use OpenAI API to answer questions about data
Prerequisites
- Node.js and
npminstalled - OpenAI API Key
How to Get Your OpenAI API Key
To use the OpenAI API in this project, you need an API key. Here’s how you can get one:
Create an OpenAI Account First, go to OpenAI’s Platform website and sign up if you don’t have an account yet. If you already have one, just log in.
Find the API Keys Section After logging in, you’ll see your user dashboard. Go to “Your Profile”, look for a menu or tab labeled API Keys, this is where you manage your secret keys.
Generate a New API Key Click the button that says “Create new secret key”. OpenAI will create a unique key for you. Copy it somewhere safe right away because for security reasons, you won’t be able to view it again once you leave the page.
Use the API Key in Your Project When you run your app, make sure to provide this API key so your app can connect to OpenAI’s servers and get the responses you want.
That’s it! With your API key ready, you can start building awesome features powered by OpenAI.
💡 Note: You Need API Usage Balance
Keep in mind that using the OpenAI API is a paid service. To make requests to the API, your OpenAI account must have a sufficient balance or an active subscription plan. If you run out of balance, your API requests will fail until you top up your account or renew your subscription.
Step 1: Set Up the Backend
We’re setting up the foundation for our backend service.
1. Initialize the project
mkdir ai-eda
cd ai-eda
npm init -y
npm install express cors multer csv-parse openai dotenv
Here’s what each package does:
- express: The express web framework.
- cors: Enables Cross-Origin Resource Sharing, allowing the frontend to interact with the backend from a different origin.
- multer: A middleware for handling file uploads.
- csv-parse: Used to convert CSV file contents into JSON objects.
- openai: Official OpenAI SDK to interact with their GPT models.
- dotenv: Loads environment variables from a
.envfile so we can securely store the OpenAI API key.
This sets up everything we need to start building the AI-powered backend.
Read also:
2. Create .env
To securely access the OpenAI API, you need to store your API key in an environment variable. Create a file named .env in the root of your project directory and add the following line:
OPENAI_API_KEY=your_openai_api_key_here
# Replace with your own Frontend URL
FRONTEND_ORIGIN="http://127.0.0.1:5500"
Replace your_openai_api_key_here with your actual API key from the OpenAI dashboard.
This .env file will be loaded automatically by the dotenv package and allows you to keep sensitive keys out of your source code.
You may also want to create a file to create some sort of configuration file (e.g., /config.js), but here we’ll keep it simple.
💡 Important: Never commit your
.envfile to version control (e.g., GitHub) to avoid exposing your API keys publicly.
3. Create index.js
In this step, you’ll build the main backend server using Express. The index.js file will:
- Set up a basic HTTP server using Express.
- Allow file uploads using multer.
- Parse CSV and JSON data.
- Store the uploaded data temporarily in memory (currentData).
- Accept user questions and send them, along with the uploaded data, to OpenAI’s GPT model.
- Return a natural-language answer based on the dataset.
Paste the following code:
// /index.js

require('dotenv').config();
const express = require('express');
const cors = require('cors');
const multer = require('multer');
const fs = require('fs');
const { parse } = require('csv-parse');
const { OpenAI } = require('openai');

const app = express();
const upload = multer({ dest: 'uploads/' });
const port = 3000;

// Handle CORS. Replace with your own Frontend URL
app.use(cors({ origin: process.env.FRONTEND_ORIGIN }));
app.use(express.json());

// Setup OPENAI with our API key
const openai = new OpenAI({ apiKey: process.env.OPENAI_API_KEY });
let currentData = null;

app.post('/upload', upload.single('file'), (req, res) => {
  const file = req.file;
  // Handle no file uploaded
  if (!file) return res.status(400).send('No file uploaded.');

  // Handle uploaded JSON file
  if (file.mimetype === 'application/json') {
    const jsonData = JSON.parse(fs.readFileSync(file.path));
    // Store the data in memory (currentData)
    currentData = JSON.stringify(jsonData);
    return res.send({ message: 'JSON uploaded successfully.' });
  }

  // Handle uploaded CSV file
  if (file.mimetype === 'text/csv') {
    const parser = parse({ columns: true }, (err, records) => {
      if (err) return res.status(500).send('CSV parsing failed.');
      currentData = JSON.stringify(records);
      res.send({ message: 'CSV uploaded successfully.' });
    });

    fs.createReadStream(file.path).pipe(parser);
  } else {
    res.status(400).send('Unsupported file format.');
  }
});

app.post('/ask', async (req, res) => {
  const { question } = req.body;
  // Simple data and question validation
  if (!currentData) return res.status(400).send('No data uploaded.');
  if (!question) return res.status(400).send('No question provided.');

  // Initial prompt
  const prompt = `You are a helpful data analyst assistant. Here's the dataset in JSON:\n\n\n\n${currentData.slice(0, 5000)}\n\nNow answer the following question:\n\n\"${question}\"`;

  try {
    const completion = await openai.chat.completions.create({
      model: 'gpt-3.5',
      messages: [{ role: 'user', content: prompt }],
      temperature: 0.2,
    });
    // Send the response to the Frontend
    res.send({ answer: completion.choices[0].message.content });
  } catch (err) {
    console.error(err);
    res.status(500).send('Error calling OpenAI.');
  }
});

app.listen(port, () => console.log(`Server running on http://localhost:${port}`));
Let’s break down what’s happening in the code:
dotenvloads environment variables from.env(like your OpenAI API key).corsallows your frontend (running on a different port) to access the backend.multerhandles file uploads (like CSV or JSON).csv-parseturns CSV files into usable JavaScript objects.- The OpenAI client is initialized with your API key.
- The
/uploadendpoint allows users to upload a dataset in either JSON or CSV format. It handles the file upload, parses the content accordingly, and stores the data in memory for later use. If the file format is unsupported or parsing fails, it responds with an appropriate error message. - The
/askendpoint receives a user’s question and combines it with the uploaded dataset to create a prompt for the OpenAI model. It sends this prompt to OpenAI’s API to generate an insightful answer based on the data. The response from OpenAI is then sent back to the client. This setup enables interactive data analysis powered by AI, where users can upload data and query it through natural language questions. - Finally,
app.listenstarts the server on port3000.
Step 2: Build the Frontend
Create index.html
Now that the backend is ready, let’s create a simple frontend so users can interact with it.
In this step, you’ll build an index.html page that:
- Allows users to upload a
.csvor.jsonfile via a form. - Lets users type natural-language questions about the data.
- Sends these questions to the backend, which then queries the AI and returns a response.
- Displays the AI-generated answer directly on the page.
No frameworks required. This is pure HTML + JS, so it’s easy to understand and modify.
<!-- /index.html -->

<!DOCTYPE html>
<html lang="en">
<head><meta charset="UTF-8"><title>AI EDA Assistant</title></head>
<body>
  <h1>Upload CSV or JSON</h1>
  <form id="uploadForm" enctype="multipart/form-data">
    <input type="file" name="file" required />
    <button type="submit">Upload</button>
  </form>

  <h2>Ask a Question</h2>
  <input type="text" id="question" placeholder="e.g. What is the average price?" />
  <button id="askBtn">Ask</button>

  <pre id="response"></pre>

  <script>
    document.getElementById('uploadForm').onsubmit = async (e) => {
      e.preventDefault();
      const formData = new FormData(e.target);
      // Upload the file
      const res = await fetch('http://localhost:3000/upload', { method: 'POST', body: formData });
      const json = await res.json();
      alert(json.message);
    };

    document.getElementById('askBtn').onclick = async () => {
      const question = document.getElementById('question').value;
      // Submit the question
      const res = await fetch('http://localhost:3000/ask', {
        method: 'POST',
        headers: { 'Content-Type': 'application/json' },
        body: JSON.stringify({ question })
      });
      const json = await res.json();
      document.getElementById('response').textContent = json.answer;
    };
  </script>
</body>
</html>
Read also:
Step 3: Test It
To test the app:
Open the
index.htmlfile:- Either use Live Server (a VSCode extension), or
- Open it manually in your browser.
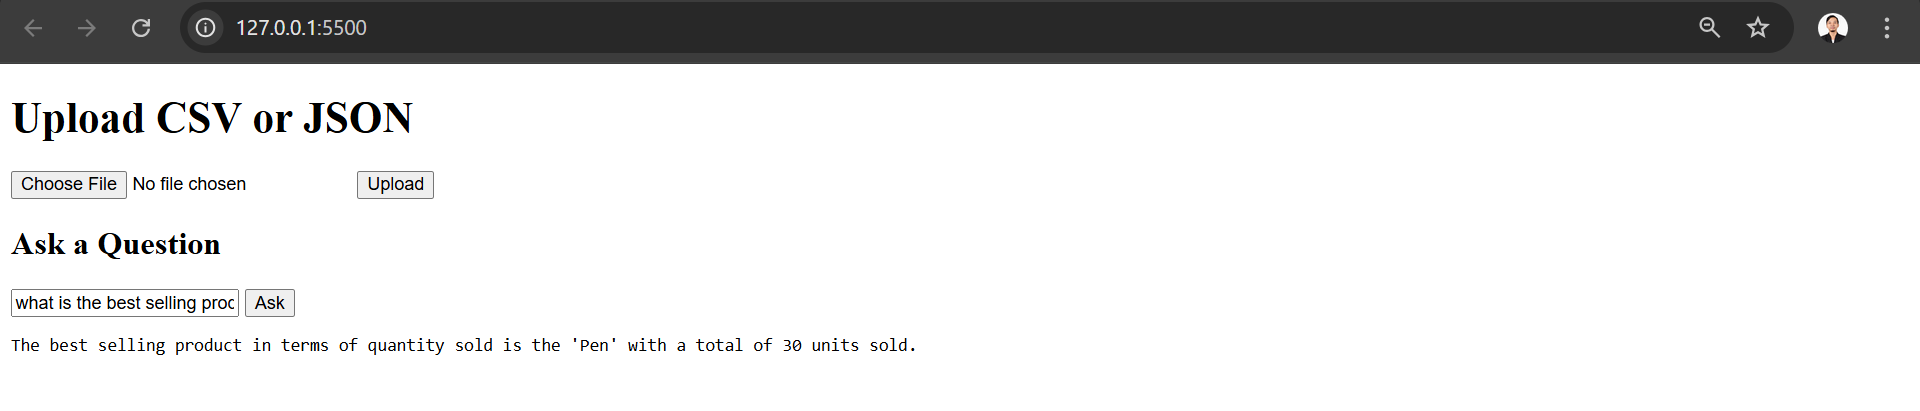
You should see a page like this:

- Try uploading your data:

- Try asking a question:
Sample Data
Use the following sample data to test the functionality.
CSV Sample
Save the content below as a .csv file (e.g., sample-orders.csv):
order_id,customer_name,product,category,quantity,price,total,sale_date
1001,John Doe,Keyboard,Electronics,2,45.00,90.00,2023-10-01
1002,Jane Smith,Mouse,Electronics,1,25.00,25.00,2023-10-02
1003,Alice Johnson,Notebook,Stationery,5,3.00,15.00,2023-10-02
1004,Bob Brown,Monitor,Electronics,1,150.00,150.00,2023-10-03
1005,Charlie Lee,Pen,Stationery,10,1.50,15.00,2023-10-03
1006,Dana White,Headphones,Electronics,1,75.00,75.00,2023-10-04
1007,Eve Black,Notebook,Stationery,3,3.00,9.00,2023-10-04
1008,Frank Green,Mouse,Electronics,2,25.00,50.00,2023-10-05
1009,Grace Hall,Keyboard,Electronics,1,45.00,45.00,2023-10-06
1010,Hank Miller,Pen,Stationery,20,1.50,30.00,2023-10-06
JSON Sample
Save the following as a .json file (e.g., sample-products.json):
[
  { "date": "2024-01-01", "product": "Laptop", "category": "Electronics", "price": 1200, "quantity": 5 },
  { "date": "2024-01-02", "product": "Mouse", "category": "Electronics", "price": 25, "quantity": 30 },
  { "date": "2024-01-03", "product": "Chair", "category": "Furniture", "price": 150, "quantity": 10 },
  { "date": "2024-01-04", "product": "Desk", "category": "Furniture", "price": 300, "quantity": 8 },
  { "date": "2024-01-05", "product": "Headphones", "category": "Electronics", "price": 200, "quantity": 12 },
  { "date": "2024-01-06", "product": "Monitor", "category": "Electronics", "price": 400, "quantity": 6 },
  { "date": "2024-01-07", "product": "Keyboard", "category": "Electronics", "price": 45, "quantity": 20 },
  { "date": "2024-01-08", "product": "Lamp", "category": "Furniture", "price": 70, "quantity": 15 },
  { "date": "2024-01-09", "product": "Notebook", "category": "Stationery", "price": 5, "quantity": 100 },
  { "date": "2024-01-10", "product": "Pen", "category": "Stationery", "price": 2, "quantity": 200 },
  { "date": "2024-01-11", "product": "Tablet", "category": "Electronics", "price": 600, "quantity": 4 },
  { "date": "2024-01-12", "product": "Phone", "category": "Electronics", "price": 800, "quantity": 7 },
  { "date": "2024-01-13", "product": "Shelf", "category": "Furniture", "price": 250, "quantity": 3 },
  { "date": "2024-01-14", "product": "Whiteboard", "category": "Office Supplies", "price": 100, "quantity": 5 },
  { "date": "2024-01-15", "product": "Marker", "category": "Office Supplies", "price": 3, "quantity": 80 },
  { "date": "2024-01-16", "product": "Stapler", "category": "Office Supplies", "price": 10, "quantity": 50 },
  { "date": "2024-01-17", "product": "Cabinet", "category": "Furniture", "price": 500, "quantity": 2 },
  { "date": "2024-01-18", "product": "Smartwatch", "category": "Electronics", "price": 300, "quantity": 9 },
  { "date": "2024-01-19", "product": "Printer", "category": "Electronics", "price": 250, "quantity": 3 },
  { "date": "2024-01-20", "product": "Backpack", "category": "Accessories", "price": 80, "quantity": 18 }
]
Conclusion
In this tutorial, you have created a lightweight yet powerful AI assistant that can perform exploratory data analysis (EDA) simply by uploading a CSV or JSON file and asking questions in natural language. By leveraging Node.js, Express, and OpenAI GPT models, you created a bridge between raw data and meaningful insights, without having to write complex code for data processing or analysis.
This project shows how language models can improve the user experience by simplifying technical tasks, like data interpretation, into conversational interactions. While this is just a starting point, the foundation you’ve laid can be extended in many directions, from supporting larger datasets, to adding authentication, to visualizing output, to integrating more sophisticated AI tools.
This assistant shows how accessible and transformative AI can be when integrated into practical web applications.
💻 The repository for this example can be found at fajarwz/blog-ai-eda-assistant.
💡 Thanks for reading all the way to the end. If you found this helpful, please like or star the Github repo so I know it’s really helpful. Otherwise, let me know what I can improve in the comment or email.

