💡 I included the link to the example repository at the conclusion of this tutorial.
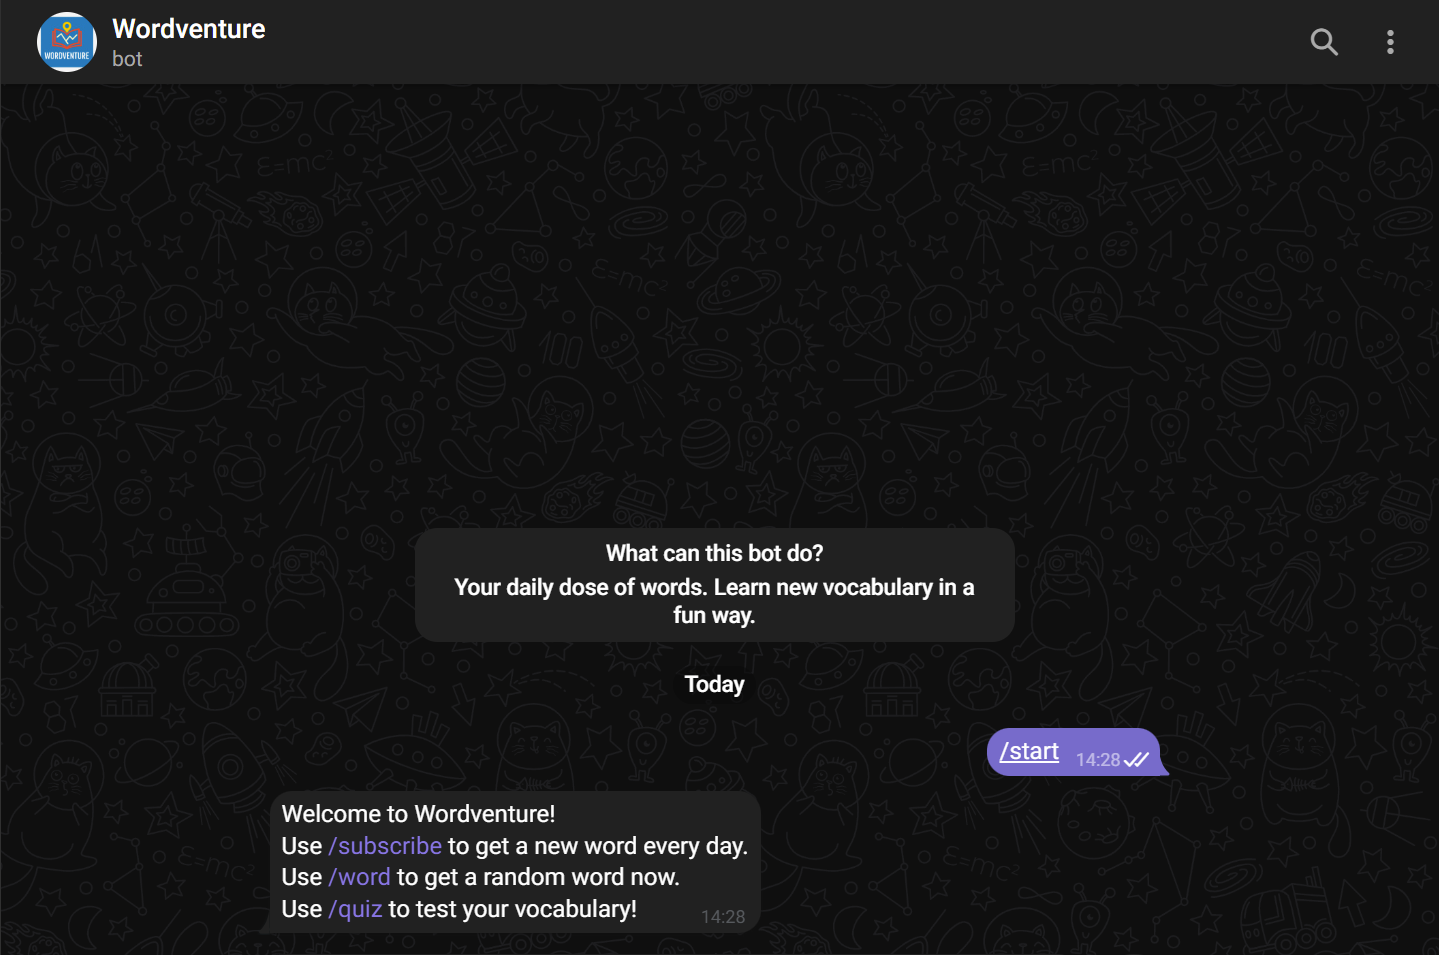
🤖 You can try the bot at @wordventure_bot.
JavaScript isn’t just for building websites anymore. It has become a powerful tool for building bots, automation scripts, and full-blown backend systems. With Node.js, you can tap into APIs, interact with databases, and run background jobs using the same language you already use in the browser.
Why Build a Telegram Bot with Node.js?
Telegram bots are a great way to automate workflows, send useful information, or build engaging interactions with users. But why use Node.js for it?
✅ Lightweight & Efficient: Node.js is event-driven and non-blocking, making it a perfect fit for bots that wait for messages or perform scheduled tasks.
✅ Familiar for Web Developers: If you’re already comfortable with JavaScript, there’s no need to learn another language just to build a bot.
✅ Huge Ecosystem: The npm ecosystem includes great libraries like node-telegram-bot-api, prisma, and others that help you build fast and clean.
✅ Easy to deploy: Platforms like Render and Glitch make it simple to get your bot live, often within minutes, even on a free plan.
The Problem: Learning New Words Can Be Boring and Ineffective
Language learning often feels like a chore. You’re either cramming flashcards or scrolling through apps that send you repetitive content with no context. Wouldn’t it be better if learning could feel more casual, like receiving a daily message from a friend?
The Solution: A Daily Word Bot on Telegram
That’s where our Telegram bot comes in. We’ll build a bot that sends users a new English word every day, complete with its definition and some multiple-choice alternatives to make it fun and interactive. Users can engage with the bot directly in Telegram, and you can automate everything, including background tasks like daily word delivery.
To do this, we’ll use:
✅ Node.js for the main logic and Telegram interaction
✅ node-telegram-bot-api to easily hook into Telegram’s Bot API
✅ Prisma ORM with PostgreSQL for managing users and tracking history
✅ Render for free deployment, including support for background jobs
✅ Scheduler to automate daily word delivery
In this tutorial, you’ll learn how to:
- Set up and configure a Telegram bot
- Handle both polling and webhook modes
- Build clean logic for bot commands
- Set up a scheduler for sending daily messages
- Deploy your bot on Render (or any other free platform)
💡 Deployment Notice
We’ll be using Render’s Free Web Service and Free PostgreSQL Database. These are great for hobby or personal projects, but they come with important limitations:
- 💤 The Web Service will go to sleep after 15 minutes of inactivity, which means the bot may have delayed responses after being idle.
- 🗃️ The Free PostgreSQL database expire 30 days after creation. An expired Free database is inaccessible unless you upgrade it to a paid instance type.
If you’re building this for long-term or production use, consider switching to their paid plans to ensure reliability and data persistence.
Creating Your Own Telegram Bot
Let’s dive into building this basic Telegram Bot that return a random word, get subscribers, and even return a word that scheduled daily.
Step 1: Getting Your Telegram Bot Token
To interact with the Telegram Bot API, you’ll need a bot token. Here’s how to get one:
- Open Telegram and search for @BotFather.
- Start a chat and run the
/newbotcommand. - Follow the instructions: give your bot a name and username (it must end with
bot, e.g.,dailyword_bot). - BotFather will give you an API token. Save this token, you’ll need it in your code.
You can also use /setdescription, /setabouttext, and /setuserpic to polish your bot’s profile.
Step 2: Project Setup
In this step, we’ll set up the foundational structure for our Telegram bot using Node.js. This includes installing dependencies, organizing folders, and preparing environment configurations. By doing this early, we ensure the project remains scalable and maintainable as features grow, such as daily word scheduling and user interactions.
We’ll use the node-telegram-bot-api package to interface with the Telegram Bot API, and Prisma as our ORM to manage user and log data in a PostgreSQL database. Environment variables will be managed with dotenv.
Let’s start by initializing a new Node.js project and installing the required packages:
mkdir telegram-daily-word-bot && cd telegram-daily-word-bot
npm init -y
npm install node-telegram-bot-api prisma @prisma/client dotenv node-cron axios
npm install nodemon --save-dev
Project structure:
telegram-daily-word-bot/
├── prisma/
│   └── schema.prisma               # Prisma schema for database models and connection
├── src/
│   ├── config/
│   │   ├── index.js                # Application and environment configurations
│   │   └── prisma.js               # Prisma client instance setup
│   ├── commands.js                 # Bot command definitions (e.g., /start, /quiz)
│   ├── scheduler.js                # Cron job setup to send daily words
│   ├── utils.js                    # Utility functions (e.g., fetch word data, formatting)
│   └── index.js                    # Entry point of the bot
├── .env                            # Environment variables (bot token, database URL, etc.)
└── package.json                    # Project metadata, dependencies, and scripts
Creating the Environment Configuration
To store sensitive configuration values like your Telegram bot token, database connection string, and application-specific settings, you’ll create a .env file in the root directory of your project. This .env file will help you manage these settings securely, ensuring that sensitive information such as API keys and database credentials are not hard-coded into your codebase.
Here’s an example of the .env file:
BOT_NAME="Wordventure"
BOT_TOKEN=your-telegram-token-here
DICTIONARY_BASE_API=https://api.dictionaryapi.dev/api

# This is the base URL of your app (such as https://example.com). If you're using ngrok for local development, you can insert the ngrok URL here for testing purposes.
APP_BASE_URL=your-app-url

APP_USE_WEBHOOK='true'
APP_PORT=3000

# Make sure to setup your Postgresql database
DATABASE_URL=postgresql://user:password@host:5432/dbname
To set up your PostgreSQL database, first make sure PostgreSQL is installed on your machine. If it’s not, download it from the official PostgreSQL site. After installation, open your terminal and create a new database using the psql command-line tool:
psql -U postgres
CREATE DATABASE dbname;
Replace dbname with the name you want to give your database. You should also create a new user with a secure password:
CREATE USER user WITH PASSWORD 'password';
GRANT ALL PRIVILEGES ON DATABASE dbname TO user;
After setting this up, update the DATABASE_URL in your .env file to match your database credentials in the following format:
DATABASE_URL=postgresql://user:password@localhost:5432/dbname
Once your environment variables and database are configured, the app will be ready to connect to both Telegram and your PostgreSQL instance securely.
Then, create a file at src/config/index.js and add the following code to load and export these values throughout your app:
require('dotenv').config();

const config = {
  botName: process.env.BOT_NAME || 'Wordventure',
  botToken: process.env.BOT_TOKEN,
  database: {
    url: process.env.DATABASE_URL,
  },
  dictionary: {
    baseApi: process.env.DICTIONARY_BASE_API,
  },
  app: {
    baseUrl: process.env.APP_BASE_URL,
    port: process.env.APP_PORT || 80,
    useWebhook: process.env.APP_USE_WEBHOOK == 'true',
    dailyWordSchedule: process.env.APP_DAILY_WORD_SCHEDULE || '0 9 * * *',
  },
};

if (!config.botToken) {
  throw new Error('❌ Token is missing');
}

module.exports = config;
By using src/config/index.js, you keep your configuration centralized and cleanly separated from logic. Any file that needs access to the configuration can simply import it like this:
const config = require('./config');
This sets the stage for your bot to be easily adaptable between development and production environments.
Step 3: Set Up Prisma for Database Access
In this step, we’ll use Prisma as our ORM (Object-Relational Mapping) tool to interact with a PostgreSQL database. Prisma offers a type-safe and modern way to handle database operations with ease.
1. Initialize the Prisma Setup
Since Prisma is already installed as part of the project dependencies, you can now initialize the Prisma setup by running:
npx prisma init
This will create:
✅ A prisma/schema.prisma file (where you’ll define your models)
✅ A .env file if not already present
✅ A prisma folder in your project
Since we already have a .env you can consolidate the one generated by Prisma.
2. Define Your Data Models
Inside prisma/schema.prisma, define the models used by your bot. Here’s a sample:
generator client {
  provider = "prisma-client-js"
}

datasource db {
  provider = "postgresql"
  url      = env("DATABASE_URL")
}

model Subscriber {
  id           Int      @id @default(autoincrement())
  chatId       BigInt   @unique
  subscribedAt DateTime @default(now())
}
This defines a Subscriber model with:
✅ chatId: The Telegram user’s unique chat ID
✅ subscribedAt: A timestamp when the user subscribed
3. Migrate the Database
After saving your schema, generate the Prisma client and run the migration:
npx prisma migrate dev --name init
This will:
✅ Create the tables in your PostgreSQL database
✅ Generate a local Prisma client to use in your code
In production, you should use:
npx prisma migrate deploy
To apply existing migrations safely.
4. Initialize Prisma in Your App
Create a new file at src/config/prisma.js:
const { PrismaClient } = require('@prisma/client');
const prisma = new PrismaClient();
module.exports = prisma;
You can now import prisma anywhere to run database queries:
const prisma = require('../config/prisma');
Step 5: Defining Bot Commands with registerCommands
Now that our bot is connected and Prisma is set up, let’s give it a brain! This step is all about making the bot interactive with real commands that users can send, such as /start, /subscribe, /word, and /quiz.
Here’s how we organize our logic:
We define a registerCommands(bot) function that takes a bot instance and attaches various command listeners using bot.onText(...).
const config = require('./config');
const prisma = require('./config/prisma');
const { fetchWordData, getRandomWord, formatWordMessage } = require('./utils');

function registerCommands(bot) {
  bot.onText(/\/(start|help)/, (msg) => {
    bot.sendMessage(
      msg.chat.id,
      `Welcome to ${config.botName}!
Use /subscribe to get a new word every day.
Use /word to get a random word now.
Use /quiz to test your vocabulary!`
    );
  });

  bot.onText(/\/subscribe/, async (msg) => {
    try {
      const existingSubscriber = await prisma.subscriber.findUnique({
        where: { chatId: msg.chat.id },
      });

      if (existingSubscriber) {
        return bot.sendMessage(msg.chat.id, 'You are already subscribed!');
      }

      // Add subscriber to the database
      await prisma.subscriber.create({
        data: {
          chatId: msg.chat.id,
        },
      });

      bot.sendMessage(msg.chat.id, `✅ Subscribed! You'll get a new word daily.`);
    } catch (error) {
      console.error('Error subscribing user:', error);
      bot.sendMessage(msg.chat.id, `❌ Failed to subscribe. Please try again later.`);
    }
  });

  bot.onText(/\/unsubscribe/, async (msg) => {
    try {
      const existingSubscriber = await prisma.subscriber.findUnique({
        where: { chatId: msg.chat.id },
      });

      if (!existingSubscriber) {
        return bot.sendMessage(msg.chat.id, 'You are not subscribed!');
      }

      // Remove subscriber from the database
      await prisma.subscriber.delete({
        where: { chatId: msg.chat.id },
      });

      bot.sendMessage(msg.chat.id, `❌ Unsubscribed. Come back soon!`);
    } catch (error) {
      console.error('Error unsubscribing user:', error);
      bot.sendMessage(msg.chat.id, `❌ Failed to unsubscribe. Please try again later.`);
    }
  });

  bot.onText(/\/word/, async (msg) => {
    const word = getRandomWord();
    const data = await fetchWordData(word);
    if (data) {
      bot.sendMessage(msg.chat.id, formatWordMessage(data), { parse_mode: 'Markdown' });
    } else {
      bot.sendMessage(msg.chat.id, 'Sorry, please try again.');
    }
  });

  bot.onText(/\/quiz/, async (msg) => {
    const correctWord = getRandomWord();
    const correctData = await fetchWordData(correctWord);
    if (!correctData) return bot.sendMessage(msg.chat.id, 'Error getting quiz word.');

    const choices = [correctData.definitions[0].definition];
    while (choices.length < 4) {
      const otherWord = getRandomWord();
      const data = await fetchWordData(otherWord);
      if (data && !choices.includes(data.definitions[0].definition)) {
        choices.push(data.definitions[0].definition);
      }
    }

    // Shuffle and assign IDs
    const shuffled = choices
      .map((definition, index) => ({ definition, id: `opt${index}` }))
      .sort(() => 0.5 - Math.random());

    // Store answer for comparison later
    const correctAnswerId = shuffled.find(c => c.definition === correctData.definitions[0].definition).id;

    // Create inline keyboard buttons
    const inlineKeyboard = shuffled.map((choice) => ([{
      text: choice.definition.slice(0, 100) + (choice.definition.length > 100 ? '...' : ''),
      callback_data: choice.id,
    }]));

    bot.sendMessage(msg.chat.id, `What does *${correctWord}* mean?`, {
      parse_mode: 'Markdown',
      reply_markup: { inline_keyboard: inlineKeyboard },
    });

    bot.once('callback_query', (query) => {
      const selectedChoice = shuffled.find(c => c.id === query.data);
      const isCorrect = query.data === correctAnswerId;

      bot.sendMessage(query.message.chat.id,
        `${isCorrect ? '*✅ Correct!*\n\n' : '*❌ Wrong!*\n\n'} *Your answer*: ${selectedChoice.definition}${!isCorrect ? `\n\n*Correct answer*: ${correctData.definitions[0].definition}` : ''}`,
        { parse_mode: 'Markdown' }
      );
    });
  });
}

module.exports = {
  registerCommands,
};
In this step, we bring our Telegram bot to life by defining a set of core user commands that are both interactive and practical. We encapsulate all command logic inside a function called registerCommands(bot), which is designed to be called from our main entry file after the bot has been initialized. The purpose here is to keep the bot’s command definitions modular and maintainable.
We begin by implementing the /start and /help commands together. These act as an introductory message for new users, giving them a clear overview of what the bot can do and how to use it. It’s a friendly touchpoint that sets the tone and guides the user experience.
Next, we implement subscription management through /subscribe and /unsubscribe. These commands are connected to our database via Prisma. When a user subscribes, we first check if their chatId already exists in the database to avoid duplicates. If not, we add them as a subscriber. The unsubscribe logic works similarly but in reverse, it checks for existence and deletes the entry if found. These features lay the groundwork for delivering daily content to users in a personalized and persistent way.
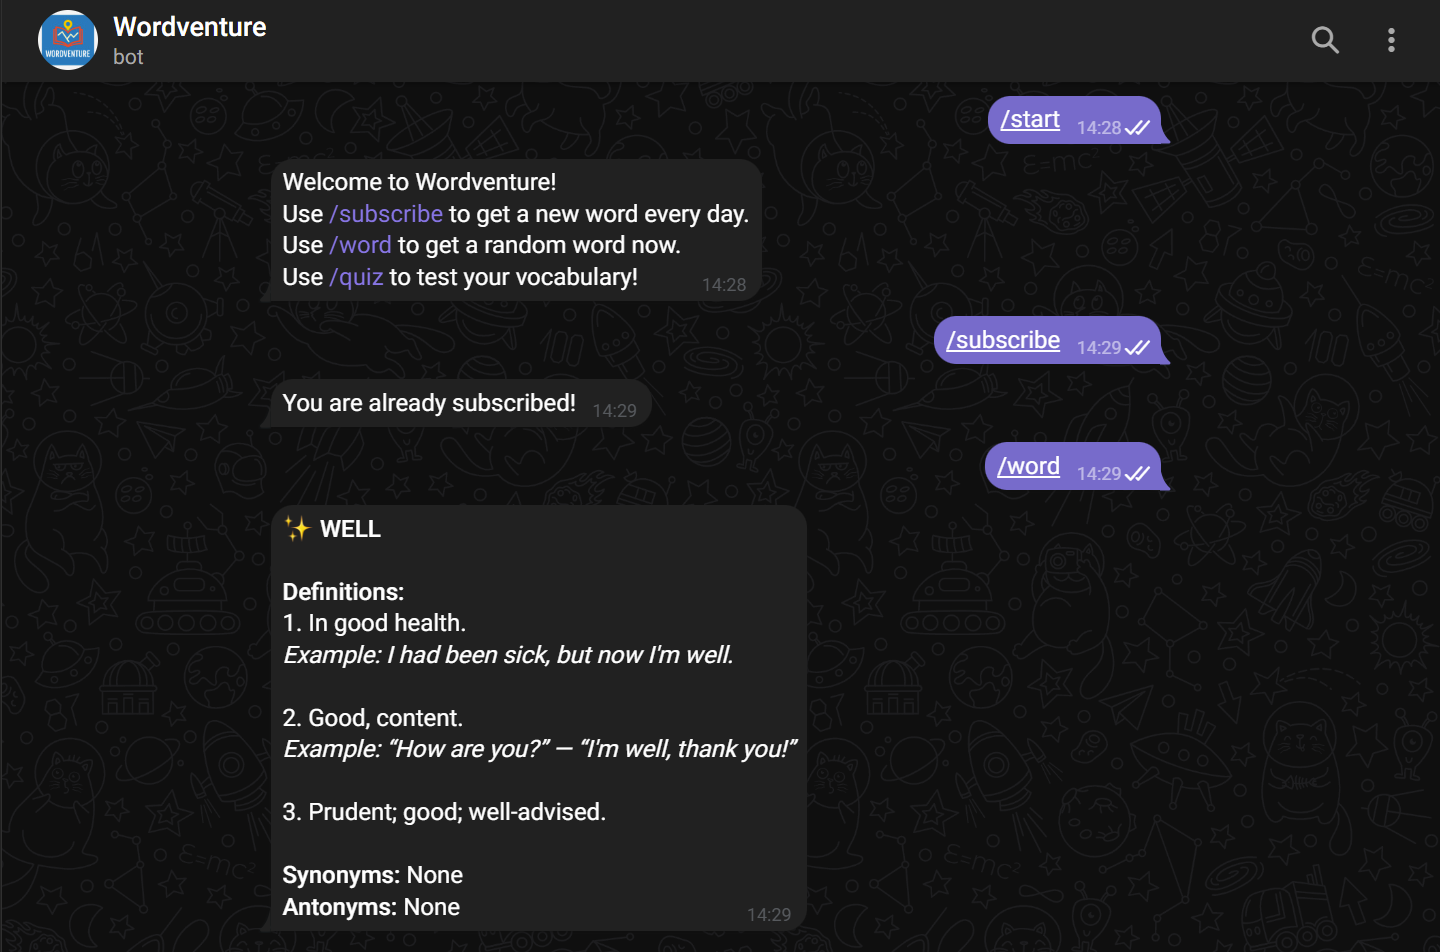
The /word command provides instant value by sending a random word and its meaning to the user. It uses helper functions, getRandomWord, fetchWordData, and formatWordMessage, to keep the logic clean and reusable. If no data is found, the bot handles it gracefully with a fallback message.
Finally, the /quiz command makes the experience more engaging. It randomly selects a word, fetches its meaning, and then creates a multiple-choice quiz with one correct and three incorrect definitions. Choices are shuffled and presented as inline keyboard buttons. Once a user selects an answer, the bot responds with either a congratulatory message or an explanation of the correct answer, all while using rich formatting to enhance clarity.
This command structure transforms the bot from a static tool into a dynamic and educational assistant. Each command is focused, modular, and designed to provide immediate feedback, ensuring a smooth and interactive user journey. By separating database logic, utilities, and command definitions, we also make the codebase easy to grow and maintain in the future.
Step 6: Word Logic & Formatter Utilities
This file handles the core logic of the bot’s vocabulary features. It reads a list of words, picks one randomly, fetches its data from a dictionary API, and formats that data into a neat message suitable for Telegram output.
const axios = require('axios');
const fs = require('fs');
const path = require('path');
const config = require('./config');

// Load the words from the file (one word per line)
const wordFilePath = path.join(__dirname, '../data/words.txt');
const wordList = fs.readFileSync(wordFilePath, 'utf-8')
  .split('\n')
  .filter(Boolean);

function getRandomWord() {
  const index = Math.floor(Math.random() * wordList.length);
  return wordList[index].trim();
}

async function fetchWordData(word) {
  try {
    const res = await axios.get(`${config.dictionary.baseApi}/v2/entries/en/${word}`);
    const data = res.data[0];

    const definitions = data.meanings[0]?.definitions;

    const synonyms = data.meanings[0]?.synonyms || [];
    const antonyms = data.meanings[0]?.antonyms || [];

    return {
      word: data.word,
      definitions,
      synonyms,
      antonyms,
    };
  } catch (err) {
    console.error(err);
    console.error(`Error fetching data for word "${word}": ${err.message}`);
    return null;
  }
}

function formatWordMessage(wordData) {
  // Format definitions as a numbered list
  let definitionsText = wordData.definitions.length
    ? wordData.definitions
      .map((def, i) => {
        let entry = `${i + 1}. ${def.definition}`;
        if (def.example) {
          entry += `\n_Example: ${def.example}_`;
        }
        return entry;
      })
      .join('\n\n')
    : 'No definition available.';

  // Format synonyms and antonyms
  const synonymsText = wordData.synonyms.length ? wordData.synonyms.join(', ') : 'None';
  const antonymsText = wordData.antonyms.length ? wordData.antonyms.join(', ') : 'None';

  return `✨ *${wordData.word.toUpperCase()}*\n\n*Definitions:*\n${definitionsText}\n\n*Synonyms:* ${synonymsText}\n*Antonyms:* ${antonymsText}`;
}

function formatDailyWordMessage(wordData) {
  return `✨ *Word of the Day* ✨\n\n${formatWordMessage(wordData)}`;
}

module.exports = {
  getRandomWord,
  fetchWordData,
  formatWordMessage,
  formatDailyWordMessage,
};
We start by reading a text file called words.txt which contains a list of English words (one per line). This file is located in the data/ directory. To populate this list, you can get a collection of vocabulary words from the repository English-Vocabulary-Word-List on GitHub. Simply download the word list from there and save it as words.txt inside the data/ folder of your project.
data/words.txt:
abolish
abortion
absence
absent
absorb
abstract
...
Once the list of words is ready, the script reads the file and splits it into an array (wordList) where each word is a separate entry. It filters out any empty lines, ensuring clean data.
The getRandomWord() function simply selects a random index using Math.floor(Math.random() * wordList.length) and returns a word from the list. This is what the bot will use when it needs to feature a new word.
Next, fetchWordData(word) sends a GET request to the dictionary API (configured in the config.js file). It extracts the first entry from the response, then grabs the definitions, synonyms, and antonyms from the first meanings object. It handles potential errors gracefully by catching them and returning null.
Once we have the word data, formatWordMessage(wordData) takes care of making it look clean and readable. It loops through each definition and adds its example usage if available. Synonyms and antonyms are listed at the bottom, or it shows ‘None’ if they don’t exist.
Lastly, formatDailyWordMessage() is just a wrapper that prepends a title like “Word of the Day” to the message. This is the function you’d use when scheduling daily posts.
Together, this module keeps all word logic centralized and reusable, making it easy to format vocabulary content however and wherever it’s needed.
Step 7: Scheduling and Sending Daily Words to Subscribers
In this part of the project, we will set up a cron job to send the “Word of the Day” to all subscribers of the bot at a scheduled time. The script will fetch a random word, retry fetching it if there’s an error, and send the formatted word message to all subscribers.
const config = require('./config');
const prisma = require('./config/prisma');
const { fetchWordData, getRandomWord, formatDailyWordMessage } = require('./utils');
const cron = require('node-cron');

function startScheduler(bot) {
  cron.schedule(config.app.dailyWordSchedule, async () => {
    console.log("Sending daily words to all subscribers...");
    await sendWordToAllSubscribers(bot);
  });
}

async function sendWordToAllSubscribers(bot) {
  let data;
  const retries = 3;
  let attempt = 1;

  while (attempt <= retries && !data) {
    const word = getRandomWord();
    console.log(`Attempt ${attempt} to fetch word data for "${word}"`);

    data = await fetchWordData(word);

    if (!data) {
      console.log(`Failed to fetch data for "${word}", retrying another word...`);
      if (attempt < retries) {
        const seconsdsToWait = 1000 * 2;
        await new Promise(resolve => setTimeout(resolve, seconsdsToWait));
      }
    }

    attempt++;
  }

  const message = formatDailyWordMessage(data);

  const subscribers = await prisma.subscriber.findMany();

  subscribers.forEach((subscriber) => {
    const chatId = subscriber.chatId.toString();
    bot.sendMessage(chatId, message, { parse_mode: 'Markdown' });
  });
};

module.exports = {
  startScheduler,
};
In this script, we define the logic to automatically send a daily word to all subscribers using a scheduled task. The cron job is set up to trigger at a specific time each day, as defined in the config.app.dailyWordSchedule. The main function, startScheduler, schedules the task, while sendWordToAllSubscribers handles fetching word data, retrying if necessary, and sending the formatted word message to all subscribers.
Key points:
- The script interacts with the database using Prisma to fetch the list of subscribers and send the messages.
- Word data is fetched using the utility functions from
utils.js, and a retry mechanism is in place if fetching fails.
Step 8: Combine all the code in index.js
Now, finally we will configure it to run in either Webhook or Polling mode, depending on the app configuration, and integrate it with the scheduler that sends daily word messages to all subscribers. This will automate the process of delivering a “Word of the Day” message to your bot subscribers.
Create a new file at src/index.js and add the following code:
const TelegramBot = require('node-telegram-bot-api');
const { registerCommands } = require('./commands');
const { startScheduler } = require('./scheduler');
const config = require('./config');

const PORT = config.app.port;
const USE_WEBHOOK = config.app.useWebhook;
const WEBHOOK_PATH = `/bot${config.botToken}`;
const WEBHOOK_URL = `${config.app.baseUrl}${WEBHOOK_PATH}`;

let bot;

if (USE_WEBHOOK) {
  bot = new TelegramBot(config.botToken, { webHook: { port: PORT } });

  bot.setWebHook(WEBHOOK_URL)
    .then(() => console.log('✅ Webhook set:', WEBHOOK_URL))
    .catch(err => console.error('🚨 Failed to set webhook:', err.response?.body || err));
} else {
  bot = new TelegramBot(config.botToken, { polling: true });
  console.log('📡 Bot started in polling mode');
}

registerCommands(bot);
startScheduler(bot);
This script sets up a Telegram bot using the node-telegram-bot-api package, with configuration details loaded from the config file. The bot can be run in either Webhook mode or Polling mode, depending on the configuration.
We use the APP_USE_WEBHOOK config in the .env file to control whether the bot runs in webhook mode or polling mode. This flexibility is important because different deployment platforms have different levels of support for incoming connections.
- If Webhook mode is enabled (
USE_WEBHOOKis true), the bot is initialized with webhook settings, meaning it will listen for updates from Telegram via a specific URL. The URL is constructed using the bot’s token and the base URL of the app. ThesetWebHookmethod is used to set the webhook, and success or failure is logged. - If Polling mode is enabled (when
USE_WEBHOOKis false), the bot uses long polling to regularly check for updates from Telegram. This ensures the bot remains responsive, continuously listening for incoming messages or commands.
After initializing the bot, the script registers custom commands through the registerCommands function, allowing the bot to respond to user inputs. Additionally, the startScheduler function is called to schedule the daily “Word of the Day” message, which will be sent automatically to all subscribers at the configured time.
Step 9: Setting Up the package.json
At this point, we’ll configure the package.json file to define our bot’s metadata, dependencies, scripts, and runtime engine requirements. This setup will help us manage the project easily, run it in development or production, and automate Prisma-related tasks after installation.
Here’s what your package.json should look like:
{
  "name": "dailyword-bot",
  "version": "1.0.0",
  "description": "A Telegram bot for daily words and quizzes",
  "main": "src/index.js",
  "scripts": {
    "dev": "nodemon src/index.js",
    "start": "node src/index.js",
    "postinstall": "prisma migrate deploy && prisma generate"
  },
  "dependencies": {
    "@prisma/client": "^5.22.0",
    "axios": "^0.27.2",
    "dotenv": "^16.5.0",
    "node-cron": "^3.0.3",
    "node-telegram-bot-api": "^0.58.0",
    "prisma": "^5.22.0"
  },
  "author": "your-author-name",
  "license": "MIT",
  "engines": {
    "node": "16.x"
  }
}
In this step, we define the package.json file which serves as the blueprint of our Node.js project. It contains essential metadata like the project’s name, version, and description, along with instructions for running and managing the bot. The main field points to the entry file of our application, in this case src/index.js.
Under the scripts section, we define helpful commands: dev runs the bot with nodemon for automatic reload during development, start runs it in a regular Node.js environment for production, and postinstall ensures that after any installation, Prisma migrations are deployed and the client is generated. This is especially useful when deploying to environments like Render or Vercel where a post-install hook is crucial.
The dependencies section lists all the packages the bot relies on to function. We also specify "node": "16.x" under the engines field to ensure consistency in the Node.js version across different environments. Altogether, this setup prepares the project for both development and deployment, keeping it clean, efficient, and maintainable.
Step 10: Try it Out
Now that everything is set up, it’s time to run the bot locally and expose it to the internet using ngrok. This allows Telegram’s servers to reach your local development server via a secure HTTPS URL.
1. Start Your Bot Locally
In your terminal, start the bot using the following command:
npm run dev
This will start your Telegram bot on the port specified in your .env file (e.g. 3000), either using polling or webhook based on your config.
2. Expose Your Localhost via ngrok
In another terminal tab or window, run:
ngrok http 3000
Replace 3000 with the port you defined in your .env file if it’s different.
You’ll see output like this:
Forwarding https://random-subdomain.ngrok.io -> http://localhost:3000
Copy the https:// URL provided by ngrok.
3. Update Your .env with the ngrok URL
Edit your .env file and replace APP_BASE_URL with the ngrok HTTPS URL:
APP_BASE_URL=https://random-subdomain.ngrok.io
Make sure you keep /bot<token> off the end, the app will add that part automatically.
4. Restart Your Bot
After updating the .env, stop and restart the bot so it uses the new webhook URL:
npm run dev
If you’re using webhook mode, you should see something like:
✅ Webhook set: https://random-subdomain.ngrok.io/bot<your-token>
5. Test It on Telegram
Go to your bot (https://t.me/<your_bot_username>) on Telegram and type /start or any command you’ve registered.
If everything is working correctly, the bot will respond as expected.
Here are the usage examples:
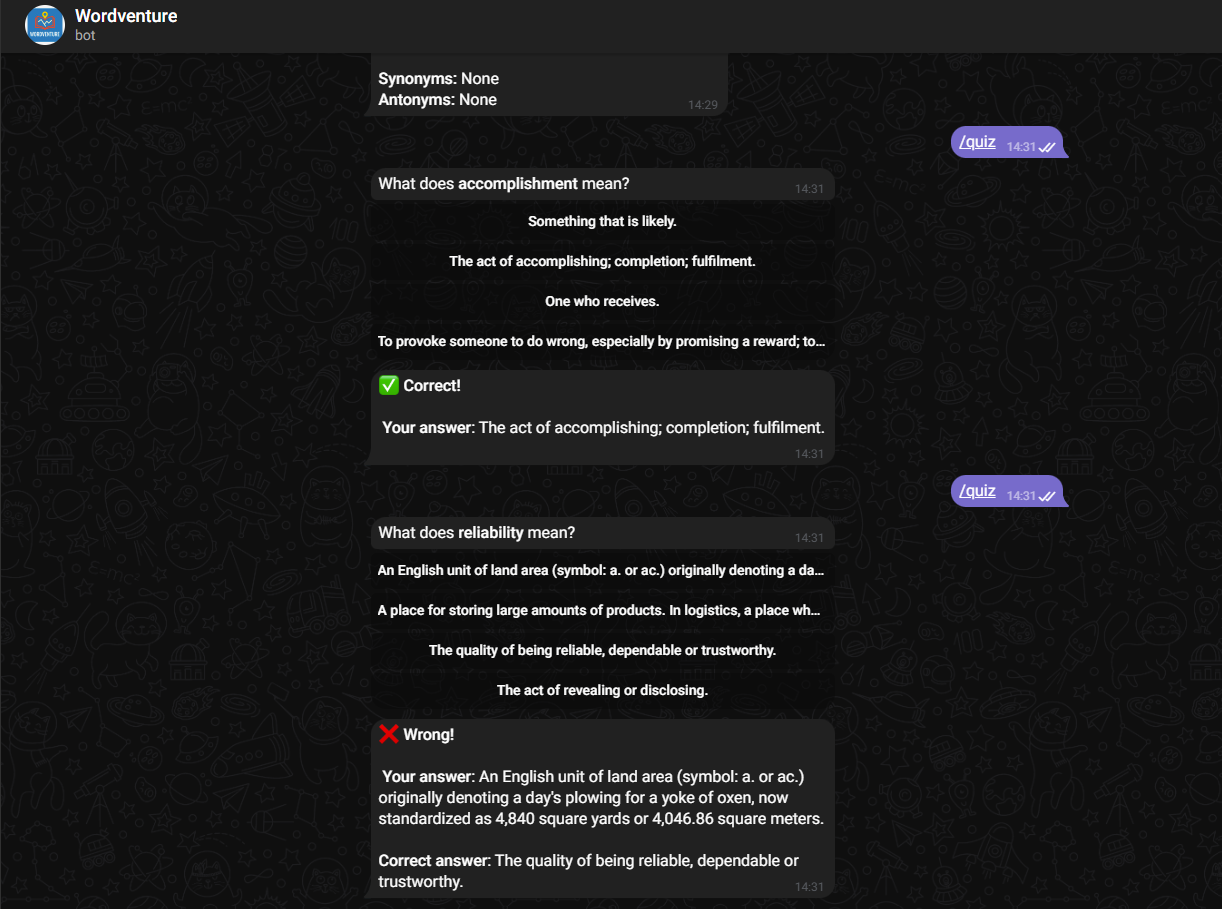
🧪 Testing the Scheduler
If you want to test the daily word delivery feature immediately, you can temporarily change the cron expression inscheduler.jsto run every minute (e.g.* * * * *). This will allow you to verify that scheduled messages are sent as expected. Just don’t forget to revert it back to a daily interval (e.g.0 9 * * *) once you’re done testing to avoid spamming your users.
Step 11: Deploy to Render.com
In this step, we’ll deploy your Telegram bot to Render, a platform that makes hosting Node.js apps simple and efficient. We’ll also configure it to use webhooks, as we will use “Web Service” service.
📝 Note: Deployment is optional. You can run the bot locally using polling mode, or choose a different platform like Railway, Fly.io, or even a VPS. However, Render’s free tier is a convenient option for most hobby projects.
We’ll use the Web Service type because:
- It supports public-facing apps, required for Telegram webhooks
- It allows us to set environment variables
- It automatically redeploys on Git push
Later, we’ll also configure a PostgreSQL database using Render’s free managed database service. Keep in mind:
- Web Services (Free Tier) sleep after 15 minutes of inactivity
- Free PostgreSQL instances may have their data wiped after 30 days
This setup is ideal for learning, testing, and personal use, but consider upgrading to paid services for production use. Let’s proceed! 🚀
Prerequisites
Before proceeding, make sure you have:
- A GitHub account
- Your project pushed to a GitHub repository
- A Render account
1. Push Your Code to GitHub
If you haven’t already, create a new GitHub repository and push your bot’s code:
git init
git add .
git commit -m "Initial commit"
git remote add origin https://github.com/your-username/your-repo-name.git
git push -u origin main
2. Create a PostgreSQL Database on Render
Before setting up your Web Service, you need to create a PostgreSQL database that your bot can connect to.
- Go to your Render Dashboard
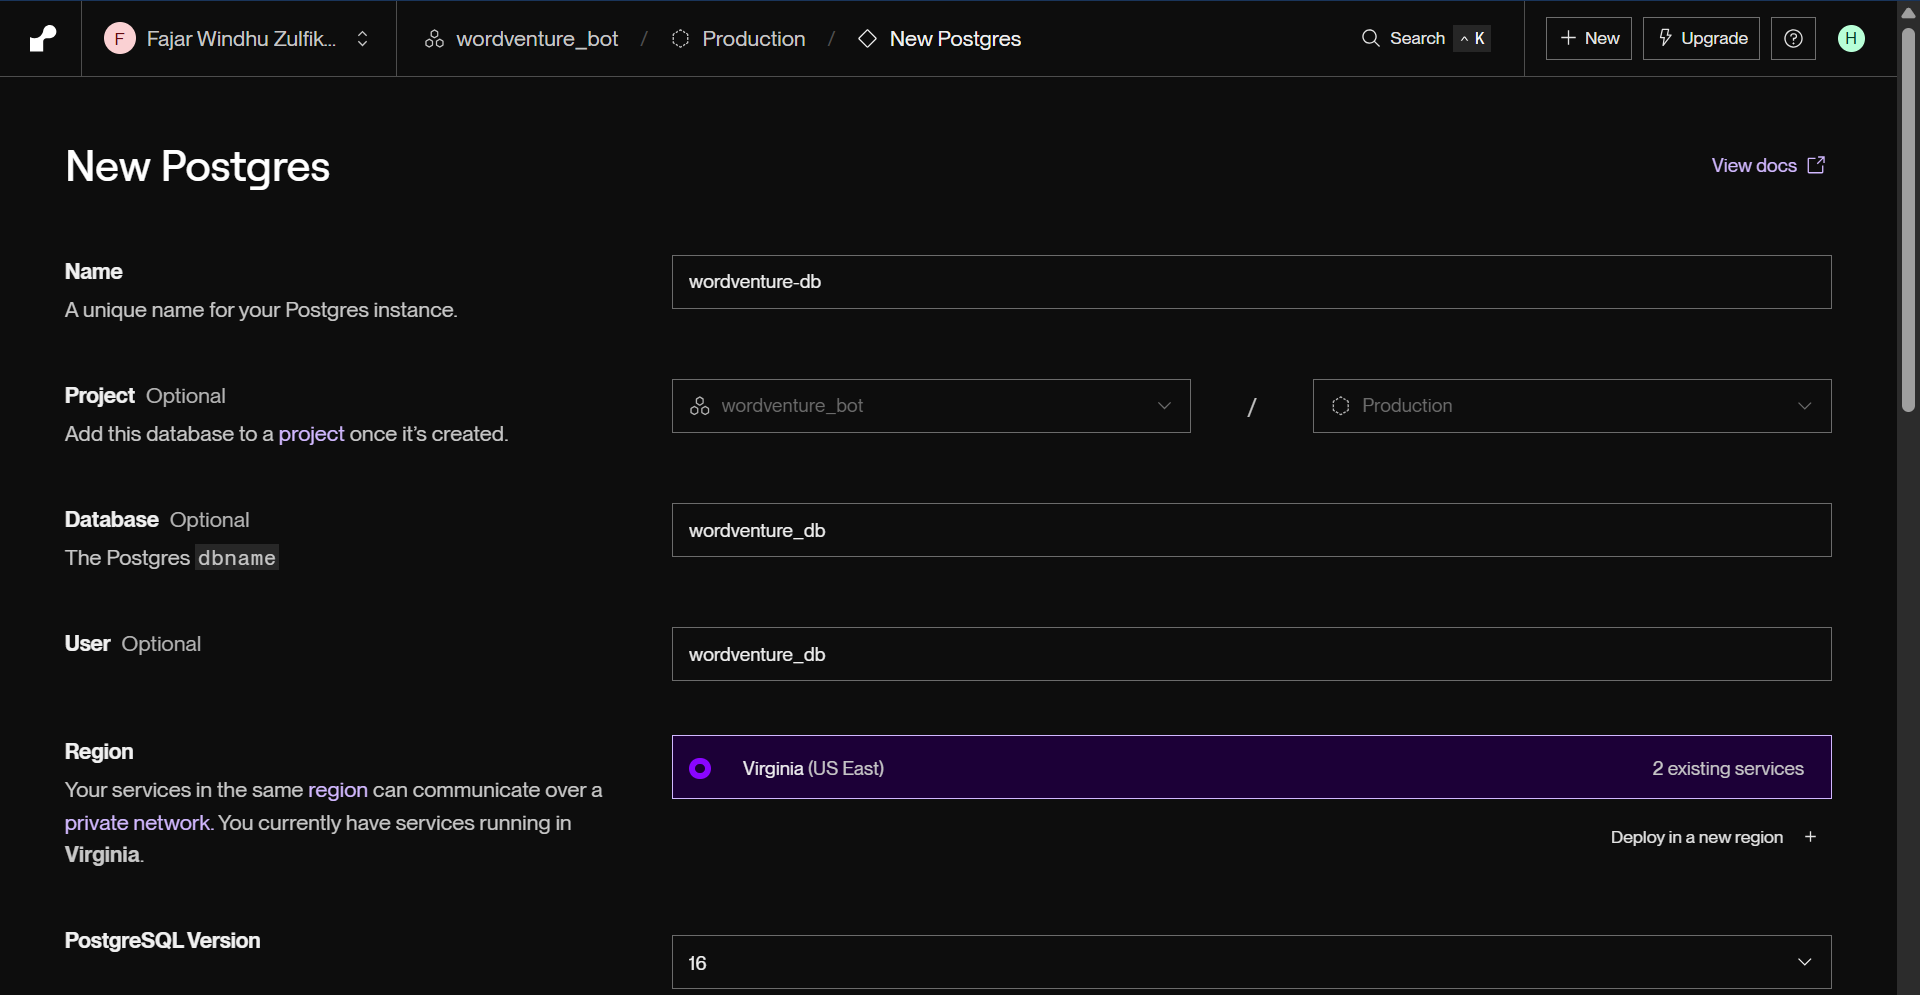
- Click “New +” → “PostgreSQL”
- Fill in the required details:
Name: wordventure-db (or anything you like)
Database: wordventure_db (or anything you like)
User: wordventure_db (or anything you like)
Region: Match this with the region of your Web Service for best performance
Instance Type: You can choose the Free tier (Free | $0/ month | 256 MB (RAM) | 0.1 CPU | 1 GB (Storage)), which is great for development or hobby use. (Note: Free databases on Render may be deleted after 30 days of inactivity)
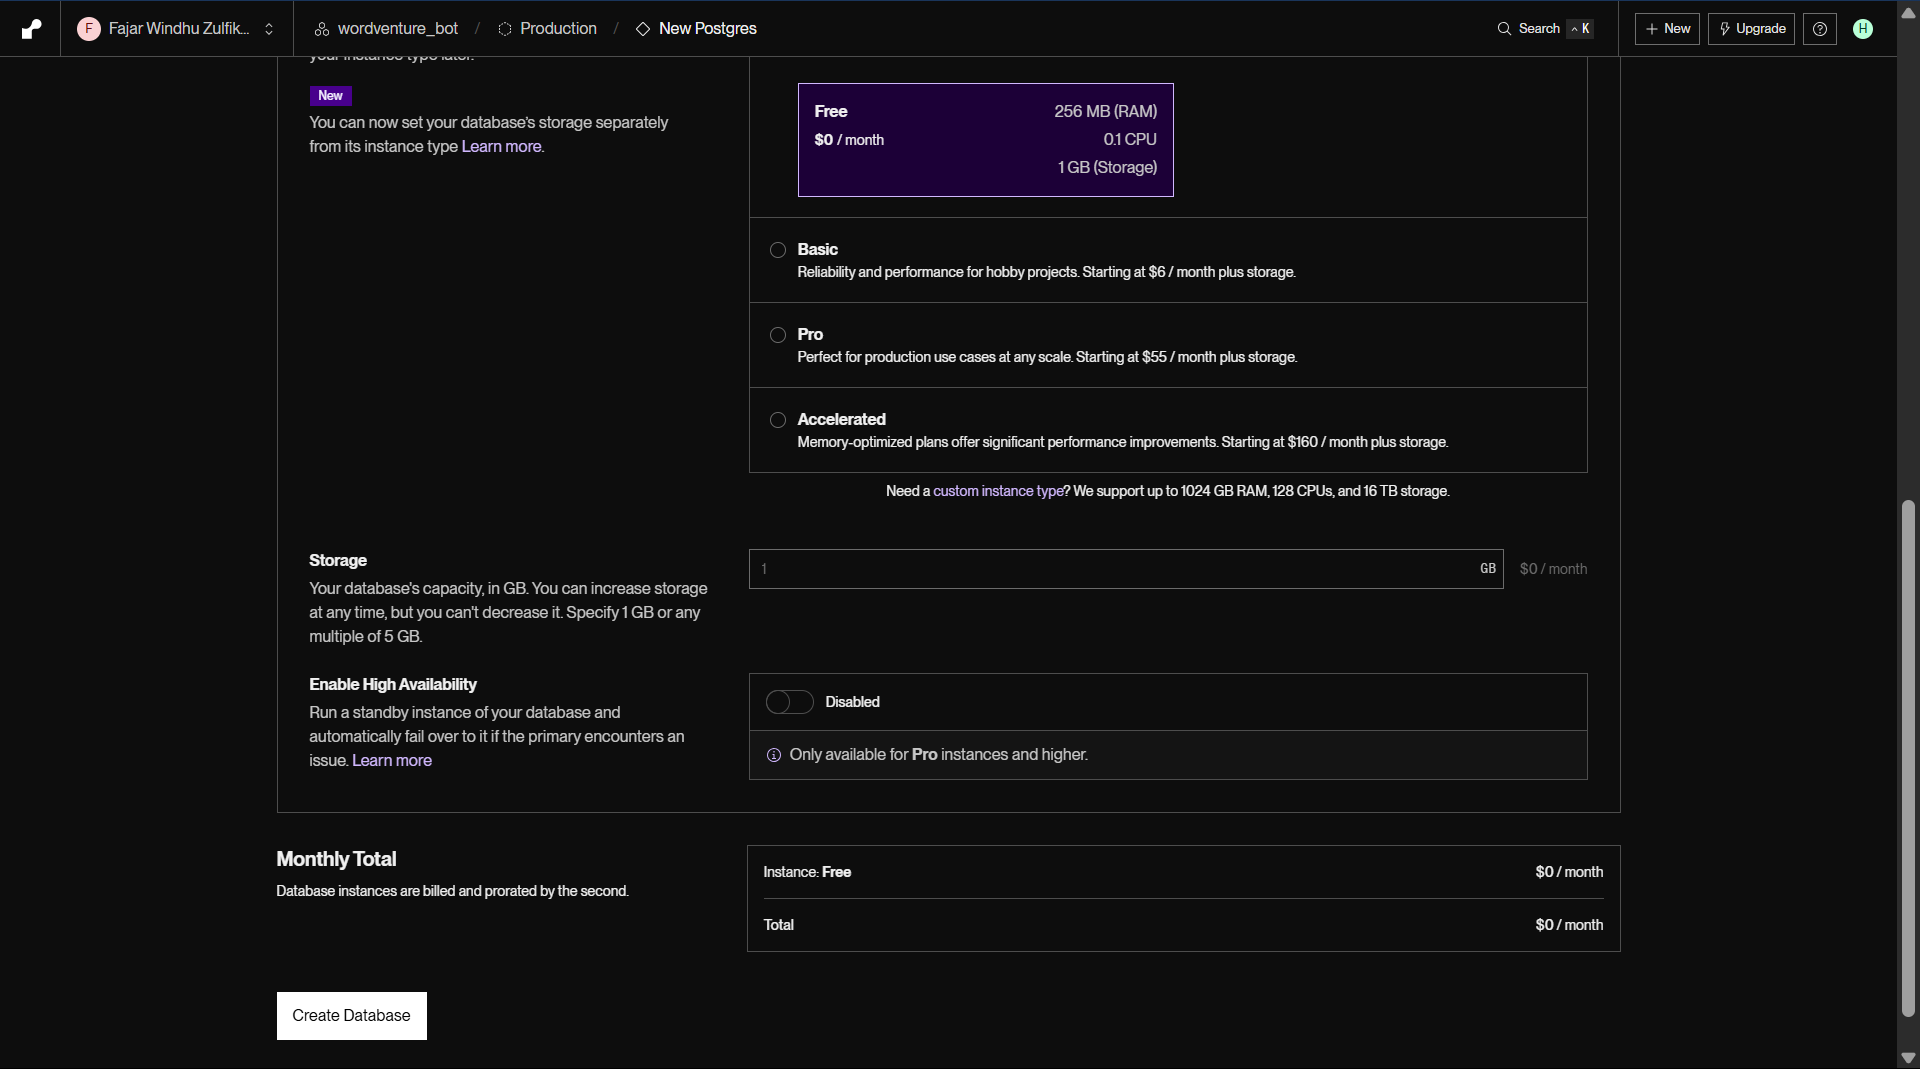
Once created, copy the Internal Database URL, you’ll need this for your .env file later as DATABASE_URL.

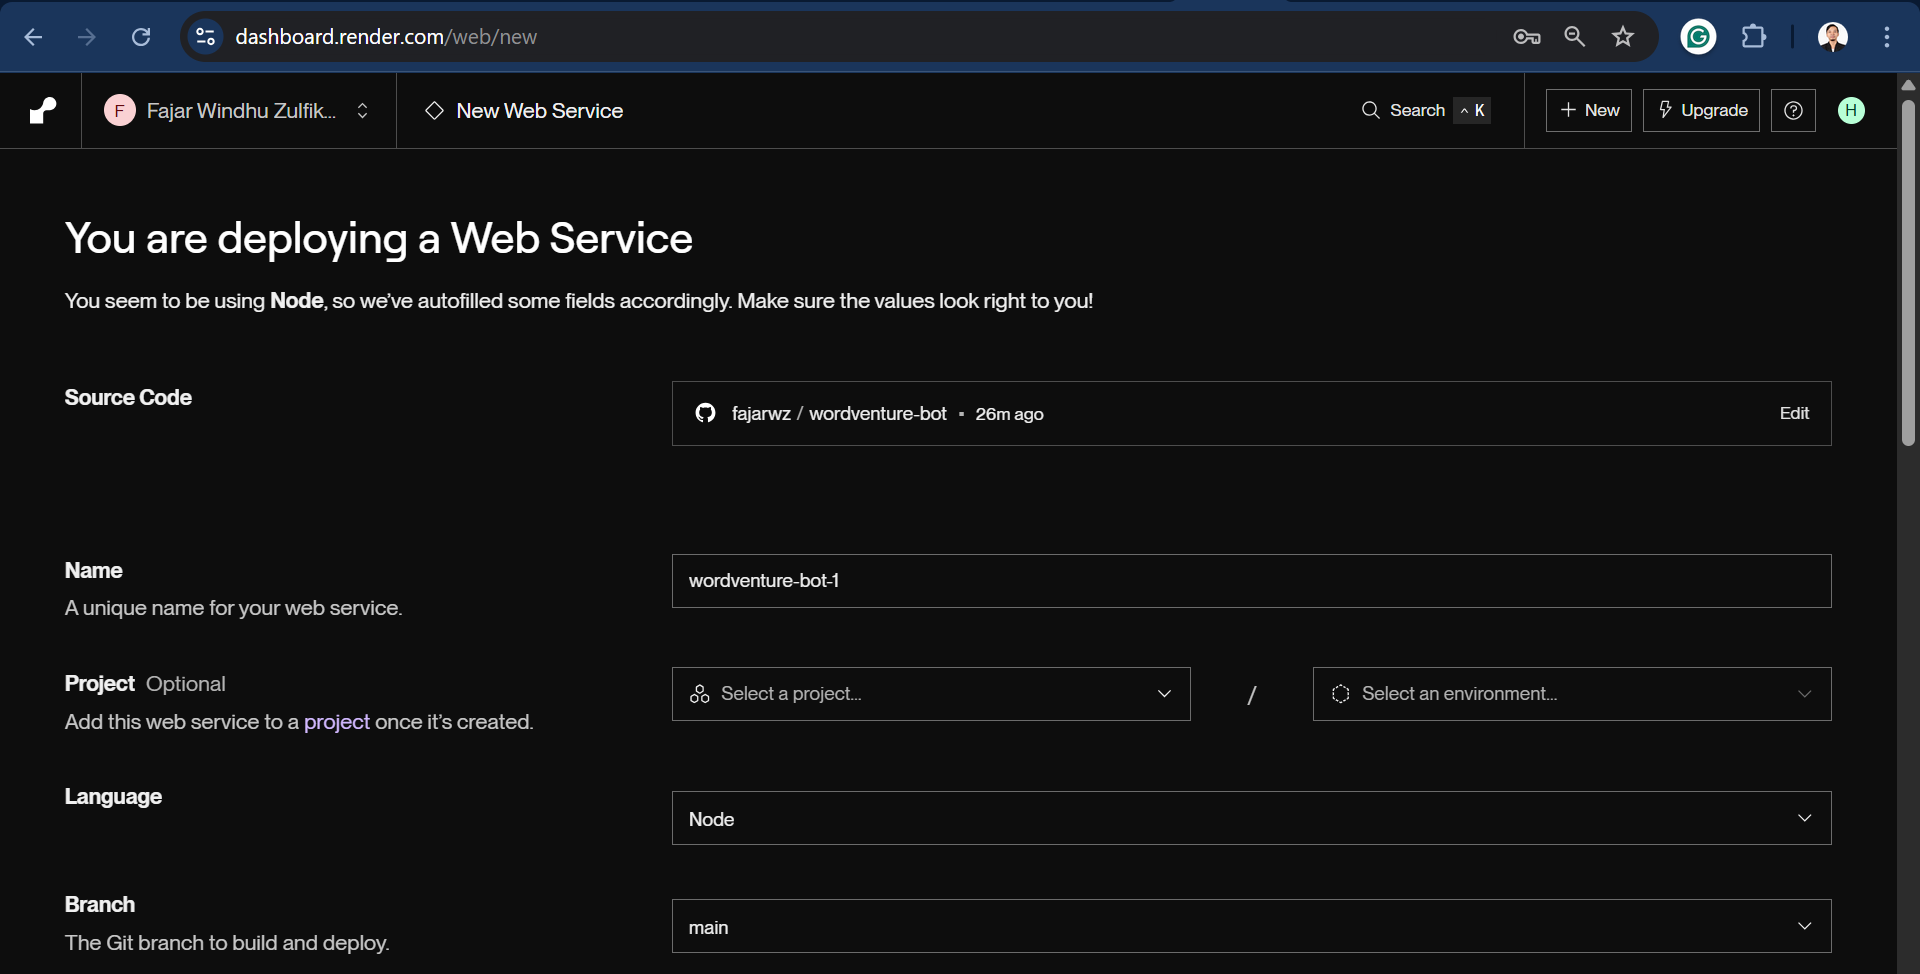
3. Create a New Web Service on Render
- Go to https://render.com/dashboard
- Click “New +” → “Web Service”
- Connect your GitHub account and choose your bot’s repository.
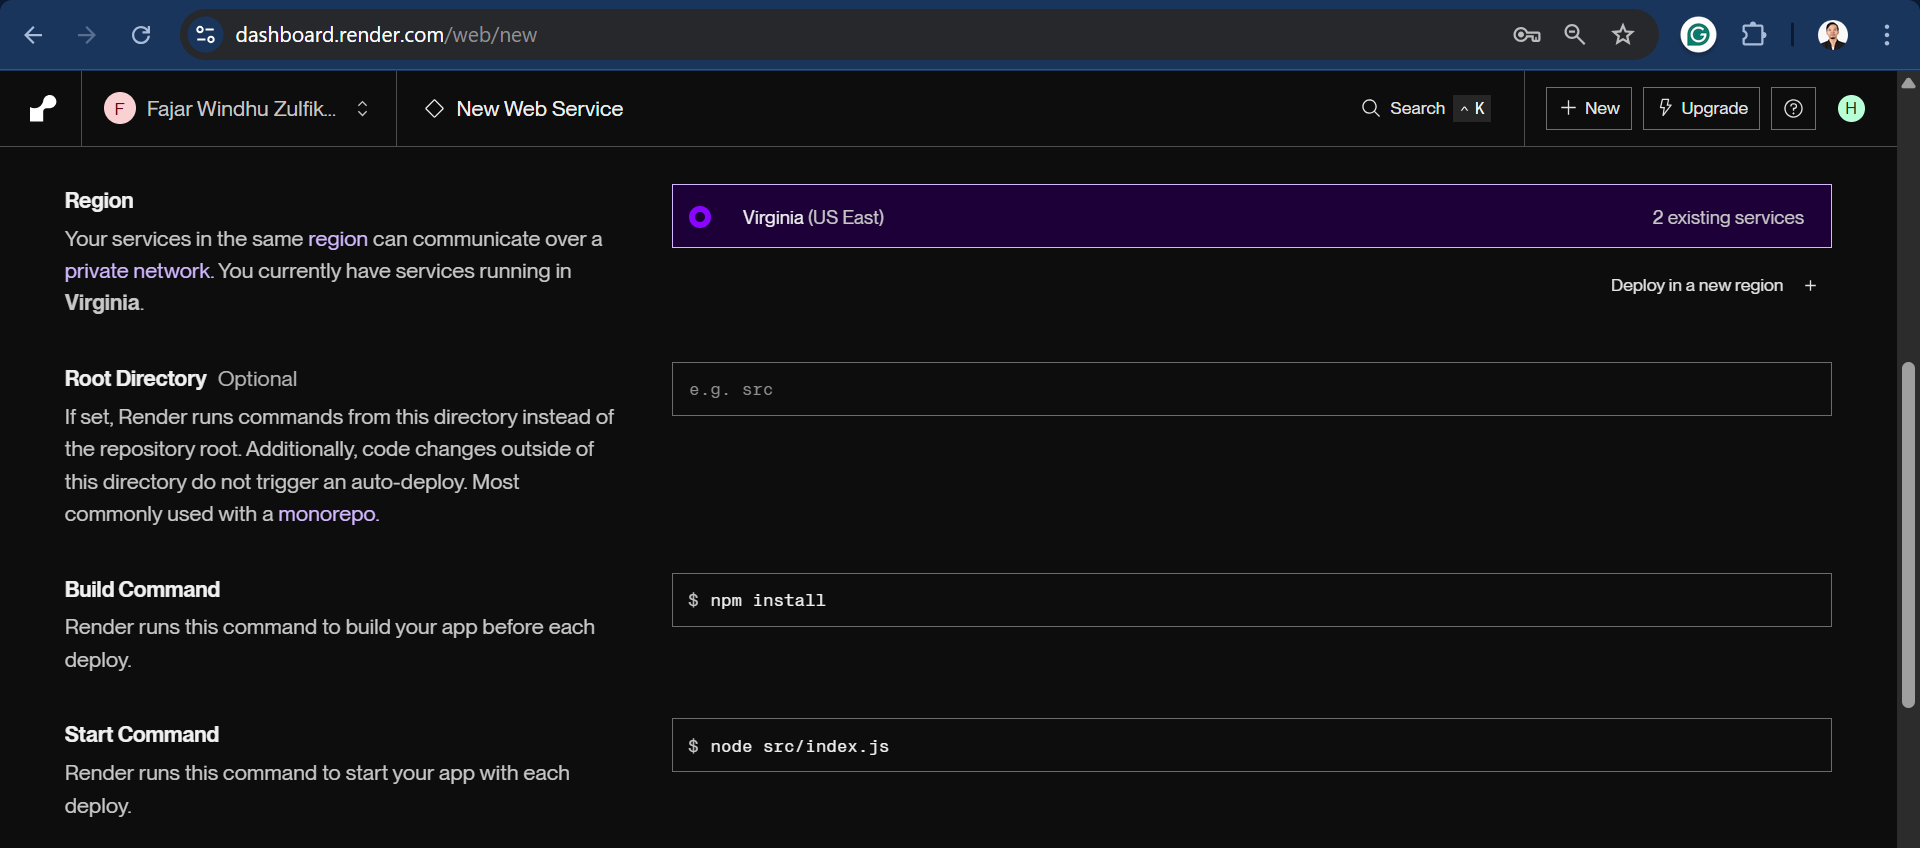
- Fill in the deployment details, for example:
Name: wordventure-bot (or whatever you like)
Language: Node
Branch: main (or whatever branch you use)
Region: Choose a region close to your users
Build Command: (leave blank, or set to npm install)
Start Command: "npm start" or keep "node src/index.js"
Instance Type: Choose Free | $0/month | 512 MB (RAM) | 0.1 CPU
Environment Variables: We will explore this on the next step
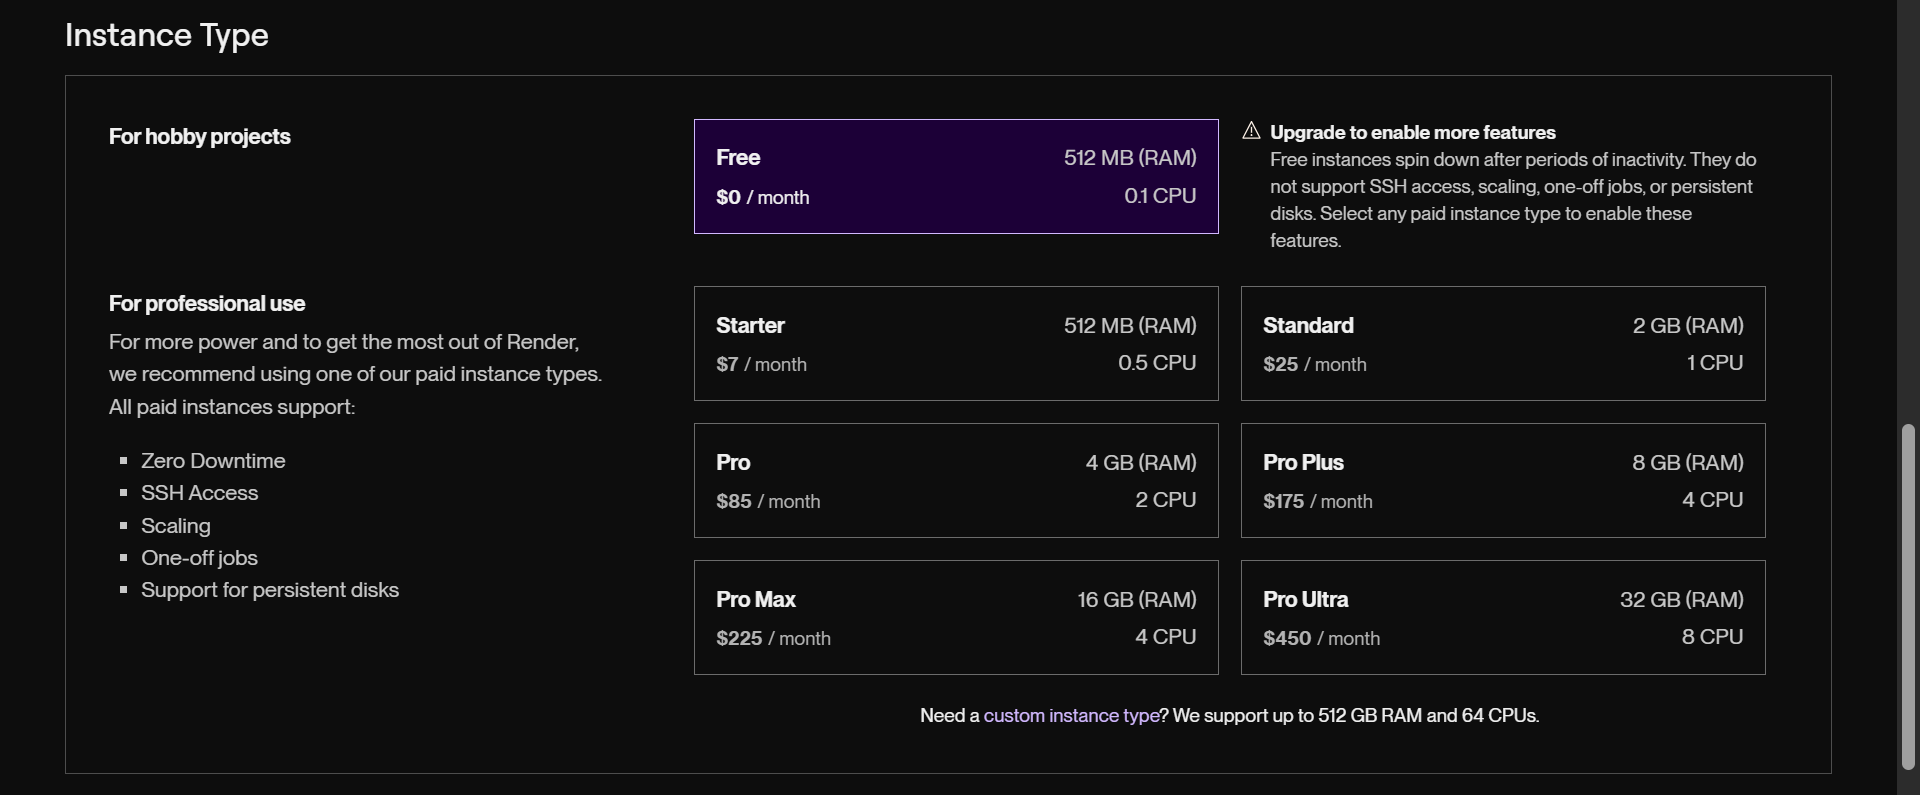
You can also select a paid instance if needed. The Free instance is perfect for hobby projects or development use, but keep in mind:
⏱️ Important: Free instances are automatically put to sleep after 15 minutes of inactivity. This means Telegram webhooks will not work properly when the app is asleep.
💡 For production or consistent uptime, a paid instance is recommended.
In the next step, we’ll configure the required environment variables for your bot to function correctly.
4. Add Environment Variables
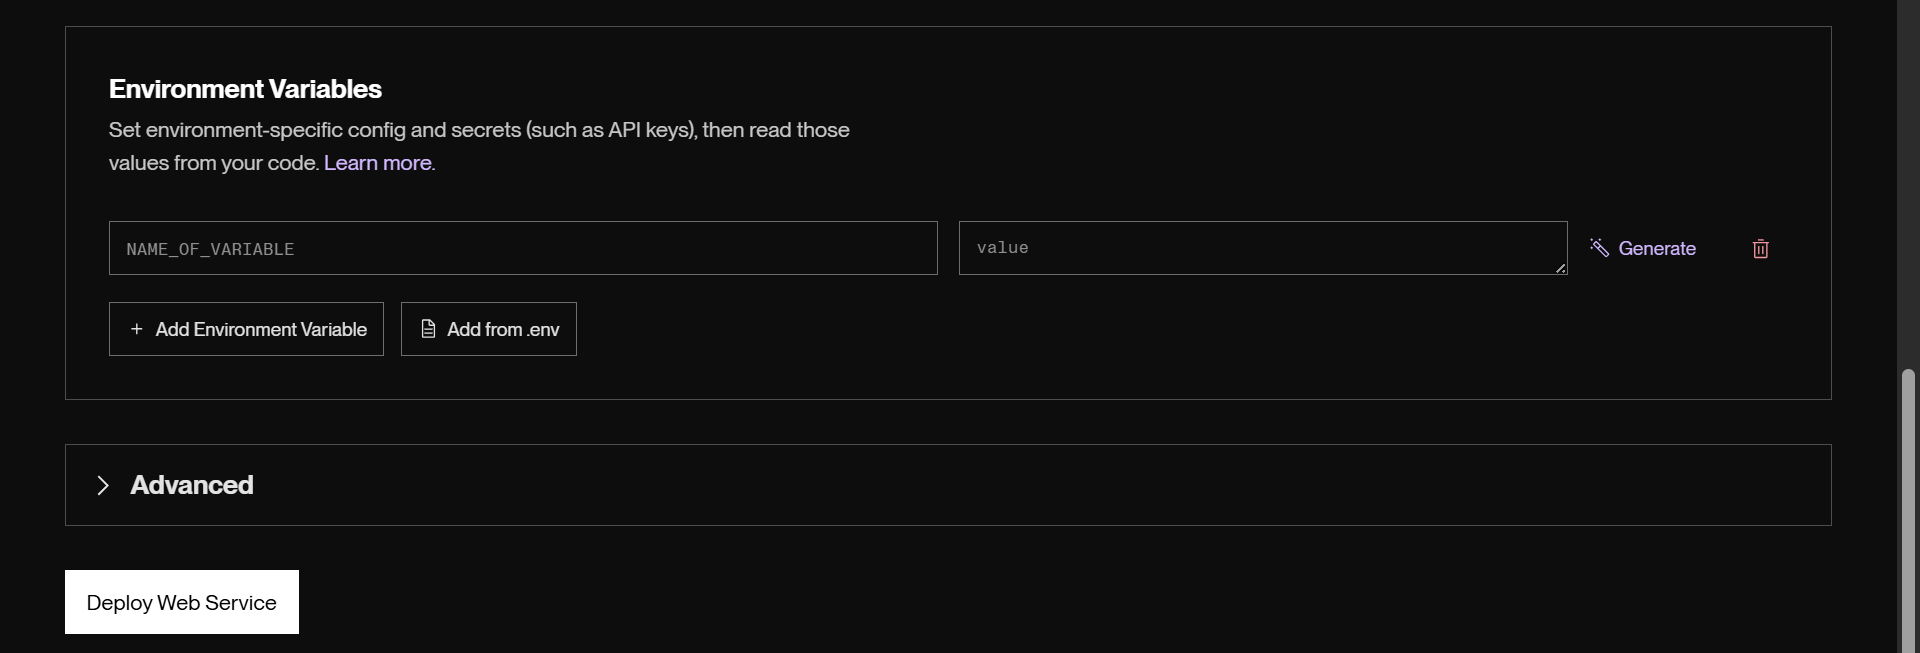
In the Environment section on Render, add all the keys from your .env file as environment variables (without quotes):
BOT_TOKEN	        your Telegram bot token
BOT_NAME	        Wordventure (or any name)
APP_USE_WEBHOOK	    true
APP_BASE_URL	    your Render HTTPS URL (e.g. https://wordventure-bot.onrender.com)
APP_PORT	        10000 (PORT open on Render's Web Service)
DATABASE_URL	    your PostgreSQL connection URI
DICTIONARY_BASE_API	https://api.dictionaryapi.dev/api
🔁 Note: Set APP_USE_WEBHOOK to true because Render supports webhook-based bots via public HTTPS URLs.
5. Deploy
Click “Deploy Web Service”, and Render will install dependencies, run your postinstall Prisma commands, and start your bot!
You should see logs like:
✅ Webhook set: https://your-app-name.onrender.com/bot<your-token>
If successful, your bot should now respond to commands via Telegram, and daily words will be sent based on your schedule.
6. Verify It Works
- Send
/startor/wordto your bot on Telegram. - Check that the webhook was set correctly.
- Check Render logs for any startup errors.
Conclusion
Congrats! You’ve just built and deployed your very own Telegram bot that sends daily words and quizzes using modern tools like Node.js, Prisma, and PostgreSQL, all running seamlessly on Render’s free tier.
Along the way, you’ve learned how to:
- Set up a Telegram bot using node-telegram-bot-api
- Switch between polling and webhook modes for flexible deployment
- Use Prisma ORM to manage and persist user data
- Automate tasks like daily word delivery with node-cron
- Deploy both your app and database on a cloud platform
Whether you’re building this as a hobby, a resume project, or a foundation for something bigger, you’re now equipped with a powerful full-stack workflow.
If you’re ready to take it to the next level, consider:
- Supporting multiple languages or word sources
- Integrating a frontend to track learning progress
- Switching to a paid tier for production-grade reliability
Thanks for following along, and happy coding! 🚀💬📚
💻 The repository for this example can be found at fajarwz/wordventure-bot.
💡 Thanks for reading all the way to the end. If you found this helpful, please like or star the Github repo so I know it’s really helpful. Otherwise, let me know what I can improve in the comment or email.