
💡 I included the link to the example repository at the conclusion of this tutorial.
If we work with a microservice architecture, non-monolith project, then we will see our project have it’s backend and frontend separated. There will be a team for both Frontend and Backend.
Some apps need authentication, maybe the app needs to collect user’s email for better engagement, or it needs an id so it is obvious which data belongs to which user, etc.
There are some method to authenticate user but here I will share about token-based authentication using JWT (JSON Web Token). We will use PHP-Open-Source-Saver/jwt-auth. Here is the step by step about how to build it.
Laravel Installation
First we will create a fresh install of Laravel app. Type this from your terminal
laravel new blog-laravel-api-jwt
After the installation finished, open the project with your IDE or text editor and then proceed to the next step.
PHP-Open-Source-Saver/jwt-auth Installation
Install the package for our app’s token-based authentication, JWT token.
Step 1: Install The Package
Install the package with following command
composer require php-open-source-saver/jwt-auth
Step 2: Publish The Config File
Run this in your terminal to publish the package config file
php artisan vendor:publish --provider="PHPOpenSourceSaver\JWTAuth\Providers\LaravelServiceProvider"
Now you should have config/jwt.php file in your project for the package configuration.
Step 3: Generate Secret Key
Run the following command to generate secret key for the jwt.
php artisan jwt:secret
Step 4: Configure config/auth.php
Since we only use the Laravel app for API only, we can change the authentication default to api
    'defaults' => [
        'guard' => 'api',   // change this to api
        'passwords' => 'users',
    ],
Next, add the api we already defined at the top to the guards
'guards' => [
    'web' => [
        'driver' => 'session',
        'provider' => 'users',
    ],

    // add below code. Here we insert additional guards named api, which the driver is jwt and the provider is users (the users provider already defined below this code in the original file, pointing to User model)
    'api' => [
        'driver' => 'jwt',
        'provider' => 'users',
    ],
],
Step 5: Add Blacklist Exception
Add this to our .env so we can logout our users.
JWT_SHOW_BLACKLIST_EXCEPTION=true
Ok that’s it for the PHP-Open-Source-Saver/jwt-auth installation and it’s configuration.
Configure the .env file
Point your Laravel app to the correct database. If you set the DB_DATABASE to laravel_api_jwt then don’t forget to create a MySQL database named laravel_api_jwt as well.
DB_DATABASE=laravel_api_jwt
Migrate the Database Migration
No need to edit the default migration if the users table migration already contained email, password, and email. Use the following command to migrate:
php artisan migrate
Preparing User Model
We should integrate our User Model with JWT Auth like so:
<?php

namespace App\Models;

use Illuminate\Database\Eloquent\Factories\HasFactory;
use Illuminate\Foundation\Auth\User as Authenticatable;
use Illuminate\Notifications\Notifiable;
use PHPOpenSourceSaver\JWTAuth\Contracts\JWTSubject;    // add this

class User extends Authenticatable implements JWTSubject // implement the JWTSubject
{
    use HasFactory, Notifiable;

    /**
     * The attributes that are mass assignable.
     *
     * @var array<int, string>
     */
    protected $fillable = [
        'name',
        'email',
        'password',
    ];

    /**
     * The attributes that should be hidden for serialization.
     *
     * @var array<int, string>
     */
    protected $hidden = [
        'password',
        'remember_token',
    ];

    /**
     * The attributes that should be cast.
     *
     * @var array<string, string>
     */
    protected $casts = [
        'email_verified_at' => 'datetime',
    ];

    // add two methods below

    /**
     * Get the identifier that will be stored in the subject claim of the JWT.
     *
     * @return mixed
     */
    public function getJWTIdentifier()
    {
        return $this->getKey();
    }

    /**
     * Return a key value array, containing any custom claims to be added to the JWT.
     *
     * @return array
     */
    public function getJWTCustomClaims()
    {
        return [];
    }

}
Make sure you implement the JWTSubject and add the two methods from JWT Auth.
Preparing Controllers
We will create examples of auth-needed and no-auth-needed endpoints.
Step 1: Create the Auth Controller
We will need to generate the controller with the following command.
php artisan make:controller Api/AuthController
You will see it generated inside app/Http/Controllers/Api folder. Once it’s created let’s fill it with the following codes.
<?php

namespace App\Http\Controllers\Api;

use App\Http\Controllers\Controller;
use Illuminate\Http\Request;
use App\Models\User;
use PHPOpenSourceSaver\JWTAuth\Facades\JWTAuth;

class AuthController extends Controller
{
    public function __construct(User $user)
    {
        // model as dependency injection
        $this->user = $user;
    }

    public function register(Request $request)
    {
        // validate the incoming request
        // set every field as required
        // set email field so it only accept the valid email format

        $this->validate($request, [
            'name' => 'required|string|min:2|max:255',
            'email' => 'required|string|email:rfc,dns|max:255|unique:users',
            'password' => 'required|string|min:6|max:255',
        ]);

        // if the request valid, create user

        $user = $this->user::create([
            'name' => $request['name'],
            'email' => $request['email'],
            'password' => bcrypt($request['password']),
        ]);

        // login the user immediately and generate the token
        $token = auth()->login($user);

        // return the response as json
        return response()->json([
            'meta' => [
                'code' => 200,
                'status' => 'success',
                'message' => 'User created successfully!',
            ],
            'data' => [
                'user' => $user,
                'access_token' => [
                    'token' => $token,
                    'type' => 'Bearer',
                    'expires_in' => auth()->factory()->getTTL() * 60,    // get token expires in seconds
                ],
            ],
        ]);
    }

    public function login(Request $request)
    {
        $this->validate($request, [
            'email' => 'required|string',
            'password' => 'required|string',
        ]);

        // attempt a login (validate the credentials provided)
        $token = auth()->attempt([
            'email' => $request->email,
            'password' => $request->password,
        ]);

        // if token successfully generated then display success response
        // if attempt failed then "unauthenticated" will be returned automatically
        if ($token)
        {
            return response()->json([
                'meta' => [
                    'code' => 200,
                    'status' => 'success',
                    'message' => 'Quote fetched successfully.',
                ],
                'data' => [
                    'user' => auth()->user(),
                    'access_token' => [
                        'token' => $token,
                        'type' => 'Bearer',
                        'expires_in' => auth()->factory()->getTTL() * 60,
                    ],
                ],
            ]);
        }
    }

    public function logout()
    {
        // get token
        $token = JWTAuth::getToken();

        // invalidate token
        $invalidate = JWTAuth::invalidate($token);

        if($invalidate) {
            return response()->json([
                'meta' => [
                    'code' => 200,
                    'status' => 'success',
                    'message' => 'Successfully logged out',
                ],
                'data' => [],
            ]);
        }
    }
}
Step 2: Create the User Controller
Generate the controller with the following command.
php artisan make:controller Api/UserController
This controller will only contain a single method me to retrieve authenticated user data. Insert the following codes in the UserController located in the app\Http\Controllers\Api folder.
<?php

namespace App\Http\Controllers\Api;

use App\Http\Controllers\Controller;
use Illuminate\Http\Request;
use App\Models\User;  // add the User model

class UserController extends Controller
{
    public function __construct(User $user)
    {
        $this->user = $user;
    }

    public function me()
    {
        // use auth()->user() to get authenticated user data

        return response()->json([
            'meta' => [
                'code' => 200,
                'status' => 'success',
                'message' => 'User fetched successfully!',
            ],
            'data' => [
                'user' => auth()->user(),
            ],
        ]);
    }
}
Configure Routing
Register all the action to our API route in routes/api.php
<?php

use Illuminate\Http\Request;
use Illuminate\Support\Facades\Route;
use App\Http\Controllers\Api\UserController;
use App\Http\Controllers\Api\AuthController;

/*
|--------------------------------------------------------------------------
| API Routes
|--------------------------------------------------------------------------
|
| Here is where you can register API routes for your application. These
| routes are loaded by the RouteServiceProvider within a group which
| is assigned the "api" middleware group. Enjoy building your API!
|
*/

// Public accessible API
Route::post('/register', [AuthController::class, 'register']);
Route::post('/login', [AuthController::class, 'login']);

// Authenticated only API
// We use auth api here as a middleware so only authenticated user who can access the endpoint
// We use group so we can apply middleware auth api to all the routes within the group
Route::middleware('auth:api')->group(function() {
    Route::get('/me', [UserController::class, 'me']);
    Route::post('/logout', [AuthController::class, 'logout']);
});
That’s it, next we can test the API.
Serve
We can run the API using artisan serve
php artisan serve
Now our API can be accessed at the 127.0.0.1:8000/api.
Test the API
I use Insomnia to test it.
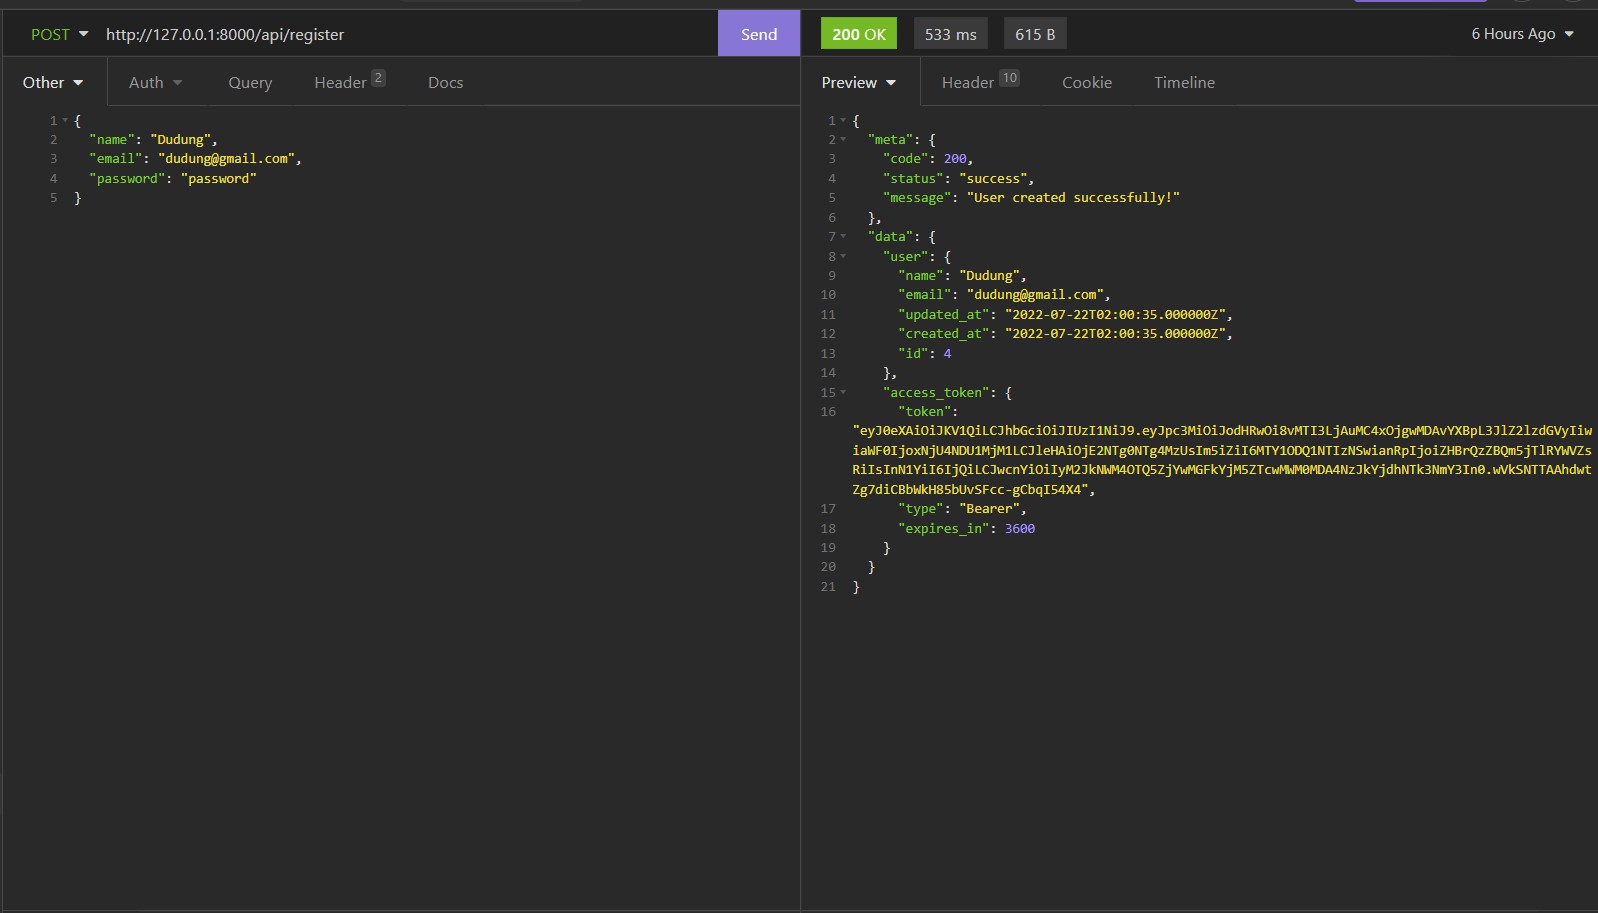
Register API
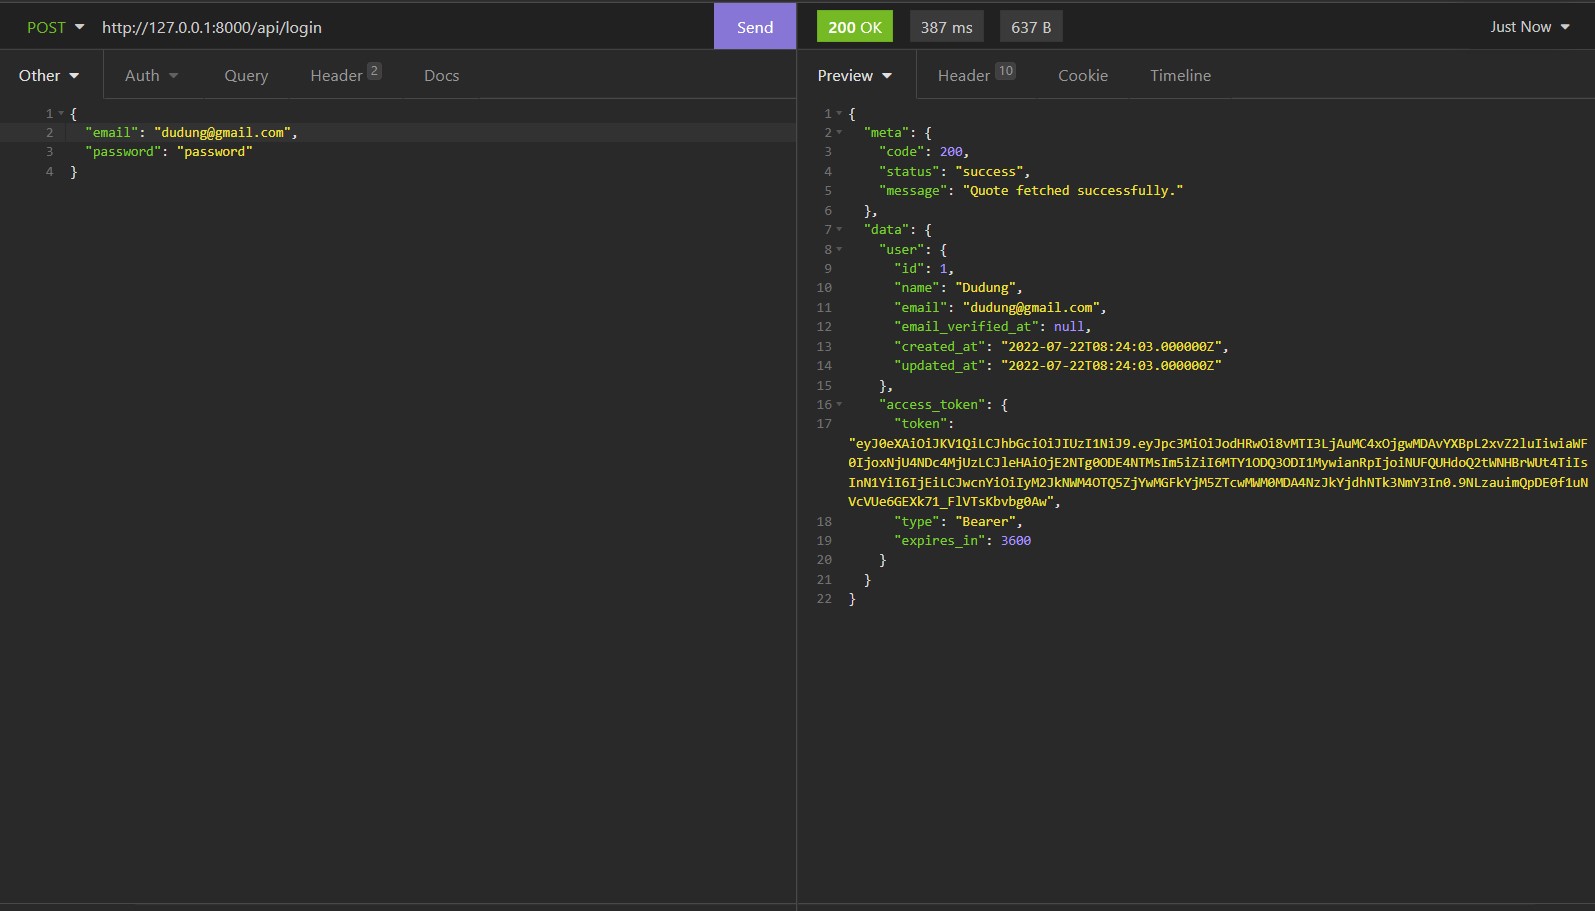
Login API
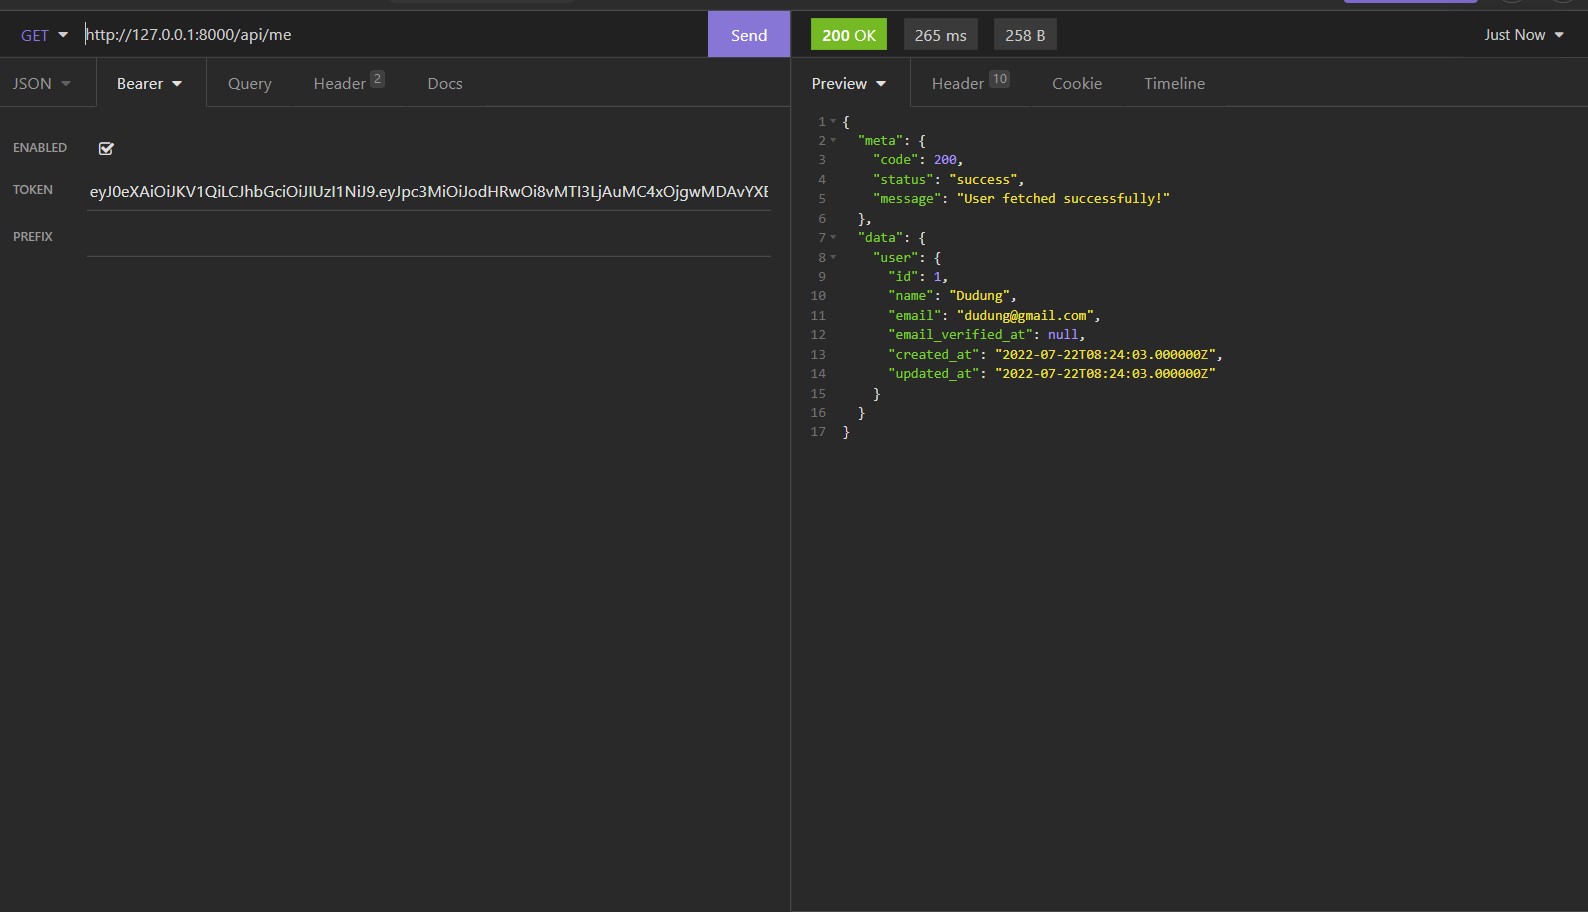
User data API
To access our authentication protected route, we need to insert token in the authorization header with Bearer prefix. In insomnia we can do that with inserting the token in the Bearer tab
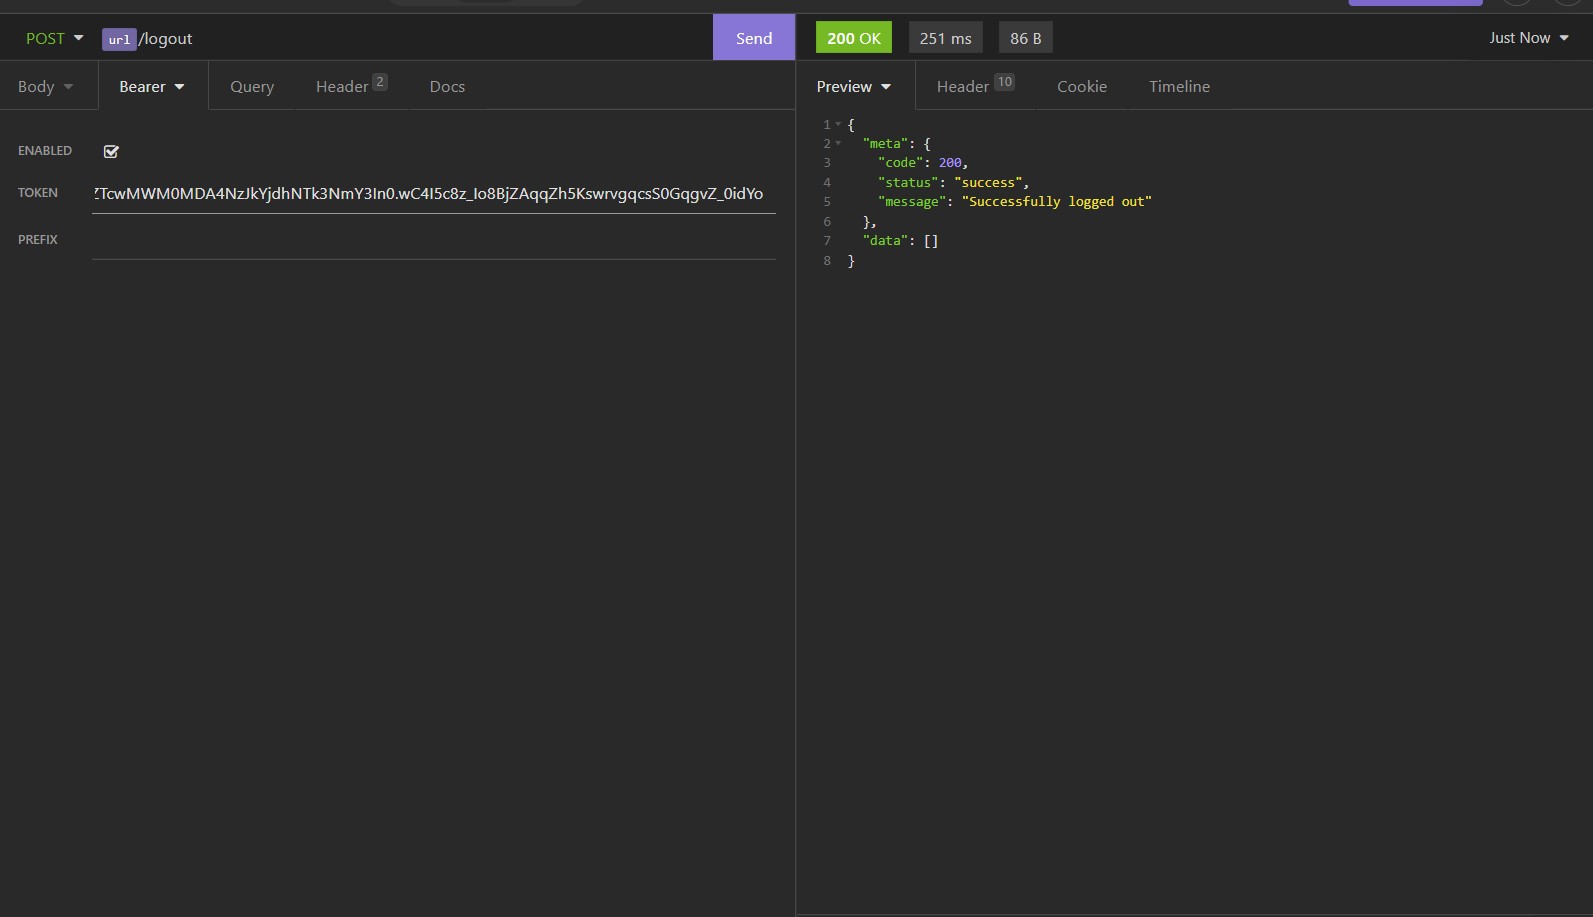
Logout API
Conclusion
That’s it. We have successfully build a simple API with authentication. Here we use PHP-Open-Source-Saver/jwt-auth package, integrate it with our model and guard, then create the endpoints.
💻 A repo for this example case can be found here fajarwz/blog-laravel-api-jwt.

