💡 I included the link to the example repository at the conclusion of this tutorial.
One of the common tasks in web development is the ability to export and import data. This can be useful for a variety of reasons, such as allowing users to download their data, or allowing administrators to bulk upload data into the system.
In the Laravel ecosystem, we can use SpartnerNL/Laravel-Excel package to handle our export and import functionality. This package is an easy-to-use wrapper for the popular PhpSpreadsheet library, and it allows us to easily export and import data from various file formats, including Excel, CSV, and ODS.
In this tutorial I’ll be using Laravel 9, but it should also work for Laravel 5/6/7/8+.
Step 1: Installing Laravel 9
To get started, we need to have Laravel installed on our machine. To do this, we will first need to have Composer, the PHP package manager, installed. Once Composer is installed, we can use it to install Laravel by running the following command:
composer create-project --prefer-dist laravel/laravel:^9.0 blog-laravel-excel
This will create a new Laravel project in a directory called blog-laravel-excel.
Step 2: Initializing the Database
Before we can start exporting and importing data, we need to have a database set up and some sample data to work with.
For this tutorial, we will create a database called blog_laravel_excel. Once the database is created, we will need to adjust the database connection settings in our Laravel app’s .env file to match the new database name, as well as the database username and password.
Step 3: Initializing the Migration
In Laravel 9, there is already a users migration in the database/migrations directory. However, you will need to make sure that it includes the necessary fields for name, email, and password before you run the migration.
public function up()
{
    Schema::create('users', function (Blueprint $table) {
        $table->id();
        $table->string('name');
        $table->string('email')->unique();
        $table->timestamp('email_verified_at')->nullable();
        $table->string('password');
        $table->rememberToken();
        $table->timestamps();
    });
}
Step 4: Initializing the Seeder
We also need to create a users seeder but in Laravel 9, there is already a factory and code in place to generate the seeders. You can use the factory to generate fake data for the users table.
Just make sure that there is a factory called UserFactory in the database/factories/UserFactory.php file, and that it contains the following code:
<?php

namespace Database\Factories;

use Illuminate\Database\Eloquent\Factories\Factory;
use Illuminate\Support\Str;

/**
 * @extends \Illuminate\Database\Eloquent\Factories\Factory<\App\Models\User>
 */
class UserFactory extends Factory
{
    /**
     * Define the model's default state.
     *
     * @return array<string, mixed>
     */
    public function definition()
    {
        return [
            'name' => fake()->name(),
            'email' => fake()->unique()->safeEmail(),
            'email_verified_at' => now(),
            'password' => '$2y$10$92IXUNpkjO0rOQ5byMi.Ye4oKoEa3Ro9llC/.og/at2.uheWG/igi', // password
            'remember_token' => Str::random(10),
        ];
    }

    /**
     * Indicate that the model's email address should be unverified.
     *
     * @return static
     */
    public function unverified()
    {
        return $this->state(fn (array $attributes) => [
            'email_verified_at' => null,
        ]);
    }
}
In addition, check the run() method from database/seeders/DatabaseSeeder.php file, to make sure it is calling the UserFactory to generate the necessary number of fake data for seeding the users table.
public function run()
{
    \App\Models\User::factory(10)->create();
}
Once we have our migration and seeder set up, we can run the following command to run the migration and seed the data into the users table:
php artisan migrate --seed
Step 5: Installing the Laravel-Excel Package
Next, we need to install the Laravel-Excel package. We can do this by running the following command:
composer require maatwebsite/excel
This will add the version 3.1 package to our project and make it available for use.
Step 6: Package Configuration
With our database set up and seeded with data, we can now move on to configuring the Laravel-Excel package.
The Maatwebsite\Excel\ExcelServiceProvider is auto-discovered and registered by default, so no need to add it manually in the config file. The Excel facade is also auto-discovered, so there is no need to register it manually.
To publish the config, we can run the vendor publish command:
php artisan vendor:publish --provider="Maatwebsite\Excel\ExcelServiceProvider" --tag=config
This command will create a new config file named config/excel.php, where you can customize the package’s settings as per your requirement.
Read also:
Step 7: Create Route file
Create 3 routes in the routes/web.php file that handle the import and export functionality for Excel and CSV files.
<?php

use Illuminate\Support\Facades\Route;
use App\Http\Controllers\UserController;

Route::get('/', [UserController::class, 'index'])->name('users.index'); // view
Route::post('import', [UserController::class, 'import'])->name('users.import'); // import route
Route::get('export', [UserController::class, 'export'])->name('users.export'); // export route
Step 8: Create Export Class
Create an export class in the app/Exports directory by utilizing the make:export command.
php artisan make:export UserExport --model=User
Here is the final code in app/Exports/UserExport.php.
<?php

namespace App\Exports;

use App\Models\User;
use Maatwebsite\Excel\Concerns\FromQuery;
use Maatwebsite\Excel\Concerns\WithHeadings;

// implements WithHeadings to add headings, we can omit this if we want
class UserExport implements FromQuery, WithHeadings
{
    // add headings if we implements WithHeadings
    public function headings(): array
    {
        return [
            'ID',
            'Name',
            'Email',
            'Email Verified At',
            'Created At',
            'Updated At',
        ];
    }

    // because we implements FromQuery we need to add this query() method
    public function query()
    {
        return User::query();   // class that we use for the query
    }
}
Step 9: Create Import Class
Create an import class in the app/Imports directory by utilizing the make:import command.
php artisan make:import UserImport --model=User
Here is the final code in app/Exports/UserImport.php.
<?php

namespace App\Imports;

use App\Models\User;
use Maatwebsite\Excel\Concerns\ToModel;
use Maatwebsite\Excel\Concerns\WithHeadingRow;

// If your file includes a heading row (a row in which each cell
// indicates the purpose of that column) and you want to use
// those names as the array keys of each row, you can implements the
// WithHeadingRow.
class UserImport implements ToModel, WithHeadingRow
{
    public function model(array $row)
    {
        return new User([
            // because we would have 'Name', 'Email', and 'Password' heading in our excel
            'name'     => $row['name'],
            'email'    => $row['email'],
            'password' => bcrypt($row['password']),
        ]);
    }
}
Step 10: Create UserController
We will create a controller to manage the import and export of files such as Excel and CSV. To create the controller, we can use the following command:
php artisan make:controller UserController
This command will generate a new controller file in the app/Http/Controllers directory.
Create index, import, and export methods as previously defined in our web routes. Alternatively, place the following code in the app/Http/Controllers/UserController.php file.
<?php

namespace App\Http\Controllers;

use Illuminate\Http\Request;
use App\Imports\UserImport;
use App\Exports\UserExport;
use App\Models\User;
use Excel;

class UserController extends Controller
{
    public function index()
    {
        return view('users.index', [
            // we will display a list of user data on the index page
            'users' => User::all(),
       ]);
    }

    public function import(Request $request)
    {
        // use Excel facade to import data, by passing in the UserImport class and the uploaded file request as arguments
        Excel::import(new UserImport, $request->file('file')->store('temp'));
        return back();
    }

    public function export()
    {
        // use Excel facade to export data, by passing in the UserExport class and the desired file name as arguments
        return Excel::download(new UserExport, 'users.xlsx');
    }
}
Step 11: Create the Blade View
In this step, we will create a view for managing the importing and exporting of files through the front-end. To do this, create a resources/views/users/index.blade.php file and insert the following code:
<!DOCTYPE html>
<html lang="{{ str_replace('_', '-', app()->getLocale()) }}">
<head>
    <meta charset="utf-8">
    <meta name="viewport" content="width=device-width, initial-scale=1">
    <title>Import Export Excel & CSV in Laravel 9</title>
    {{-- we will use Bootstrap 5 --}}
    <link href="https://cdn.jsdelivr.net/npm/bootstrap@5.3.0-alpha1/dist/css/bootstrap.min.css" rel="stylesheet" integrity="sha384-GLhlTQ8iRABdZLl6O3oVMWSktQOp6b7In1Zl3/Jr59b6EGGoI1aFkw7cmDA6j6gD" crossorigin="anonymous">
</head>
<body>
    <div class="container mt-5 text-center">
        <h2 class="mb-4">
            Laravel 9 Import and Export CSV & Excel to Database
        </h2>
        {{-- create a form tag with method post for the import feature --}}
        <form action="{{ route('users.import') }}" method="POST" enctype="multipart/form-data">
            @csrf
            <div class="form-group mb-4" style="max-width: 500px; margin: 0 auto;">
                <div class="input-group">
                    {{-- make sure to add file to name attribute --}}
                    <input type="file" name="file" class="form-control">
                </div>
                <div><small>Upload the file here before clicking 'Import data'</small></div>
            </div>
            <button class="btn btn-primary">Import data</button>
            {{-- create a button for export feature --}}
            <a class="btn btn-success" href="{{ route('users.export') }}">Export data</a>
        </form>
        {{-- display users data --}}
        <table class="table">
            <thead>
                <tr>
                    <td>#</td>
                    <td>Name</td>
                    <td>Email</td>
                </tr>
            </thead>
            <tbody>
                @foreach ($users as $key => $user)
                <tr>
                    <td>{{ ++$key }}</td>
                    <td>{{ $user->name }}</td>
                    <td>{{ $user->email }}</td>
                </tr>
                @endforeach
            </tbody>
        </table>
    </div>
</body>
</html>
Read also:
Step 12: Run and Test It
Now we have our UI, controller, and model set up, we can test our export and import functionality. We can do this by running the project and navigating to the users index page.
php artisan serve
Here is the endpoint that we can finally test:
http://127.0.0.1:8000/
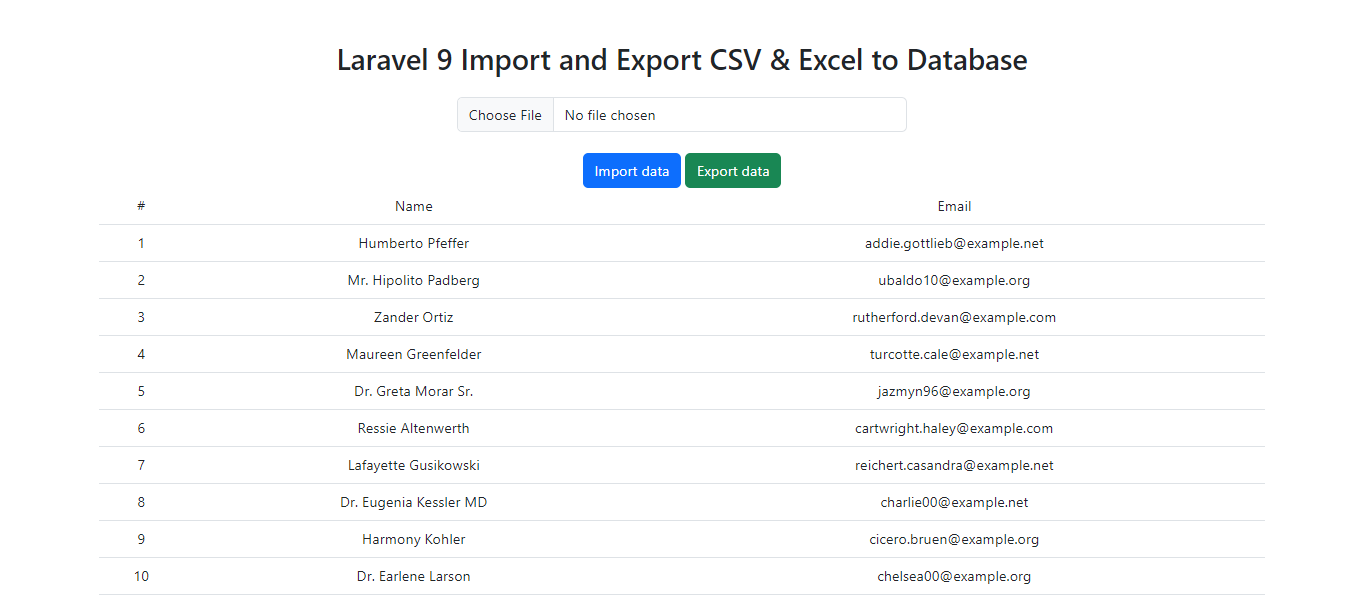
We can then test uploading an excel file and check if the data is imported correctly, and also test exporting the data and check if the exported file is in the correct format.
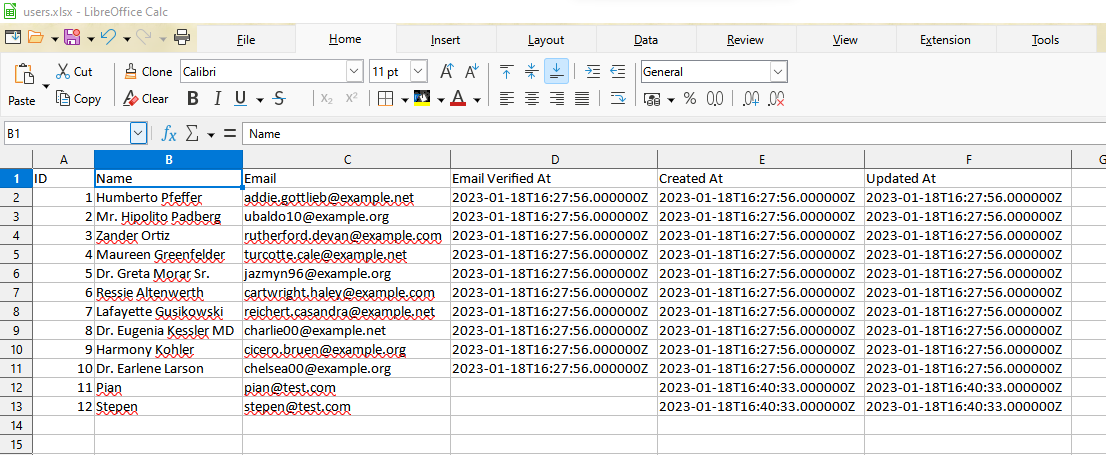
Import Feature
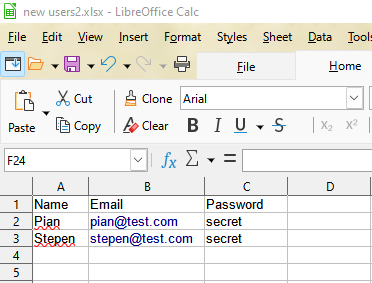
Here is the data that will be imported:
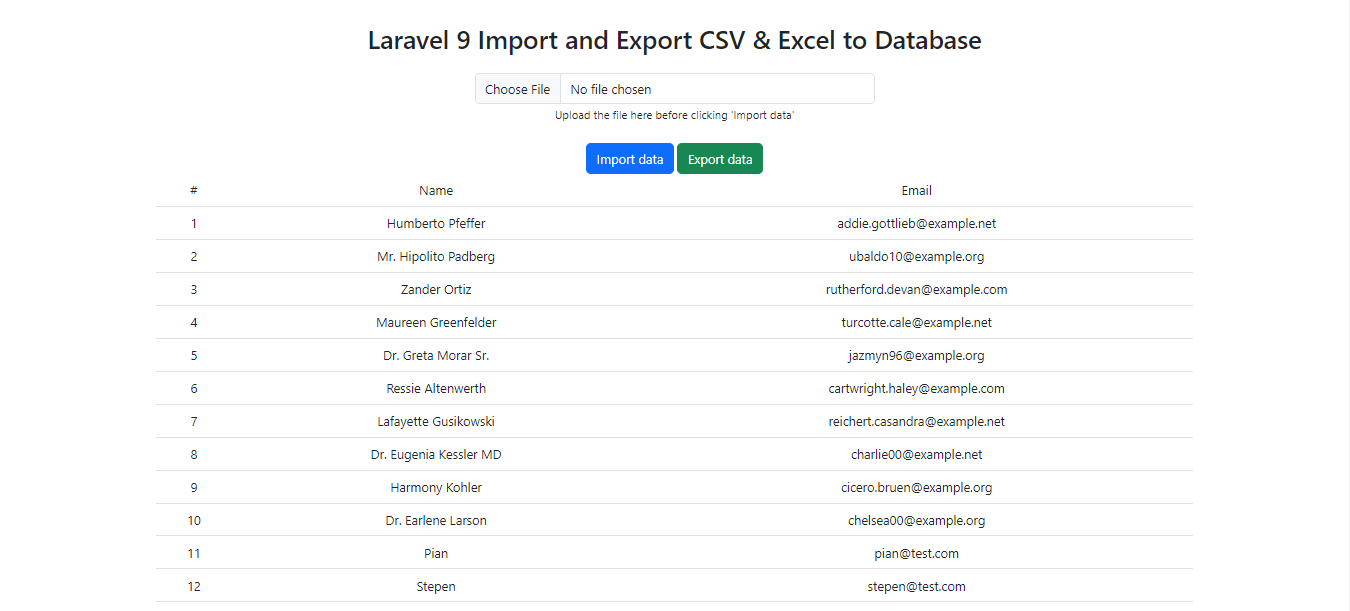
Upload it by clicking ‘Import data’ and here is the list of user data after it has been successfully imported:
Export feature
Here is the exported data:
Conclusion
In conclusion, using the Laravel-Excel package, it is easy to add export and import functionality to a Laravel application. With its simple syntax and powerful features, it makes it easy to handle various file formats and manipulate data. This tutorial gives a simple example of how to implement export and import functionality in a Laravel application, but the package can be used for more complex use cases as well.
💻 The repository for this example can be found at fajarwz/blog-laravel-excel.