
💡 I included the link to the example repository at the conclusion of this tutorial.
What is Laravel Dusk?
Laravel Dusk is a testing tool that enables browser automation and end-to-end testing in a Laravel application. It simulates user interactions by navigating through pages, clicking buttons, and filling out forms, just like a real user would. Dusk provides an elegant and intuitive syntax for writing browser tests, making it an invaluable tool for ensuring the functionality and user experience of our web application.
Create Simple CRUD with Laravel Dusk
Let’s dive into a practical example to showcase the power of Laravel Dusk. We will create a simple CRUD (Create, Read, Update, Delete) Post application with only title and content fields in the form.
Step 1: Install Laravel
As always, we will start with a fresh Laravel application. Create a new application for this demo:
Using the Laravel Installer
laravel new blog-laravel-dusk-testing
Using Composer create-project
composer create-project laravel/laravel blog-laravel-dusk-testing
Using Laravel build and Sail
curl -s "https://laravel.build/blog-laravel-dusk-testing" | bash
This command will create a new Laravel project in a directory named blog-laravel-dusk-testing.
Step 2: Setting .env File
Adjust your .env file with your own environment (db host, db username, etc.), and make sure to set the APP_URL with the correct host and port.
# make sure this is filled with the correct host and port because Laravel Dusk would use this
APP_URL=http://localhost:8000
Step 3: Setting Up Laravel Dusk
Add Laravel Dusk to the Composer dependency:
composer require --dev laravel/dusk
After that, run the Dusk installation command:
php artisan dusk:install
The dusk:install command will create a tests/Browser directory, an example Dusk test, and install the Chrome Driver binary for our operating system.
Step 4: Creating CRUD functionality
Creating posts Migration
Run the following command to create a migration for the posts table:
php artisan make:migration create_posts_table
This will generate a new migration file in the database/migrations directory.
Open the newly created migration file located in the database/migrations directory. The file name should look something like yyyy_mm_dd_hhmmss_create_posts_table.php.
Inside the migration file, define the schema for the posts table.
<?php

use Illuminate\Database\Migrations\Migration;
use Illuminate\Database\Schema\Blueprint;
use Illuminate\Support\Facades\Schema;

return new class extends Migration
{
    /**
     * Run the migrations.
     */
    public function up(): void
    {
        // create posts table with title, content, and timestamps column
        Schema::create('posts', function (Blueprint $table) {
            $table->id();
            $table->string('title');
            $table->string('content');
            $table->timestamps();
        });
    }

    /**
     * Reverse the migrations.
     */
    public function down(): void
    {
        Schema::dropIfExists('posts');
    }
};
After defining the migration, run the migration command to create the posts table in the database:
php artisan migrate
Creating Post Model
Run the following command to create a model for the Post:
php artisan make:model Post
This will generate a Post.php file in the app/Models directory.
Open the generated Post.php model file in the app/Models directory.
<?php

namespace App\Models;

use Illuminate\Database\Eloquent\Factories\HasFactory;
use Illuminate\Database\Eloquent\Model;

class Post extends Model
{
    use HasFactory;

    // set the $fillable property to allow mass assignment
    // of the title and content attributes.
    protected $fillable = [
        'title',
        'content',
    ];
}
Read also:
Creating The Routes
Let’s set up the necessary routes. Add the following code to our routes/web.php file:
// routes/web.php

use App\Http\Controllers\PostController;

Route::resource('posts', PostController::class)
    ->only(['index', 'create', 'store', 'edit', 'update', 'destroy']);
By utilizing the resource route, our routes file becomes more organized and maintains a clear structure.
Creating The Controller
Create a controller using the make:controller Artisan command.
php artisan make:controller PostController
This will generate a PostController.php file in the app/Http/Controllers directory of your Laravel project.
Implement the following code in PostController.php file:
<?php

namespace App\Http\Controllers;

use Illuminate\Http\Request;
use App\Models\Post;

class PostController extends Controller
{
    // retrieves all posts from the Post model
    // and passes them to the posts.index view for rendering.
    public function index()
    {
        return view('posts.index', [
            'posts' => Post::all(),
        ]);
    }

    // displays the posts.form view, which is the form
    // for creating new posts.
    public function create()
    {
        return view('posts.form');
    }

    public function store()
    {
        // validate the incoming data (title and content)
        $validated = request()->validate([
            'title'   => 'required|max:255',
            'content' => 'required|max:255',
        ]);

        // creating a new Post record in the database with the validated data.
        Post::create($validated);

        // Upon successful creation, the user is redirected to the index page.
        return redirect(route('posts.index'));
    }

    // takes a Post model as a parameter and passes it
    // to the posts.form view for editing.
    public function edit(Post $post)
    {
        return view('posts.form', [
            'post' => $post,
        ]);
    }

    public function update(Post $post)
    {
        $validated = request()->validate([
            'title'   => 'required|max:255',
            'content' => 'required|max:255',
        ]);

        // updates an existing post in the database with the validated data.
        $post->update($validated);

        // redirects the user to the index page.
        return redirect(route('posts.index'));
    }

    public function destroy(Post $post)
    {
        // removes a specified post from the database.
        $post->delete();

        // redirects the user to the index page after deletion.
        return redirect(route('posts.index'));
    }
}
Creating the View
Let’s create a simple layout that serves as a layout for our application’s views. It includes the necessary HTML structure, meta tags, and Bootstrap CSS and JavaScript dependencies for styling and functionality.
<!DOCTYPE html>
<html>
<head>
    <meta charset="utf-8">
    <meta http-equiv="X-UA-Compatible" content="IE=edge">
    <title>Posts</title>
    <link href="https://cdn.jsdelivr.net/npm/bootstrap@5.3.1/dist/css/bootstrap.min.css" rel="stylesheet" integrity="sha384-4bw+/aepP/YC94hEpVNVgiZdgIC5+VKNBQNGCHeKRQN+PtmoHDEXuppvnDJzQIu9" crossorigin="anonymous">
</head>
<body class="mt-5">
    <div class="container">
        {{-- Blade directive used to define a placeholder named content that will be replaced
        with actual content in child views. --}}
        @yield('content')
    </div>
    <script src="https://cdn.jsdelivr.net/npm/bootstrap@5.3.1/dist/js/bootstrap.bundle.min.js" integrity="sha384-HwwvtgBNo3bZJJLYd8oVXjrBZt8cqVSpeBNS5n7C8IVInixGAoxmnlMuBnhbgrkm" crossorigin="anonymous"></script>
</body>
</html>
Create a new folder called posts in resources\views and create a new file called index.blade.php inside of it to create the post list page.
{{-- resources\views\posts\index.blade.php --}}

{{-- extend the layout.blade.php file, inheriting its structure and styles. --}}
@extends('layout')
{{-- defines the content that will replace the @yield('content') placeholder in the layout. --}}
@section('content')
<h2 class="text-center mb-5">Posts</h2>
<div class="row justify-content-center">
    <div class="col-md-4 col-md-offset-2">
        <a class="btn btn-primary mb-3" href="{{ route('posts.create') }}">Create Post</a>
        <ul class="list-group">
            {{-- a loop iterating over the $posts array that passed from PostController --}}
            @foreach ($posts as $post)
                <li class="list-group-item">
                    <form id="delete-form" action="{{ route('posts.destroy', $post->id) }}" method="post">
                        <a
                            href="{{ route('posts.edit', $post->id) }}"
                            class="me-2">
                            Edit
                        </a>
                        @csrf
                        @method('delete')
                        <button type="submit" class="btn btn-link p-0">Delete</button>
                    </form>
                    <h3>{{ $post->title }}</h3>
                    <p>{{ $post->content }}</p>
                </li>
            @endforeach
        </ul>
    </div>
</div>
@endsection
Create a new file called form.blade.php that will be used for both creating new posts and updating existing ones.
{{-- resources\views\posts\form.blade.php --}}

@extends('layout')
@section('content')
<div class="col-md-4">
    <h2>@isset($post) Update @else Create @endisset Post</h2>

    {{-- Checks for validation errors and displays them if they exist. --}}
    @if (count($errors) > 0)
    <div class="alert alert-danger">
        <ul class="list-unstyled">
            @foreach ($errors->all() as $error)
                <li>{{ $error }}</li>
            @endforeach
        </ul>
    </div>
    @endif

    {{-- it sets the action attribute to the appropriate route depending on whether a post exists. --}}
    <form action="{{ isset($post) ? route('posts.update', $post->id) : route('posts.store') }}" method="post">
        @csrf
        {{-- use put method if this is an edit mode --}}
        @isset ($post)
            @method('PUT')
        @endisset
        <div class="mb-3">
            <label for="title" class="form-label">Title</label>
            <input name="title" type="text" class="form-control" id="title" value="{{ $post->title ?? old('title') }}">
          </div>
        <div class="mb-3">
            <label for="content" class="form-label">Content</label>
            <textarea name="content" type="text" class="form-control" id="content">{{ $post->content ?? old('content') }}</textarea>
          </div>
        <button type="submit" class="btn btn-primary mb-3">Submit</button>
    </form>

</div>
@endsection
Now, we can manually verify whether our application is working as expected. To do this, execute the Laravel development server using the following command:
php artisan serve
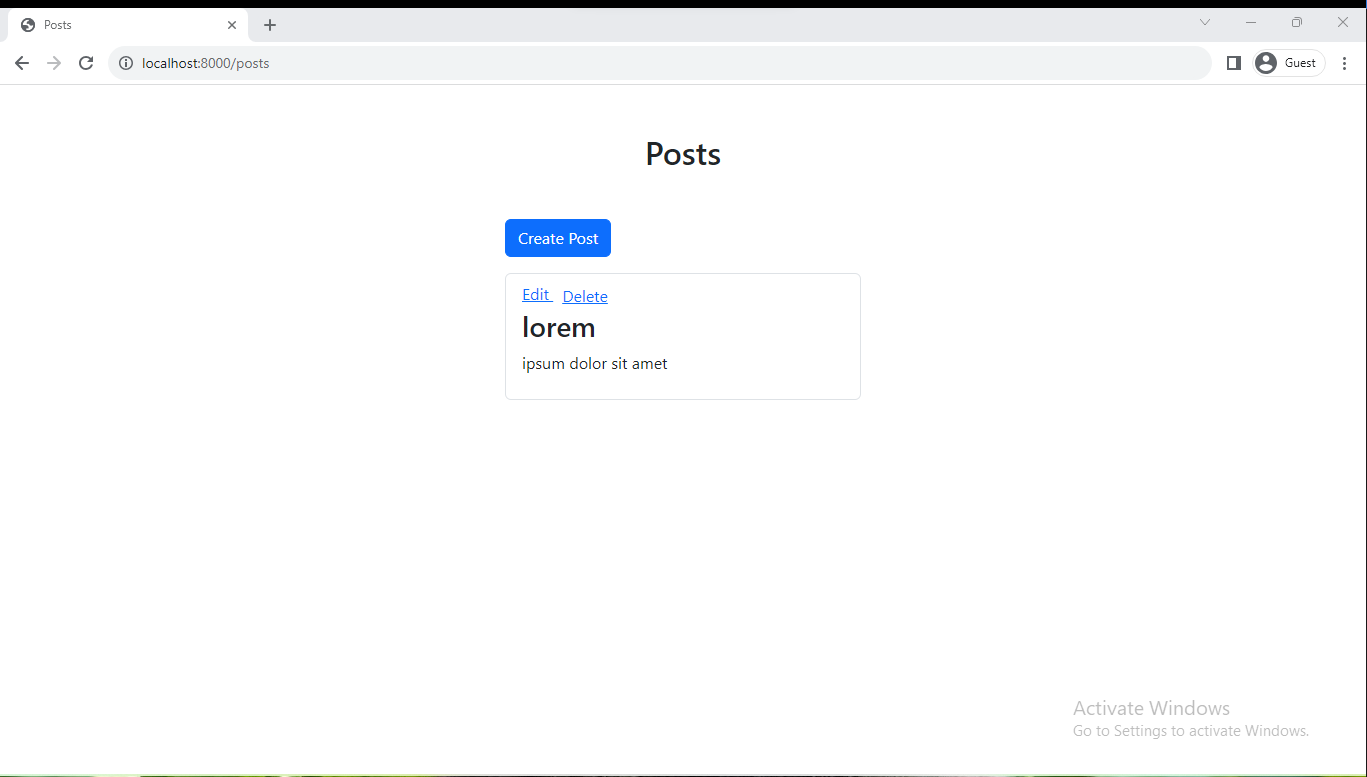
Check our application through a web browser. Visit the post list page at http://localhost:8000/posts.
The list post page:
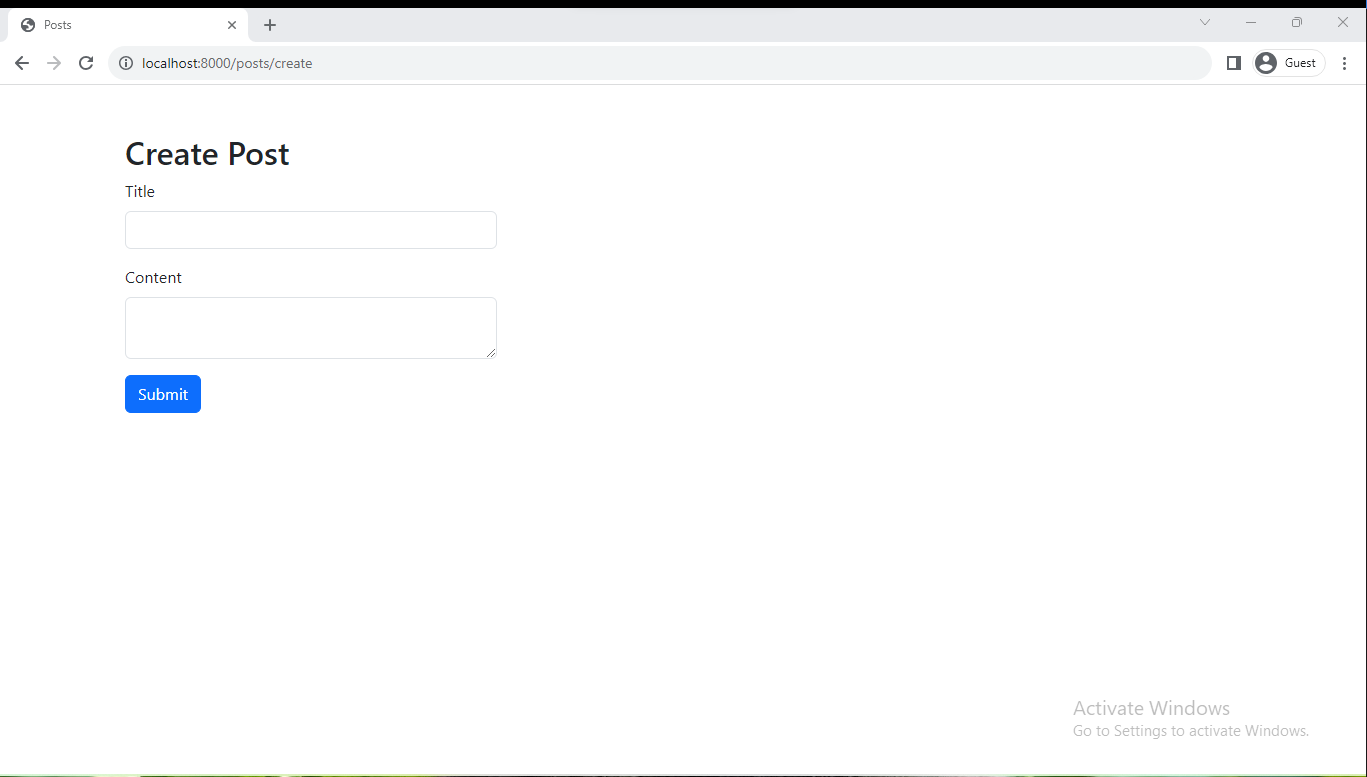
The create post page:
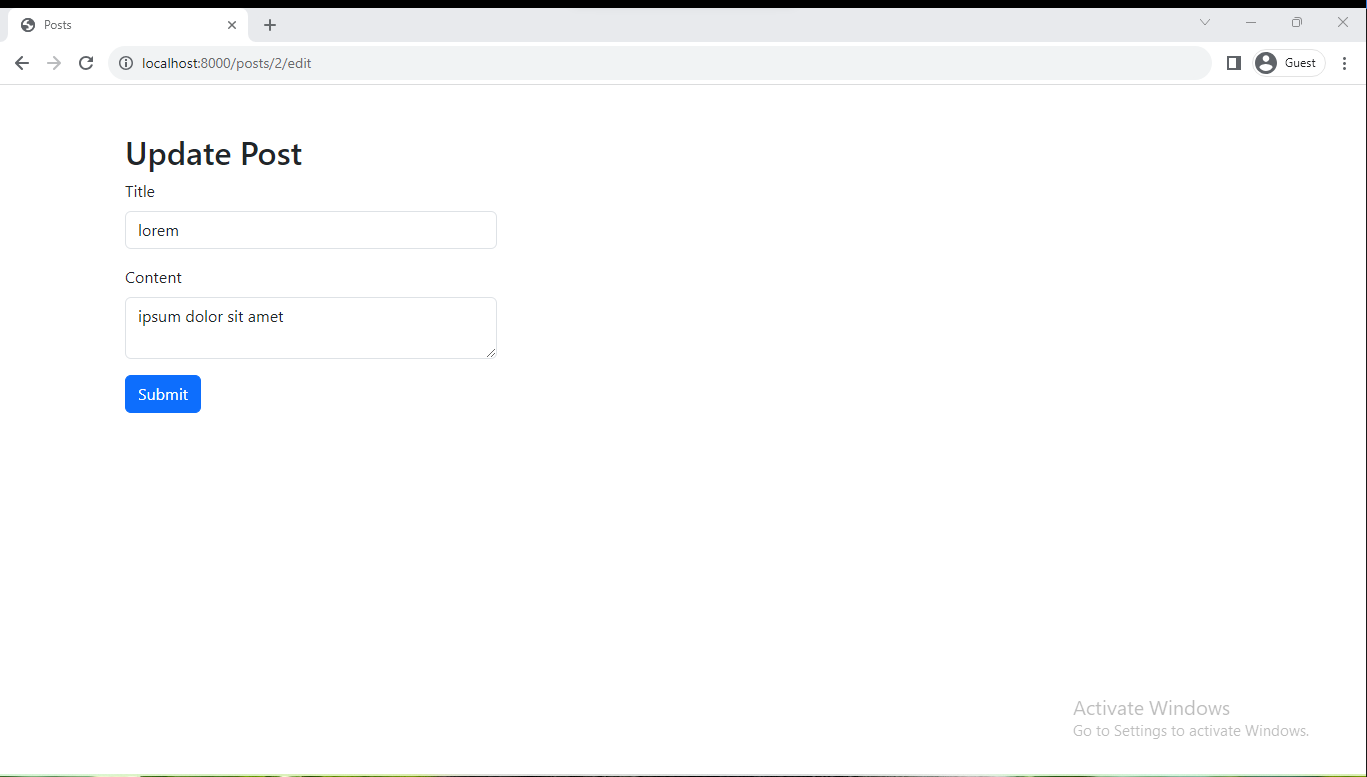
The edit post page:
Read also:
Step 5: Creating Test Class
Now let’s create the test class. create a new test file named ManagePostTest.php, in the tests/Browser directory. We can create it with the following command:
php artisan dusk:make ManagePostTest
Here is how my test class looks like:
// tests\Browser\ManagePostTest.php

namespace Tests\Browser;

use App\Models\Post;
// use Illuminate\Foundation\Testing\DatabaseMigrations;
use Illuminate\Foundation\Testing\DatabaseTruncation;
use Laravel\Dusk\Browser;
use Tests\DuskTestCase;

class ManagePostTest extends DuskTestCase
{
    use DatabaseTruncation;
}
Notice that I use Illuminate\Foundation\Testing\DatabaseTruncation instead of using the DatabaseMigrations one, because dropping and re-creating database tables for each test is typically slower than truncating the tables. But to use DatabaseTruncation we must install the doctrine/dbal package using the Composer package manager, so let’s install the package.
composer require --dev doctrine/dbal
The DatabaseTruncation trait performs an initial migration of our database during the first test to guarantee the correct creation of database tables. Subsequent tests, however, will only truncate the tables in the database. This approach offers a performance advantage compared to rerunning all database migrations from scratch.
Writing Test Methods
Let’s write our test methods.
// tests\Browser\ManagePostTest.php
// code ...

/** @test */
public function user_can_create_a_post()
{
    $this->assertTrue(true);
}

/** @test */
public function user_can_browse_posts_on_the_index_page()
{
    $this->assertTrue(true);
}

/** @test */
public function user_can_edit_an_existing_post()
{
    $this->assertTrue(true);
}

/** @test */
public function user_can_delete_an_existing_post()
{
    $this->assertTrue(true);
}

// code ...
By writing the names of our test methods to start with clear, descriptive phrases, we enhance readability and understanding. This will make it easier for us and other developers to quickly grasp the purpose of each test method.
Run the Test
Let’s run the test and ensure everything is okay. We can run the Dusk tests by using the following command:
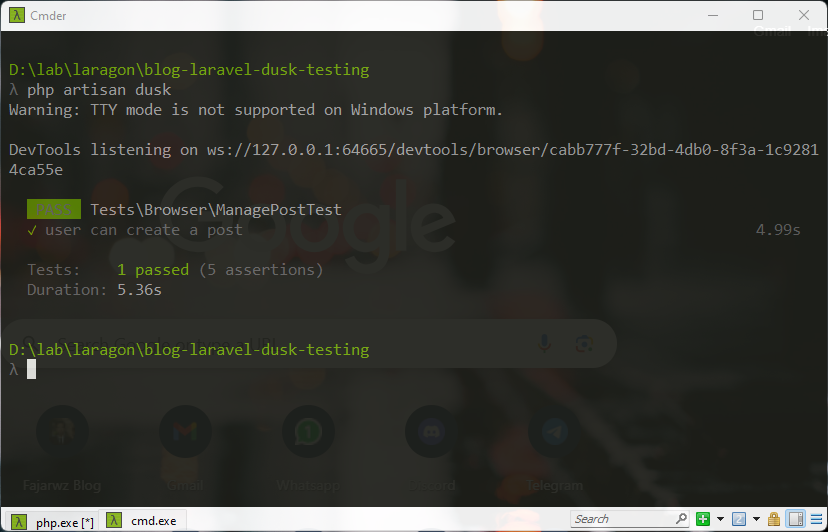
php artisan dusk
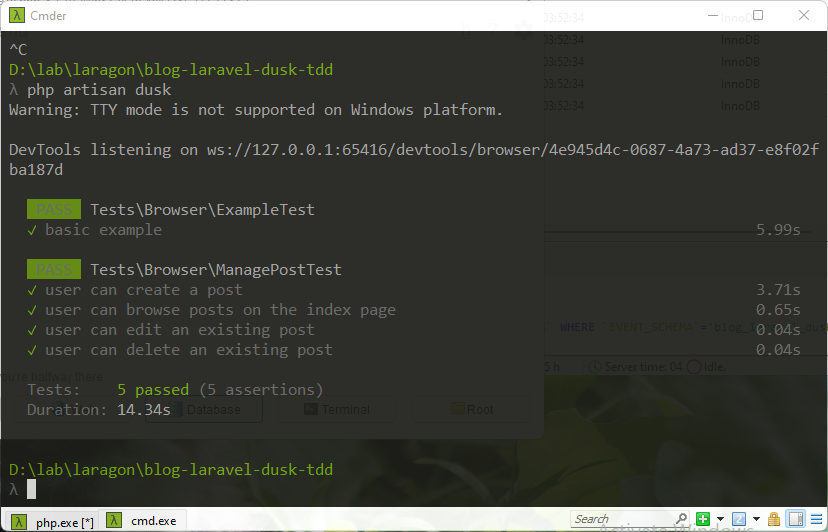
As you can see, all the tests have passed successfully. It’s important to note that the current test results are positive because we’ve used assertions that simply check if true is indeed true. You’ll also notice the presence of the ExampleTest containing the basic_example method, you can let it there or remove it.
Writing The Test
Let’s write the user_can_create_a_post test.
// tests\Browser\ManagePostTest.php

/** @test */
public function user_can_create_a_post()
{
    // User opens the Post list page
    // Enters the title and content, then submits the form
    // Expects to be redirected to the Post list page
    // Expects the created post to be visible in the post list
    // Expects the created post to be stored in the database

    // the data to be inserted
    $post = [
        'title' => 'My First Post',
        'content' => 'This is my first post today',
    ];

    $this->browse(function (Browser $browser) use ($post) {
        $browser->visitRoute('posts.index')
            ->clickLink('Create Post')

            ->assertRouteIs('posts.create')

            ->type('title', $post['title'])
            ->type('content', $post['content'])
            ->press('Submit')

            ->assertRouteIs('posts.index')

            ->assertSee($post['title'])
            ->assertSee($post['content']);
    });

    $this->assertDatabaseHas('posts', [
        'title' => $post['title'],
        'content' => $post['content'],
    ]);
}
The codes simulating user actions using Dusk’s browser automation capabilities and verifying the expected outcomes. The test script effectively replaces manual user interactions with scripted interactions.
Let me explain the methods used in the test code:
visitRoute('route.name'): This method simulates a user visiting a specific route in the application. In the context of the test, it navigates to the URL associated with the given route name. For example,visitRoute('posts.index')would navigate to the route namedposts.index, which corresponds to the Post list page.assertRouteIs('route.name'): This assertion method checks whether the currently visited route matches the specified route name. It ensures that the navigation and redirection within the application are working as expected.type('field_name', 'input_value'): The type method mimics a user typing input into a form field. It takes the field name and the desired input value as parameters. In the test code,type('title', $post['title'])inputs the title value into the ’title’ form field.press('button_text'): This method simulates clicking a button on the page. In this case,press('Submit')simulates clicking the ‘Submit’ button on the form, which triggers form submission.assertSee('expected_text'): This assertion method verifies that a specific text is present on the page. In the test code,assertSee($post['title'])confirms that the newly created post title is displayed on the page after the form is submitted.assertDatabaseHas('table_name', ['column' => 'value']): This assertion checks if a record exists in the database table with the specified column-value pair. In the test code,assertDatabaseHas('posts', ['title' => $post['title'], 'content' => $post['content']])ensures that the newly created post is stored in thepoststable with the correct title and content.@test: This is a Dusk annotation that indicates the method below is a test.
These methods provided by Laravel Dusk’s browser automation and testing framework allow you to interact with your application as if you were a user and validate the expected behaviors.
Now let’s try to run the test again
php artisan dusk
After running the test, a successful result should be displayed. This indicates that the test for creating a post has passed.
Now let’s write the rest of the test but first let’s create a post factory first. Run the following command to create a post factory:
php artisan make:factory PostFactory
Open the generated PostFactory.php file located in the database/factories directory. Inside this file, we can define the factory’s attributes and their default values.
// database\factories\PostFactory.php

<?php

namespace Database\Factories;

use Illuminate\Database\Eloquent\Factories\Factory;

/**
 * @extends \Illuminate\Database\Eloquent\Factories\Factory<\App\Models\Post>
 */
class PostFactory extends Factory
{
    /**
     * Define the model's default state.
     *
     * @return array<string, mixed>
     */
    public function definition(): array
    {
        return [
            'title' => fake()->sentence(),
            'content' => fake()->paragraph(),
        ];
    }
}
Now let’s write the rest of the test:
// make sure to import the Post Model
use App\Models\Post;

// codes ...

/** @test */
public function user_can_browse_posts_on_the_index_page()
{
    // Generate 3 post record by factory.
    // User open Post list page.
    // User see three post in the page.

    $posts = Post::factory()->count(3)->create();

    $this->browse(function (Browser $browser) use ($posts) {
        $browser
            ->visitRoute('posts.index')

            ->assertSee($posts[0]->title)
            ->assertSee($posts[0]->content)
            ->assertSee($posts[1]->title)
            ->assertSee($posts[1]->content)
            ->assertSee($posts[2]->title)
            ->assertSee($posts[2]->content);
    });
}

/** @test */
public function user_can_edit_an_existing_post()
{
    // Generate one post record by factory.
    // Visit post list page.
    // Click edit post button
    // Make sure we redirected to the edit page
    // Make sure the action of the update form pointing to the correct route (update route)
    // Make sure there is already a value in the title and content field
    // User submit edited value
    // Make sure we redirected back to the post list page
    // Make sure the data updated in the database

    $post = Post::factory()->create();

    $newValue = [
        'title' => 'Updated Post',
        'content' => 'Updated post content',
    ];

    $this->browse(function (Browser $browser) use($post, $newValue) {
        $browser
            ->visitRoute('posts.index')

            ->clickLink('Edit')

            ->assertRouteIs('posts.edit', $post->id)

            ->assertAttribute('form', 'action', route('posts.update', $post->id))

            ->assertInputValue('title', $post->title)
            ->assertInputValue('content', $post->content)

            ->type('title', $newValue['title'])
            ->type('content', $newValue['content'])
            ->press('Submit')

            ->assertRouteIs('posts.index')
            ;
    });

    $this->assertDatabaseHas('posts', [
        'id' => $post->id,
        'title' => $newValue['title'],
        'content' => $newValue['content'],
    ]);
}

/** @test */
public function user_can_delete_an_existing_post()
{
    // Generate one record of post.
    // User open post list page.
    // User click Delete button.
    // Make sure we redirected back to the post list page
    // Make sure the record removed from our database

    $post = Post::factory()->create();

    $this->browse(function (Browser $browser) {
        $browser
            ->visitRoute('posts.index')

            ->click('form#delete-form > button[type=submit]')

            ->assertRouteIs('posts.index');
    });

    $this->assertDatabaseMissing('posts', [
        'id' => $post->id,
    ]);
}

// codes ...
Read also:
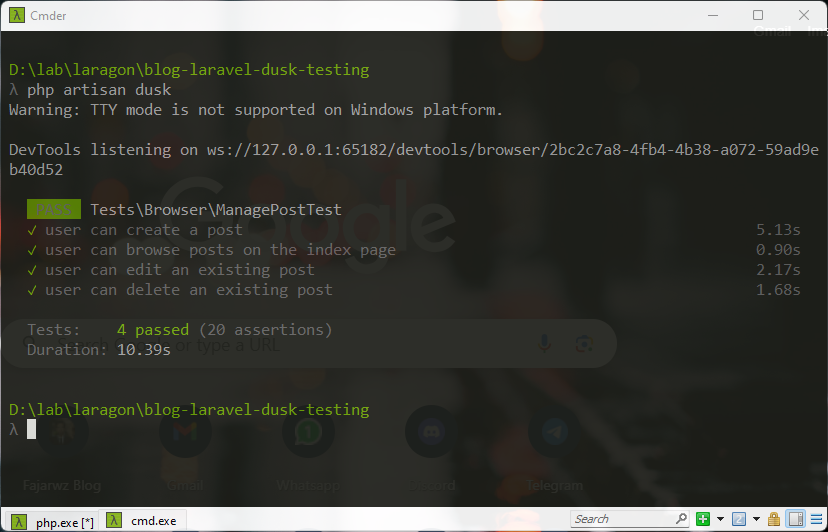
With our CRUD Post feature test script complete, let’s proceed to execute the test suite again to ensure everything is working as expected. Run the following command to run our Dusk tests:
php artisan dusk
You should see the following result if all the tests passed:
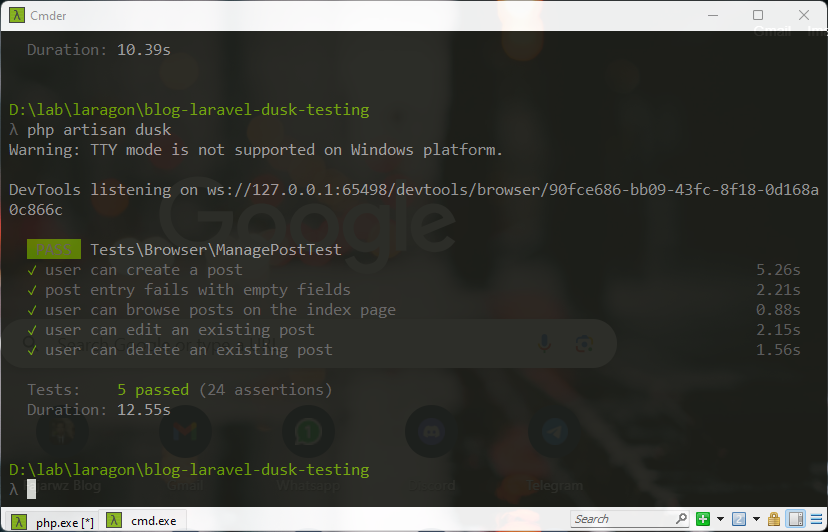
To ensure that the post form validation is functioning correctly, we’ll write another test method to validate the behavior when empty fields are submitted.
// codes ...

/** @test */
public function post_entry_fails_with_empty_fields()
{
    // Submit form to create new post with empty title and content
    // Make sure we redirected back to the post form
    // Check if there is an error in the title and content field

    $this->browse(function (Browser $browser) {
        $browser->visitRoute('posts.index')
            ->clickLink('Create Post')

            ->assertRouteIs('posts.create')

            ->type('title', '')
            ->type('content', '')
            ->press('Submit')

            ->assertRouteIs('posts.create')

            ->assertSee('The title field is required.')
            ->assertSee('The content field is required.');
    });
}

// codes ...
Run the Dusk tests again to ensure that the validation behavior is working as expected:
php artisan dusk
Conclusion
Laravel Dusk offers a robust solution for browser testing, allowing developers to verify their applications from a user’s perspective. Through this article, we navigated the setup and creation of browser tests, focusing on a CRUD post management feature.
We established Dusk’s installation process, including browser driver setup for headless testing. With practical examples, we crafted browser tests that mimicked user actions such as creating, editing, and deleting posts. We also tested form validation to ensure smooth user experiences.
Browser tests play a pivotal role in maintaining application integrity and user satisfaction. Leveraging Laravel Dusk, developers can confidently validate their front-end interactions, safeguarding against regressions and ensuring application reliability.
💻 The repository for this example can be found at fajarwz/blog-laravel-dusk-testing.

