💡 I included the link to the example repository at the conclusion of this tutorial.
Recently I decided to finally try building a desktop app with Tauri. I had seen a lot of developers talking about it, especially people who wanted something lighter than Electron, but I kept postponing it because Rust looked intimidating at first glance.
Turns out, getting started with Tauri is much simpler than I expected.
In this article, we are going to build a simple desktop todo app using:
- Tauri v2
- React
- TypeScript
- SQLite
- Vite
The app itself is intentionally simple. Just enough to understand how Tauri works without drowning in architecture decisions too early.
One thing I immediately liked about Tauri is that it feels like web development with a native shell around it. We still build UI using familiar frontend tools, but the final app becomes a real desktop application.
Also, the memory usage compared to Electron apps feels refreshingly small. Tiny desktop spaceship energy 🚀
Tauri itself is an open-source framework for building desktop apps using web technologies and Rust.
Prerequisites
Before starting, make sure these are installed:
- Node.js
- Rust
- Visual Studio Build Tools (Windows)
- Git
For Windows users, this part matters a lot:
Install Visual Studio Build Tools and make sure you check Desktop development with C++, and these tools are checked:
- MSVC v143 build tools
- Windows SDK
- C++ CMake tools
I actually hit linker issues during setup because my Windows build tools were incomplete. Tauri relies on Rust’s MSVC toolchain on Windows, so if the linker is broken, the app simply will not compile.
Install Rust from:
Install Visual Studio Build Tools from:
Creating the Project
To create the app:
npm create tauri-app@latest
I used these options:
Project name: todo-new
Frontend: React
Language: TypeScript
Package manager: npm
After installation:
cd todo-new
npm install
Then start the app:
npm run tauri dev
If everything works correctly, a desktop window should appear with the default starter app.
That moment honestly feels pretty magical the first time.
Understanding the Project Structure
The generated structure is surprisingly clean:
todo-new/
├── src/
├── src-tauri/
├── package.json
├── vite.config.ts
Important folders:
src
This is our React frontend.
If you already know React or Next.js, this part feels very familiar.
src-tauri
This is where the Rust side lives.
Important files inside:
src-tauri/
├── src/
│   └── lib.rs
├── Cargo.toml
├── tauri.conf.json
Cargo.toml
Think of this like package.json for Rust.
Example:
[package]
name = "todo-new"
version = "0.1.0"
description = "My new todo"
authors = ["fajarwz"]
edition = "2021"
The edition = "2021" part tells Rust which language edition the project uses.
Most modern Rust projects still use Rust 2021 edition today because it is stable and widely supported.
Understanding Cargo.toml
Inside src-tauri, we will find a file called:
src-tauri/Cargo.toml
If we come from JavaScript or Node.js, this file feels very similar to package.json.
It defines:
- package metadata
- dependencies
- build configuration
- Rust crate settings
Here is the important part from this project:
[package]
name = "todo-new"
version = "0.1.0"
description = "My new todo"
authors = ["fajarwz"]
edition = "2021"

[lib]
name = "todo_new_lib"
crate-type = ["staticlib", "cdylib", "rlib"]

[build-dependencies]
tauri-build = { version = "2", features = [] }

[dependencies]
tauri = { version = "2", features = [] }
tauri-plugin-sql = { version = "2", features = ["sqlite"] }
tauri-plugin-opener = "2"
serde = { version = "1", features = ["derive"] }
serde_json = "1"
Let’s break down the important parts.
[package]
This section contains basic project information.
[package]
name = "todo-new"
version = "0.1.0"
description = "My new todo"
authors = ["fajarwz"]
edition = "2021"
A few interesting fields:
nameis the Rust package nameversionis the application versioneditiondefines which Rust language edition we use
The Rust edition system is somewhat similar to ECMAScript versions in JavaScript.
Most modern Rust projects still use:
edition = "2021"
because it is stable and widely supported.
[lib]
This section configures the Rust library output.
[lib]
name = "todo_new_lib"
crate-type = ["staticlib", "cdylib", "rlib"]
The naming here looks a little strange at first.
Why not just use todo-new?
Because Windows can sometimes hit naming conflicts between binaries and libraries. That _lib suffix avoids collisions during compilation.
The crate-type values tell Rust which library formats to generate.
For normal Tauri development, we usually do not touch this section much.
The template already sets it correctly.
[build-dependencies]
[build-dependencies]
tauri-build = { version = "2", features = [] }
This dependency runs during the build process itself.
Tauri uses it to:
- generate bindings
- process configuration
- prepare capabilities
- handle desktop integration
This is different from normal runtime dependencies.
[dependencies]
This is the Rust equivalent of npm dependencies.
[dependencies]
tauri = { version = "2", features = [] }
tauri-plugin-sql = { version = "2", features = ["sqlite"] }
tauri-plugin-opener = "2"
serde = { version = "1", features = ["derive"] }
serde_json = "1"
A few important ones:
tauri
Core Tauri framework.
This powers:
- windows
- system APIs
- communication between frontend and Rust
tauri-plugin-sql
Adds SQLite support.
tauri-plugin-sql = { version = "2", features = ["sqlite"] }
The important detail here is:
features = ["sqlite"]
Without enabling the SQLite feature, the app throws:
invalid connection url: sqlite:todo.db - No database driver enabled!
This confused me at first because the package installed successfully, but the database still failed.
Rust dependencies often use feature flags to keep binaries smaller and avoid compiling unnecessary functionality.
tauri-plugin-opener
This plugin allows opening:
- external URLs
- files
- folders
Many starter templates include it by default even if we do not use it immediately. We can actually remove this.
serde and serde_json
These are extremely common Rust libraries for serialization.
Think of them as Rust’s version of converting objects into JSON and back again.
Tauri uses them heavily when frontend and Rust communicate with each other.
One thing I noticed while learning Rust is that serde appears almost everywhere.
Adding SQLite Support
For this todo app, we want local database storage.
Tauri has an official SQL plugin, so we install it on both frontend and Rust sides.
Frontend package
npm install @tauri-apps/plugin-sql
Rust package
cargo add tauri-plugin-sql --manifest-path src-tauri/Cargo.toml
One beginner mistake I hit here:
The plugin installs successfully, but SQLite still does not work.
I got this error:
invalid connection url: sqlite:todo.db - No database driver enabled!
The fix is enabling the SQLite feature in Cargo.toml.
Change this:
tauri-plugin-sql = "2"
Into this:
tauri-plugin-sql = { version = "2", features = ["sqlite"] }
This happens because the plugin supports multiple database drivers, and SQLite is optional.
Rust crates love feature flags. At first it feels weird, but later it starts making sense because unused features are not compiled into the binary.
Registering SQLite and Running Migrations
Inside:
src-tauri/src/lib.rs
We register the SQL plugin and define SQLite migrations.
use tauri_plugin_sql::{Migration, MigrationKind};

#[cfg_attr(mobile, tauri::mobile_entry_point)]
pub fn run() {
    // Define the SQLite migration that creates our todos table
    let migrations = vec![Migration {
        version: 1,
        description: "create initial todos table",
        sql: "CREATE TABLE IF NOT EXISTS todos (
            id          INTEGER PRIMARY KEY AUTOINCREMENT,
            text        TEXT NOT NULL,
            completed   INTEGER NOT NULL DEFAULT 0,
            created_at  TEXT NOT NULL DEFAULT (datetime('now'))
        )",
        kind: MigrationKind::Up,
    }];

    tauri::Builder::default()
        .plugin(
            tauri_plugin_sql::Builder::default()
                .add_migrations("sqlite:todo.db", migrations)
                .build(),
        )
        .run(tauri::generate_context!())
        .expect("error while running tauri application");
}
I actually like this approach a lot more than manually running CREATE TABLE queries from React.
Why?
Because the database structure now lives in the Rust backend layer instead of the UI layer.
This gives us a few benefits:
- database setup happens automatically
- schema changes become versioned
- frontend stays cleaner
- easier to maintain later
If we ever need to add new columns or tables, we can simply create a new migration version.
This feels very similar to Laravel migrations, which made the concept much easier to understand coming from backend development.
The migration itself creates a simple todos table:
CREATE TABLE IF NOT EXISTS todos (
    id          INTEGER PRIMARY KEY AUTOINCREMENT,
    text        TEXT NOT NULL,
    completed   INTEGER NOT NULL DEFAULT 0,
    created_at  TEXT NOT NULL DEFAULT (datetime('now'))
)
A few interesting things here:
AUTOINCREMENThandles automatic IDscompleteddefaults to0created_atautomatically stores creation timestamps
That datetime('now') part is a neat SQLite feature because we do not need to manually generate timestamps from the frontend.
Tauri Capabilities and Permissions
Tauri v2 introduced a capability system for plugins and APIs.
At first this felt a little confusing because desktop apps usually just access everything automatically. Tauri takes a more explicit security approach.
Inside the capabilities file, we define what the app is allowed to do.
For this todo app, the working configuration looked like this:
{
  "$schema": "../gen/schemas/desktop-schema.json",
  "identifier": "default",
  "description": "Capability for the main window",
  "windows": ["main"],
  "permissions": [
    "core:default",
    "sql:default",
    "sql:allow-load",
    "sql:allow-execute",
    "sql:allow-select",
    "sql:allow-close"
  ]
}
This file basically tells Tauri:
- allow normal app functionality
- allow SQLite plugin usage
- allow loading database connections
- allow executing queries
- allow selecting data
- allow closing database connections
One interesting thing I noticed is that sql:default alone was not enough in my case.
The app only worked correctly after explicitly adding:
"sql:allow-load",
"sql:allow-execute",
"sql:allow-select",
"sql:allow-close"
Without those permissions, the SQL plugin failed during runtime.
This is actually one of the common beginner pain points with Tauri v2 because the permission system is much stricter than older desktop frameworks.
The capability file usually lives around here:
src-tauri/capabilities/default.json
I honestly like the idea behind this system though.
It feels a bit like API permissions or backend authorization. Instead of giving the app unlimited native access immediately, we explicitly allow only what we need.
That becomes much more valuable later when apps grow larger or use multiple plugins.
Building the Todo App
Now we can finally build the actual todo application.
The React side stays surprisingly simple because Tauri already handles the native desktop layer for us.
Inside src/App.tsx, we manage:
- database connection
- CRUD operations
- filters
- loading states
- keyboard shortcuts
- rendering the todo list
Defining the Todo Type
First, we define the shape of our todo items.
interface Todo {
  id: number;
  text: string;
  completed: number;
  created_at: string;
}
One interesting detail here is:
completed: number;
Instead of using boolean.
SQLite stores booleans as 0 and 1, so using number keeps the TypeScript type aligned with the actual database value.
Tiny detail, but it avoids weird type conversions later.
Initializing the Database
Next, we open the SQLite database when the app starts.
useEffect(() => {
  async function initDb() {
    try {
      const database = await Database.load("sqlite:todo.db");

      setDb(database);

      const rows = await database.select<Todo[]>(
        "SELECT * FROM todos ORDER BY created_at DESC"
      );

      setTodos(rows);
    } catch (e) {
      setError(String(e));
    } finally {
      setLoading(false);
    }
  }

  initDb();
}, []);
A few important things happen here:
- Tauri opens the local SQLite database
- existing todos are loaded immediately
- newest todos appear first
- loading state prevents broken UI during startup
I also like keeping database initialization inside useEffect because it mirrors how we usually bootstrap APIs in React apps.
Adding Todos
The addTodo function inserts new records into SQLite.
const addTodo = useCallback(async () => {
  if (!db || !newText.trim()) return;

  try {
    const result = await db.execute(
      "INSERT INTO todos (text) VALUES (?)",
      [newText.trim()]
    );

    const id = result.lastInsertId;

    const rows = await db.select<Todo[]>(
      "SELECT * FROM todos WHERE id = ?",
      [id]
    );

    if (rows.length > 0) {
      setTodos((prev) => [rows[0], ...prev]);
    }

    setNewText("");
  } catch (e) {
    setError(String(e));
  }
}, [db, newText]);
One thing I intentionally like here is re-fetching the inserted row after insertion.
Why not just manually create the object in React state?
Because the database becomes the source of truth.
That means:
- timestamps stay accurate
- future DB triggers/defaults still work
- frontend stays synchronized with actual stored data
Toggling Completion State
Updating completion status is straightforward.
await db.execute(
  "UPDATE todos SET completed = ? WHERE id = ?",
  [newCompleted, todo.id]
);
Then we immediately update local React state for responsive UI.
This gives the app a more native feel because users do not wait for a full reload after clicking checkboxes.
Deleting Todos
Deleting is equally simple.
await db.execute(
  "DELETE FROM todos WHERE id = ?",
  [id]
);
I like how direct SQLite operations feel inside Tauri apps.
It almost feels like talking directly to the database without an API layer in between.
Because technically, we kind of are.
Filters and Derived State
The filtering logic is intentionally lightweight.
const filtered = todos.filter((t) => {
  if (filter === "active") return !t.completed;
  if (filter === "completed") return !!t.completed;
  return true;
});
For a small local app, filtering in memory is perfectly fine.
No need to overengineer database queries too early.
Keyboard Shortcuts
One tiny feature I always like in todo apps:
if (e.key === "Enter") addTodo();
Pressing Enter to add tasks makes the app feel much smoother immediately.
Small UX improvements matter a lot in desktop apps.
Loading and Error States
The app also handles loading and database errors cleanly.
if (loading) {
  return <p>Opening database…</p>;
}
and:
if (error) {
  return <p>Database error</p>;
}
This is especially useful during development because SQLite or permission issues can happen while setting up Tauri.
Instead of crashing silently, we actually see useful feedback in the UI.
Rendering the Todo List
Finally, we render the todos normally using React.
{filtered.map((todo) => (
  <li key={todo.id}>
    ...
  </li>
))}
At this point, it honestly just feels like building a normal React app.
That is probably my favorite thing about Tauri so far.
The frontend experience remains familiar while Rust handles the native desktop side quietly in the background.
Common Issues Beginners May Hit
1. link.exe failed
This is extremely common on Windows.
Usually it means:
- MSVC build tools missing
- Windows SDK missing
- broken Rust toolchain setup
Fixing Visual Studio Build Tools solved it for me.
2. Cannot find module '@tauri-apps/plugin-sql'
Usually the frontend package was not installed.
Install:
npm install @tauri-apps/plugin-sql
3. could not find Cargo.toml
Sometimes we accidentally run Cargo commands in the wrong directory.
Remember:
src-tauri/Cargo.toml
The Rust project lives inside src-tauri.
4. Overcomplicating Tauri Setup
This one is important.
At one point I accidentally ended up with weird linker configs like:
linker = "rust-lld"
and custom LIB environment variables.
Honestly, most Tauri apps do not need that.
The default setup usually works fine once MSVC is installed correctly.
Sometimes the best fix is deleting the clever configuration we added at 2 AM.
Useful Commands
Run development app
npm run tauri dev
Run frontend only
npm run dev
Build production app
npm run tauri build
This generates an actual desktop installer.
After the build finishes, the generated files usually appear inside:
src-tauri/target/release/bundle/
On Windows, common outputs are:
src-tauri/target/release/bundle/nsis/
src-tauri/target/release/bundle/msi/
Depending on the installer type, we may see files like:
todo-new_0.1.0_x64-setup.exe
or:
todo-new_0.1.0_x64_en-US.msi
Tauri also generates the raw executable binary here:
src-tauri/target/release/todo-new.exe
That executable can actually run directly without installing the app first.
Seeing our own desktop application packaged into a real .exe for the first time feels strangely satisfying.
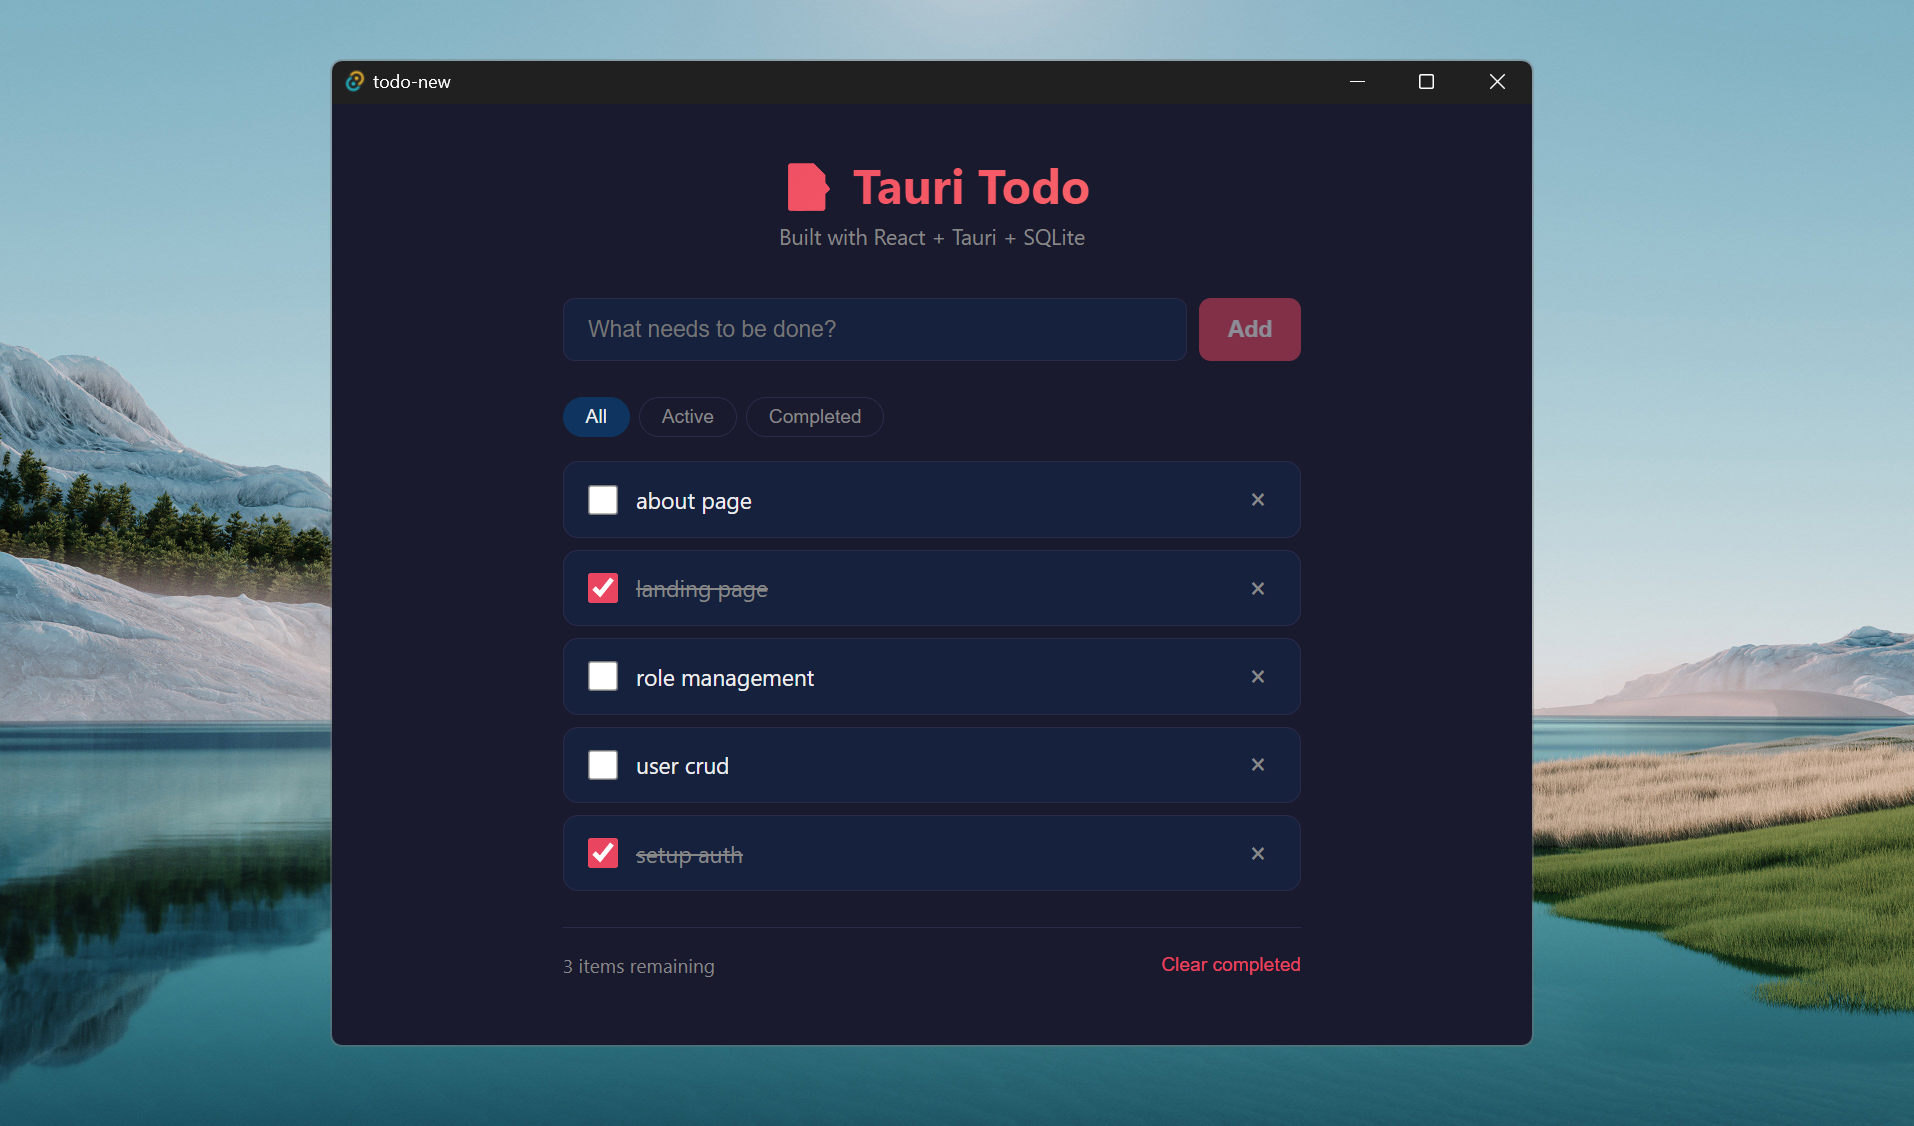
Final Result
At the end, we have:
- A real desktop app
- React frontend
- Rust backend
- SQLite local database
- Small application size
- Native desktop experience
And honestly, the learning curve was much less scary than I expected.
Tauri feels especially comfortable for web developers because we can keep using the frontend stack we already know.
A lot of developers in the Tauri community also mention how lightweight and enjoyable the experience feels compared to heavier desktop frameworks.
Conclusion
Building this first Tauri app changed my impression of desktop development quite a bit.
Before this, desktop apps felt like a completely separate world with different UI frameworks, different tooling, and a much steeper learning curve.
Tauri feels more like extending web development into desktop applications rather than abandoning it.
We still use React, TypeScript, CSS, and familiar tooling, but now the app runs natively on the desktop with Rust powering the backend.
For small tools, productivity apps, internal software, or side projects, I think Tauri hits a really nice balance between performance and developer experience.
The ecosystem is also growing very fast right now, especially after Tauri v2 became stable.
This todo app is obviously simple, but it already gives us a solid foundation for:
- local-first apps
- offline tools
- productivity software
- desktop utilities
- cross-platform applications
And the best part is we can keep using the frontend skills we already have.
That makes the jump into desktop development feel much less intimidating.
💻 The repository for this example can be found at fajarwz/todo-tauri.
💡 Thanks for reading all the way to the end. If you found this helpful, please like or star the Github repo so I know it’s really helpful. Otherwise, let me know what I can improve in the comment or email.

