Having a large website with a lot of content can often make it difficult to know where to find what we need. To solve this problem, we may want to add a search feature to the website.
We have already figured out how to make a search feature for a dynamic website, but what if the site is a static site?
Just because our Hugo website is a static site doesn’t mean we can’t implement a search feature for our content. Thanks to technologies such as Lunr, we can use this to implement a client-side search.
I have already implemented this feature on my site at fajarwz.com/blog. I used Lunr to make the feature. There are some other libraries that can do the same job - you can check them out here. But in this tutorial, we will only try to implement it with Lunr. If you want to find out how to make it, keep following me here.
Step 1: Get Lunr
We can install Lunr with npm:
npm install lunr
Alternatively, we can also include Lunr using script tags before the closing </body> tag by getting a link from a CDN. For example, we can use the unpkg CDN
<script src="https://unpkg.com/lunr/lunr.js"></script>
But I use jsdelivr and the minified version one so here is the code:
<script type="text/javascript" src="https://cdn.jsdelivr.net/npm/lunr@2.3.9/lunr.min.js"></script>
Step 2: Create a Search Form
To create a search feature, we’ll need to create a search form. It’s a good idea to make this a partial template so that we can reuse the form wherever we want and keep the design consistent across the website.
Here is an example of what the search form partial template might look like:
<!-- action to the search page permalink, HTTP method get is enough -->
<form id="search" action='{{ with .GetPage "/search" }}{{.Permalink}}{{end}}' method="get">
    <label hidden for="search-input">Search</label>
    <input type="text" id="search-input" name="query" placeholder="🔍 Type here to search">
</form>
This will create a simple search form with an input field. You can customize the form by adding additional fields or styling the form with CSS. We can save it as layouts/partials/search-form.html.
Include it in other templates we need with:
{{ partial "search-form.html" . }}
For example I include the form in /blog page so here is how it looks like with additional CSS:

Step 3: Create a Search Page
The next step in implementing a search feature for our static website is to create a page for displaying the search results, the “Search Results” Page.
Create a layouts inside layouts/search/list.html with the following markup example
<!-- inherit from base layout -->
{{ define "main" }}
<!-- include our search form -->
{{ partial "search-form.html" . }}

<h2 id="search-title">
    {{ .Name }}
</h2>

<!-- later this element will be used to place our search results -->
<ul id="results">
    <li>
        Search results would be shown here.
    </li>
</ul>
{{ end }}
To make Hugo render our search page, we need to create a front matter for it. A minimal one should also work. Create a file in content/search/_index.md.
---
title: Search
---
We can see the search page in /search to make sure it works as we expected. Here is an example of my search page:

I also included the search form there.
Step 4: Create a Search Index
This is our “search database”. We will create an index of our desired searchable content. Create a file in layouts/partials/search-index.html and write the following code:
<script>
window.store = {
    // get section blog data
    {{ range where .Site.Pages "Section" "blog" }}
    // Permalink as an identifier
    "{{ .Permalink }}": {
        // write all data we need to be displayed in the search list
        "title": "{{ .Title  }}",
        "content": {{ .Content | plainify }}, // Strip out HTML tags
        "url": "{{ .Permalink }}"
        "tags": [{{ range .Params.Tags }}"{{ . }}",{{ end }}],
    },
    {{ end }}
}
</script>
Include this file inside our search page.
If we try to build it on our local device, we will see that it generates the same data as we generate it for a list page. Every time we search for content using the search form, Lunr will look for it in this index. The code to integrate the search form with this index will be covered later on.
Step 5: Search Form and Index Integration
Place this code inside your main.js or wherever you want so it is included also on the search page.
function displayResults (results, store) {
    // grab the element that we will use to place our search results
    const searchResults = document.getElementById('results')
    // if the result(s) found
    if (results.length) {
    let resultList = ''
    // iterate over the results
    for (const n in results) {
        // get the data
        const item = store[results[n].ref]
        // build result list elements
        // if you want to style the list, edit this
        resultList += `
            <li>
                <h2>
                    <a href="${item.url}">${item.title}</a>
                </h2>'
                <p>${item.content.substring(0, 150)}...</p>
                <p>${item.tags}</p>
            </li>
        `;
    }
    // place the result list
    searchResults.innerHTML = resultList
    } else {
    // if no result return this feedback
    searchResults.innerHTML = 'No results found.'
}
}

// Get the query parameter(s)
const params = new URLSearchParams(window.location.search)
const query = params.get('query')

// if query exists, perform the search
if (query) {
    // Retain the query in the search form after redirecting to the search page
    document.getElementById('search-input').setAttribute('value', query)

    // Search these fields
    const idx = lunr(function () {
        this.ref('id')
        this.field('title', {
            // boost search to 15
            boost: 15
        })
        this.field('tags')
        this.field('content', {
            // boost search to 10
            boost: 10
        })

        // provide search index data to lunr function / idx
        for (const key in window.store) {
            this.add({
            id: key,
            title: window.store[key].title,
            tags: window.store[key].category,
            content: window.store[key].content
            })
        }
  })

  // Perform the search
  const results = idx.search(query)
  // get the result and build the result list
  displayResults(results, window.store)

  // Replace the title to 'Search Results for <query>' so user know if the search is successful
  document.getElementById('search-title').innerText = 'Search Results for ' + query
}
This is what the search results list looks like when there are results:
<li>
    <h2>
        <a href=".../blog/my-awesome-blog/">
            My Awesome Blog
        </a>
    </h2>
    <p>Welcome to my awesome blog, this is fajarwz...</p>
    <p>Go,Hugo,Blog</p>
</li>
If no results are found, return the message ‘No results found’.
<li>
    No results found.
</li>
Here is my own search page with CSS:

That’s it! Now we have a search form, a search results page, a search index, and JavaScript for performing the search. Be sure to adjust the code to fit your own Hugo site.
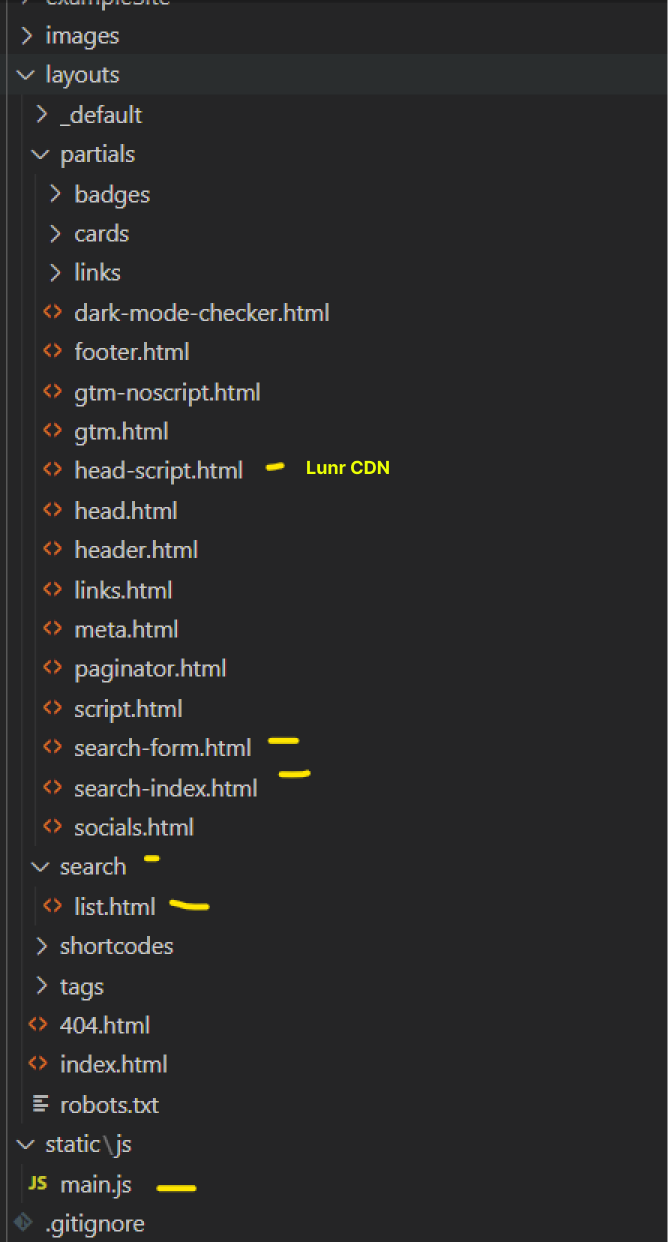
Here is the folder structure inside my Mayhugo theme for this search feature:

the-theme/
├── layouts/
│   ├── partials/
│   │   ├── search-form.html
│   │   ├── search-index.html
│   ├── search/
│   │   ├── list.html
└── static/
    └── js/
        ├── search.js
Conclusions
Finally we have successfully implemented a client-side search feature for our Hugo static website! This is a very useful feature for static sites, as it allows users to quickly search for specific content without having to scroll or click through multiple pages. While static sites are known for their speed, a search feature can still be a valuable addition for improving the user experience.
I hope this tutorial has been helpful in showing you how to implement a search feature for your Hugo static website. If you have any questions or need further assistance, feel free to ask.
Reference
Add search to Hugo static sites with Lunr | victoria.dev
Read Also
Search for your Hugo Website | Hugo
Subscribe
Follow my Twitter @fajarwz or connect with my LinkedIn Fajar Windhu Zulfikar for more content.


